How to create email templates with inFlow’s Email Designer
inFlow’s Email Designer simplifies creating email templates for all your inFlow orders. See below for more details.
Web
Getting started
To start, go to inFlow’s Order settings and select Email Designer (Main Menu>Options>Orders.)
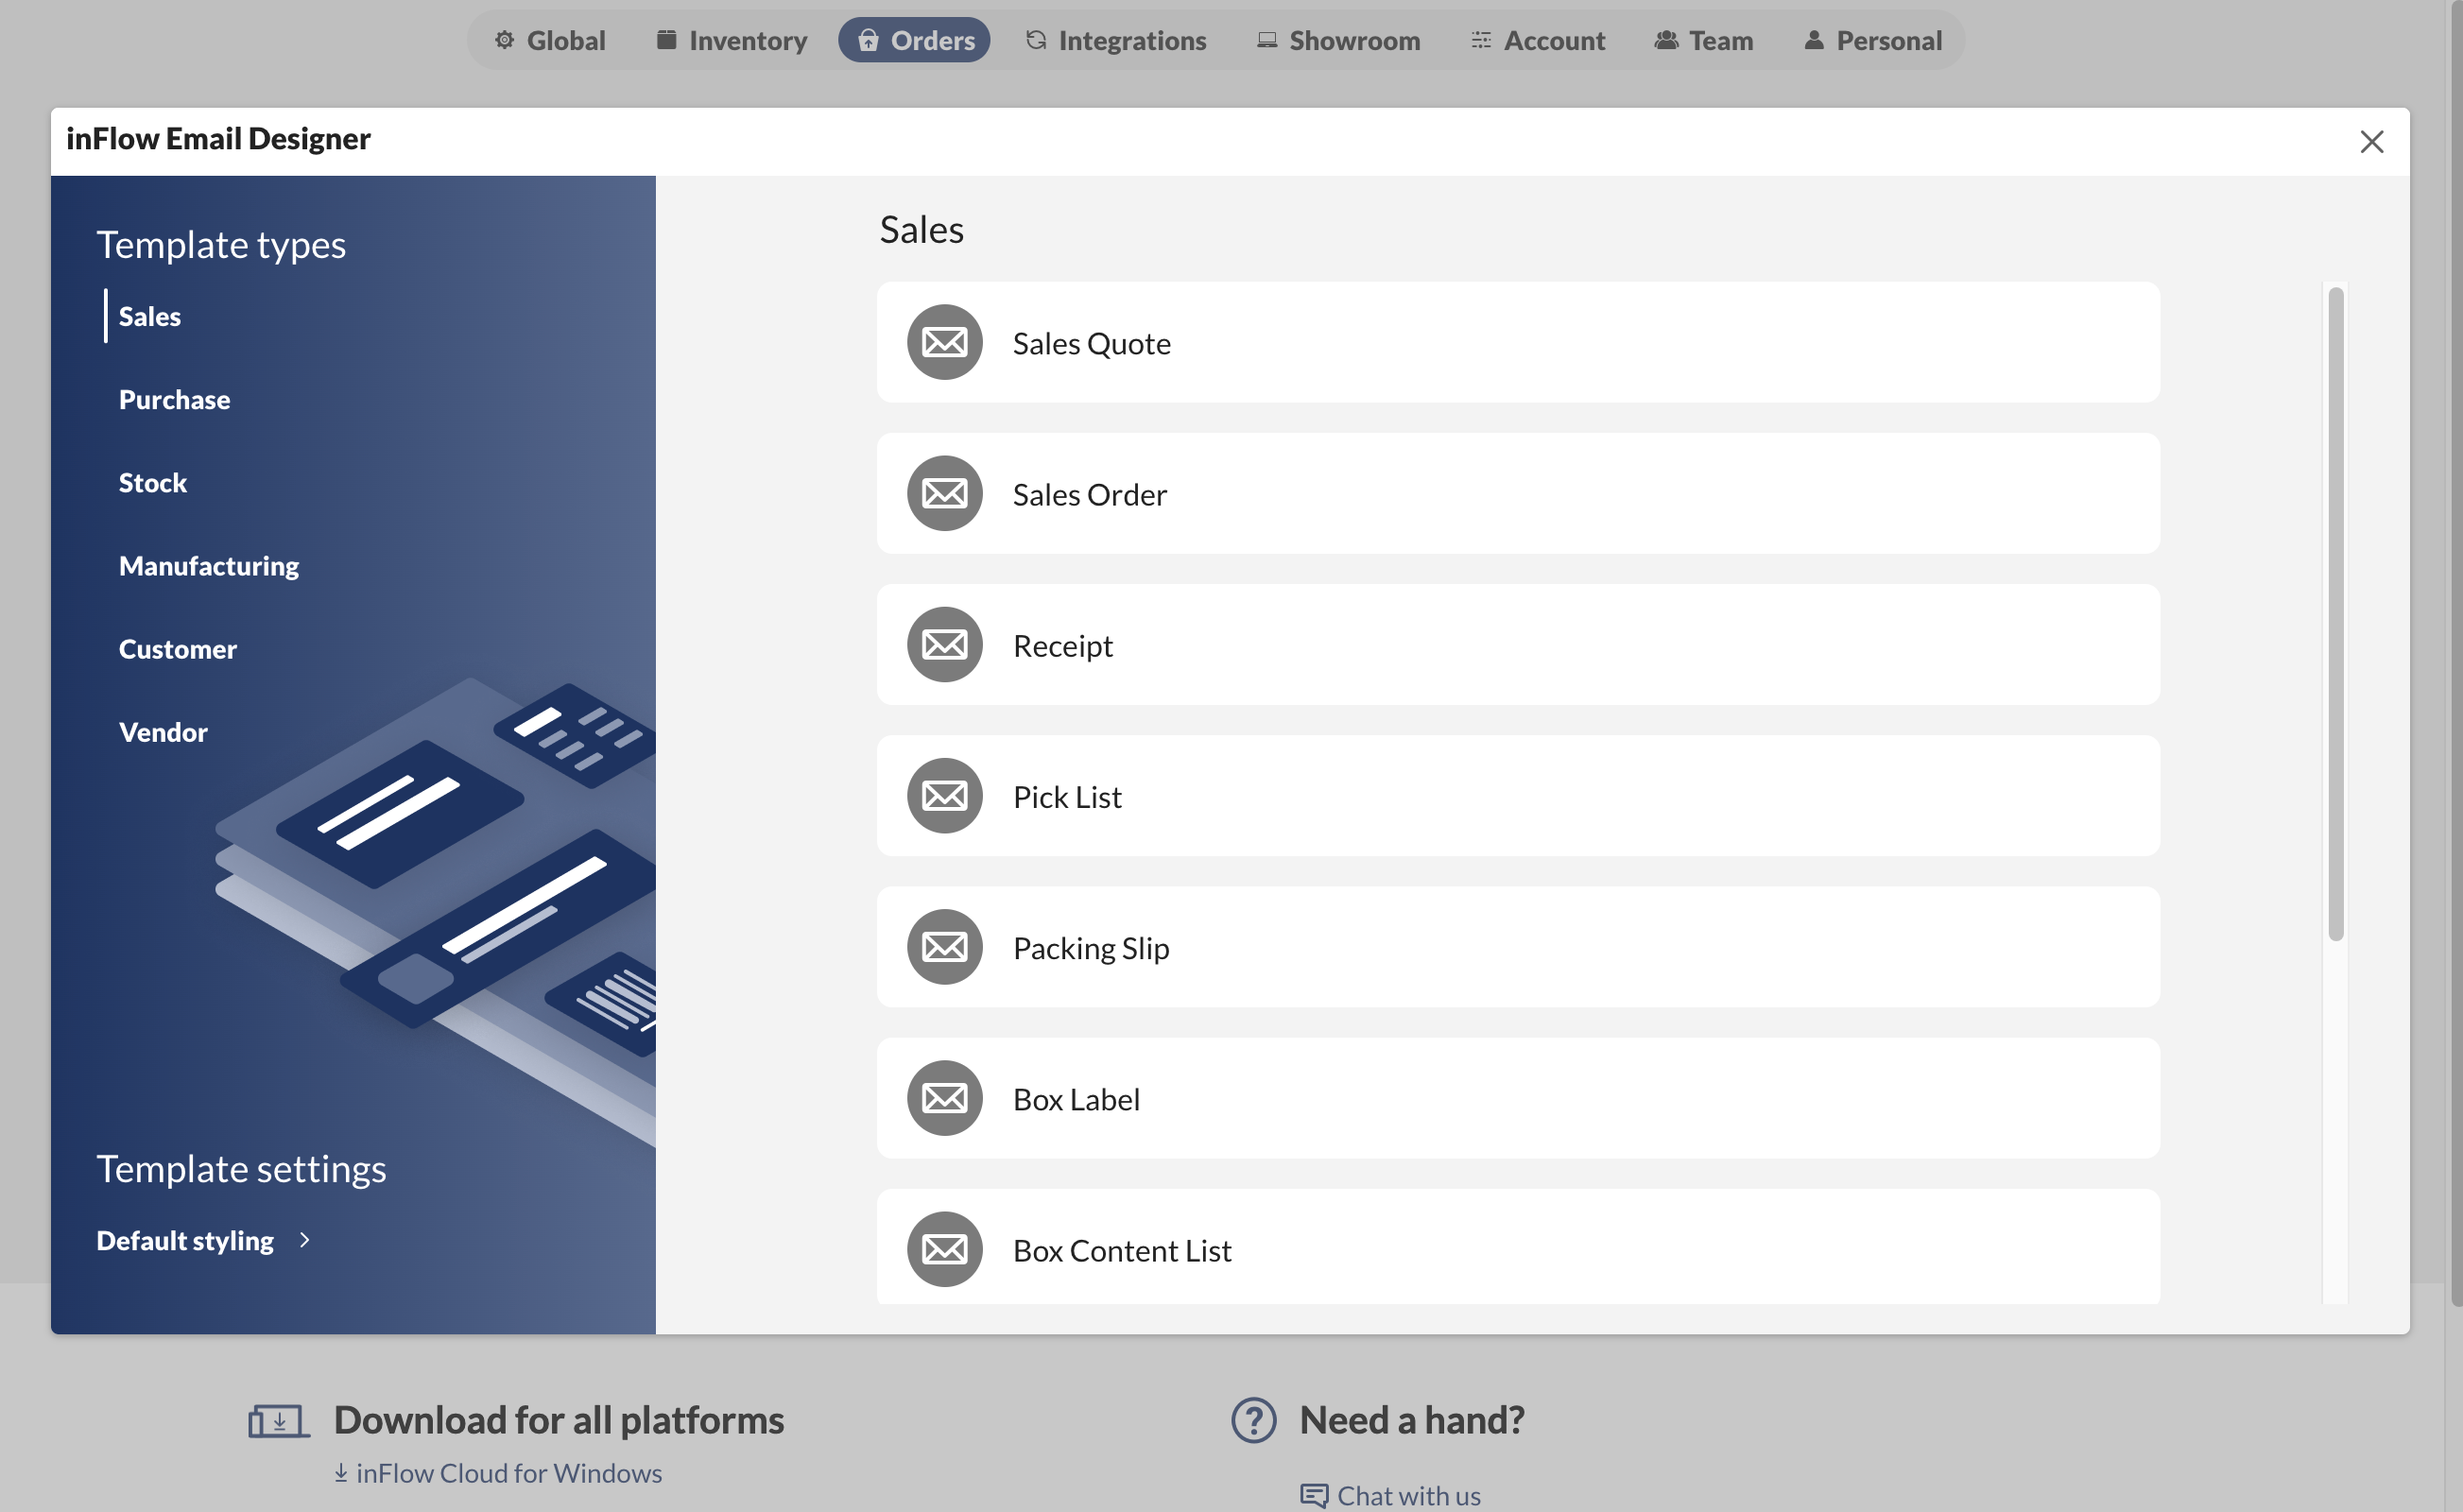
Email template types
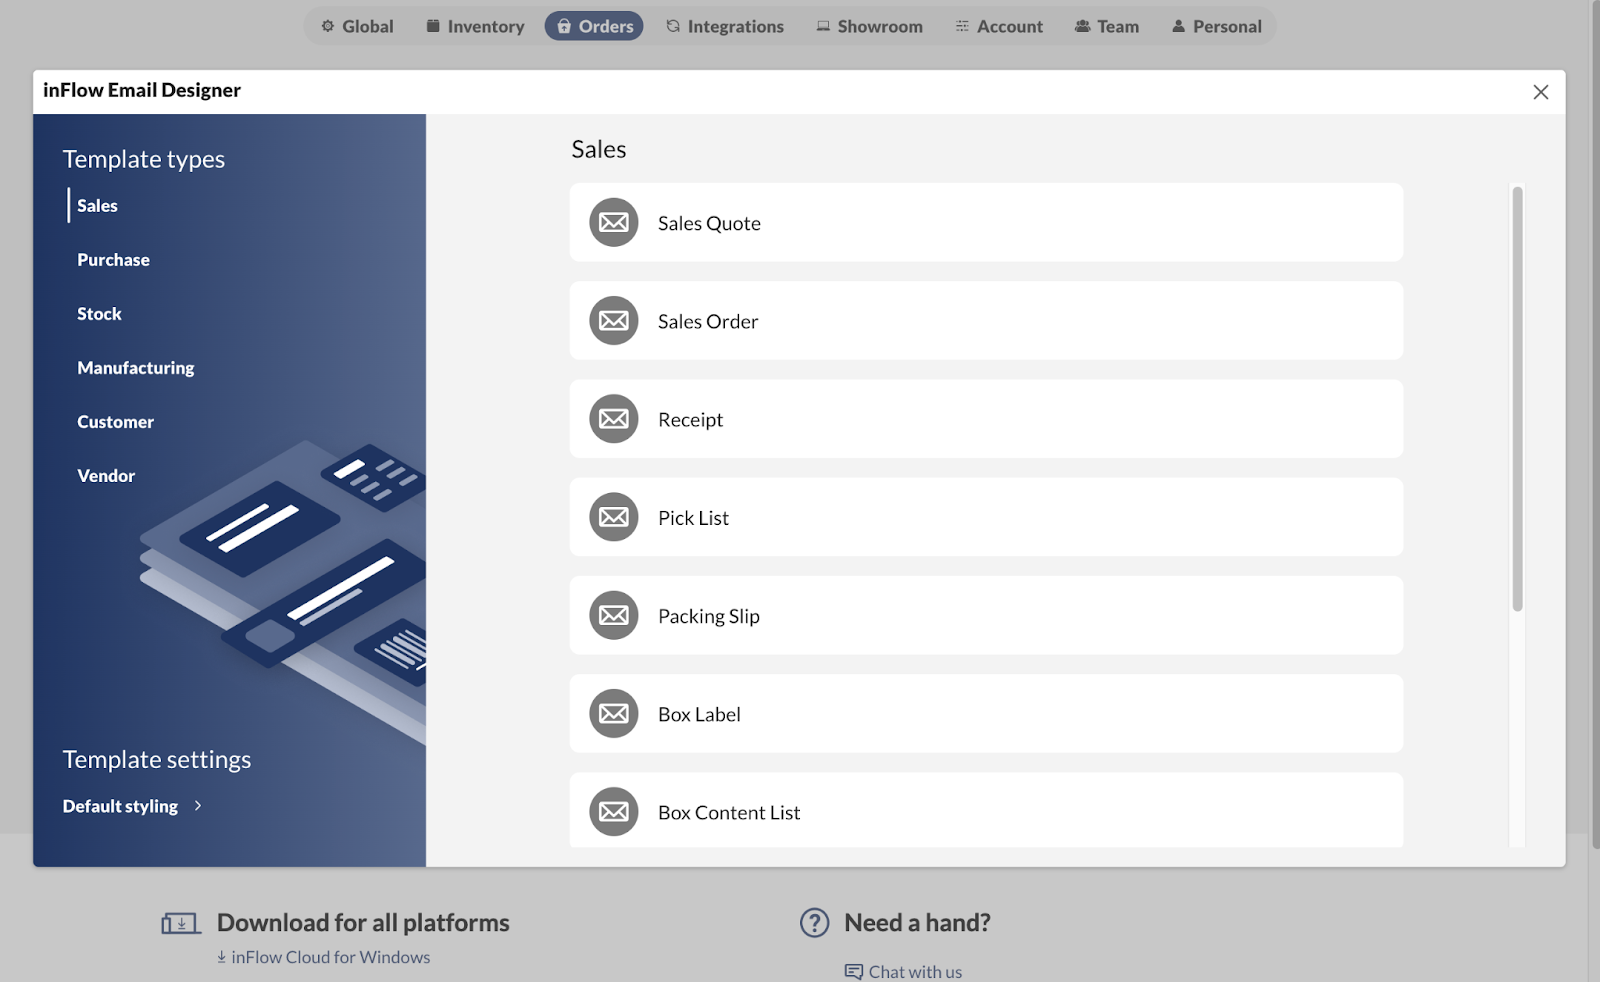
On this screen, you can toggle between the list of template types from the different areas of inFlow.
Default styling
This section of the email designer is where you can set a header image, image size, and button color that will apply to all email templates. Click on the plus button to choose a different color.
If you’d like to remove changes made to the Default styling, click on Reset.
When done, click Save & close.
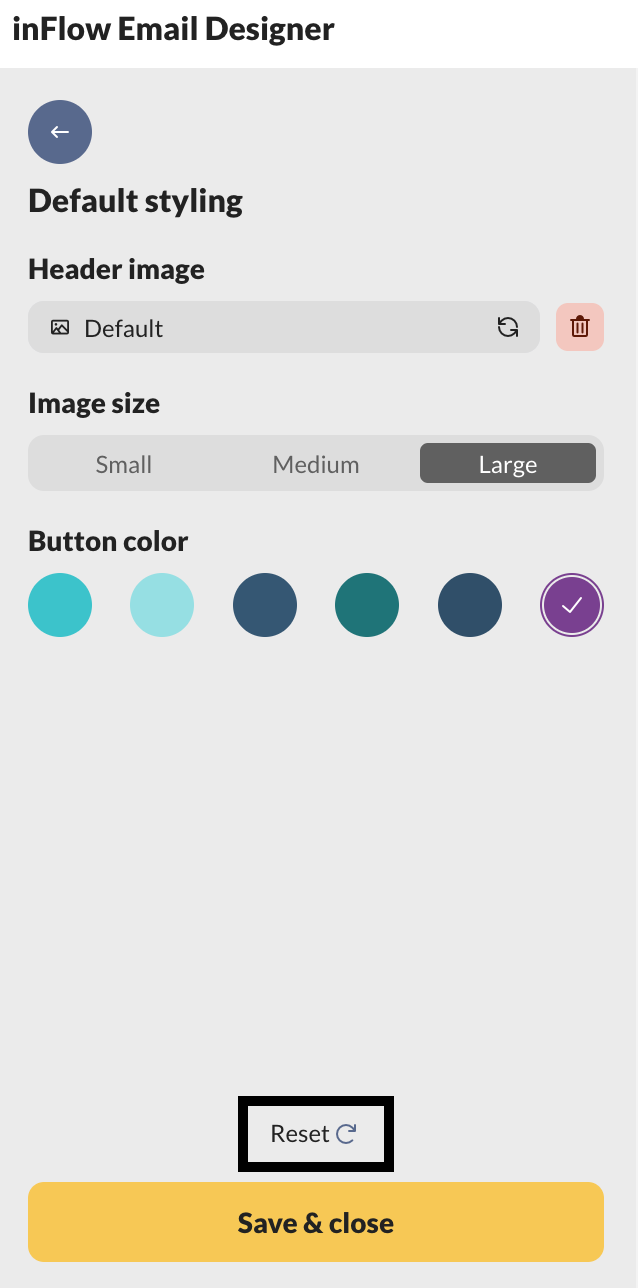
The reset button will revert recent changes; however, it won’t restore the default styling to its original state.
Editing an email template
Hover over one of the email templates and select Edit template.
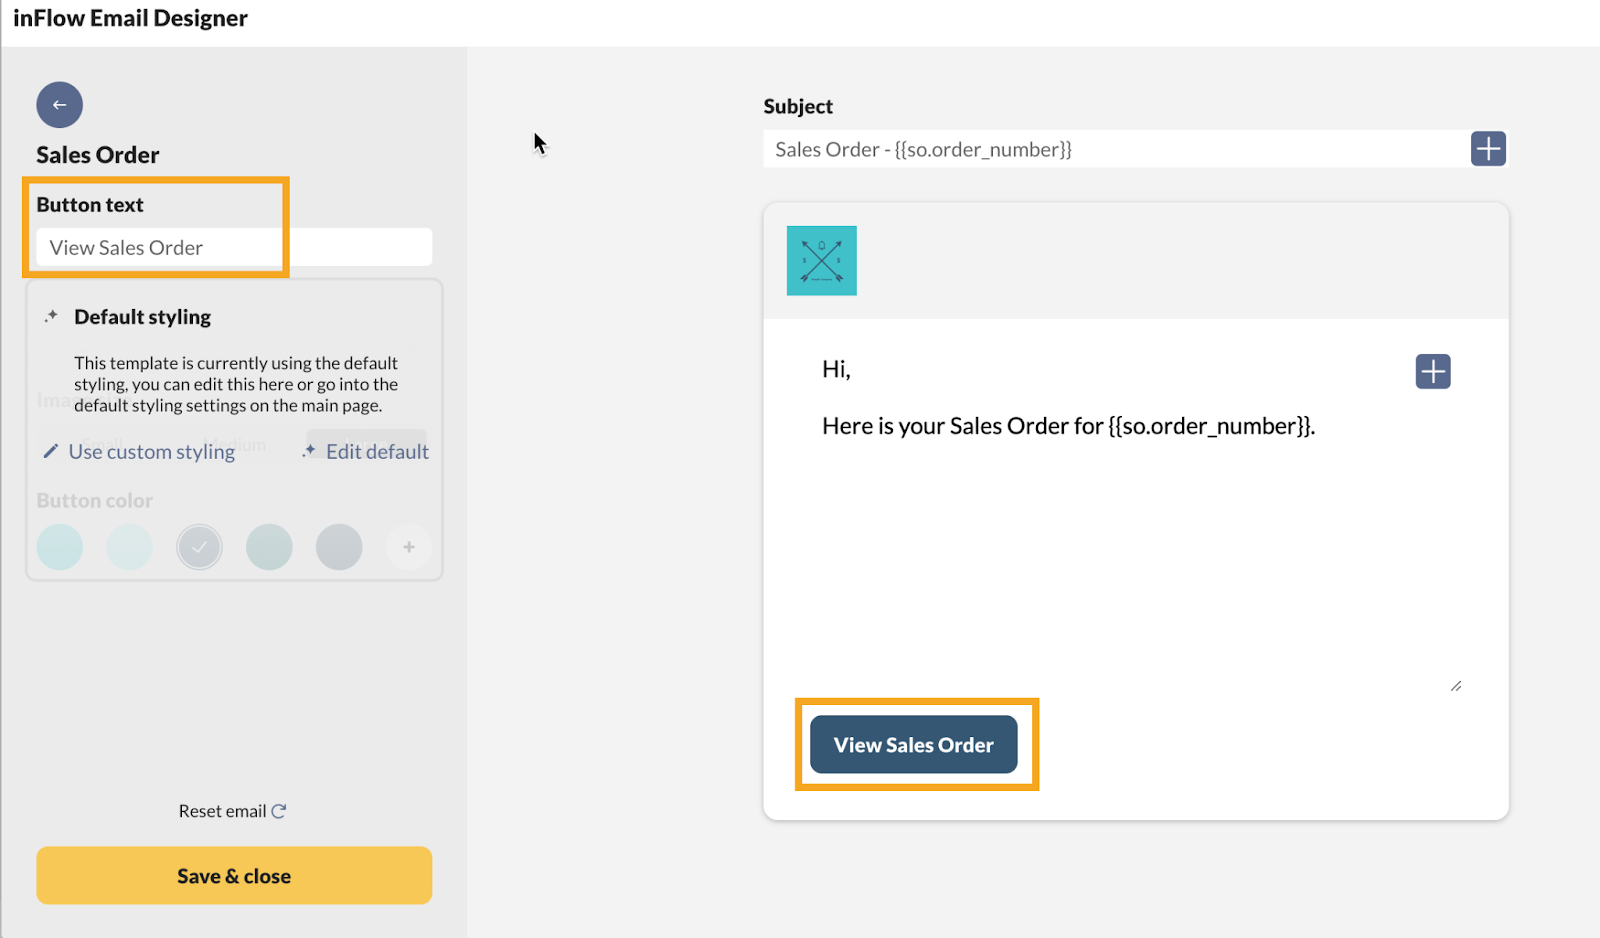
Button text
Use the Button text field to change the text on the button in the email template. (This button is what the recipient will select to view the document.)

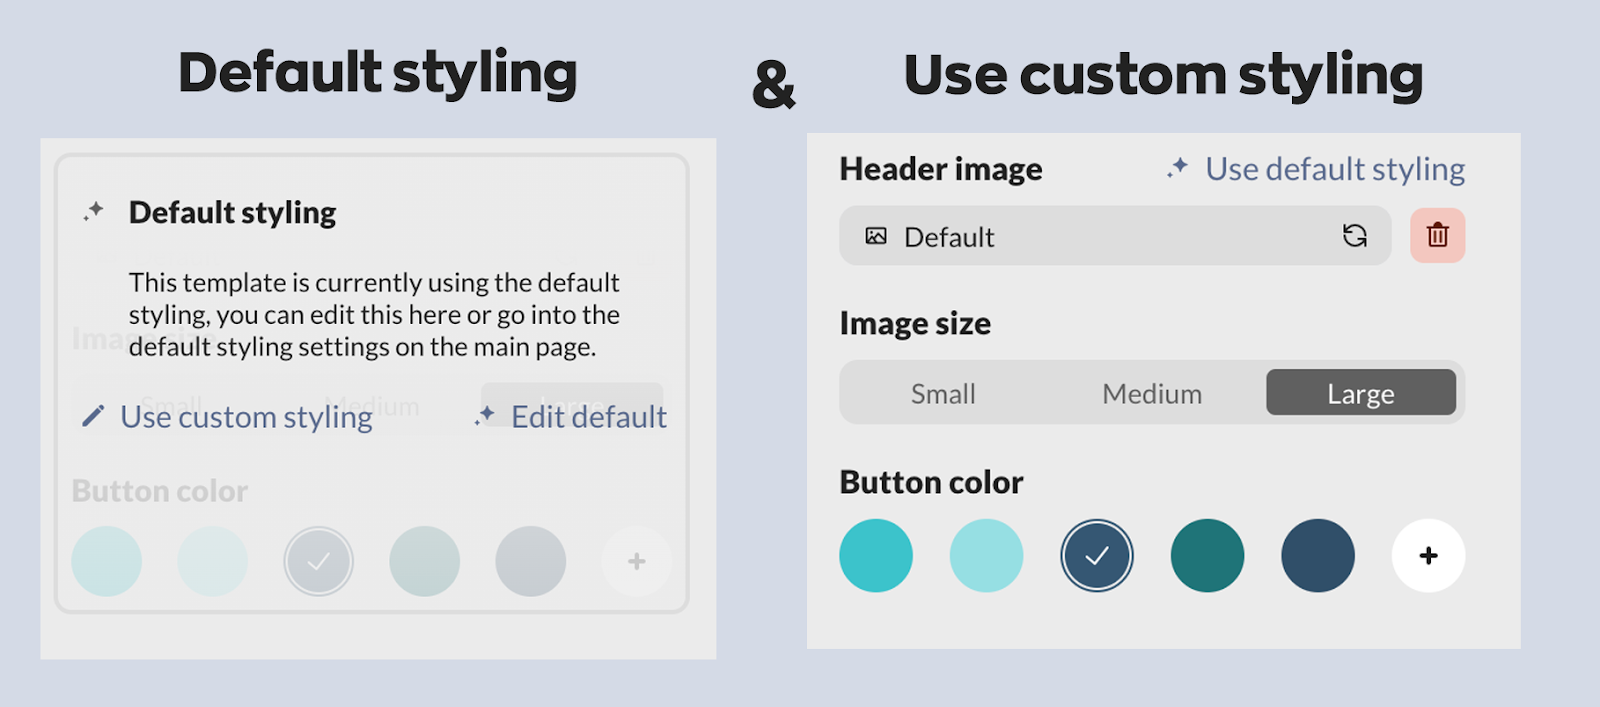
Using custom or Default styling
The Email Designer uses the default styling for all email templates. You can edit the default styling by selecting Edit default, or you can override the defaults by selecting Use custom styling.
When using the custom styling, you can select the header image, image size, and button color.

Reset
This button allows you to undo any recent changes. However, the reset button does not restore the template back to its original state.
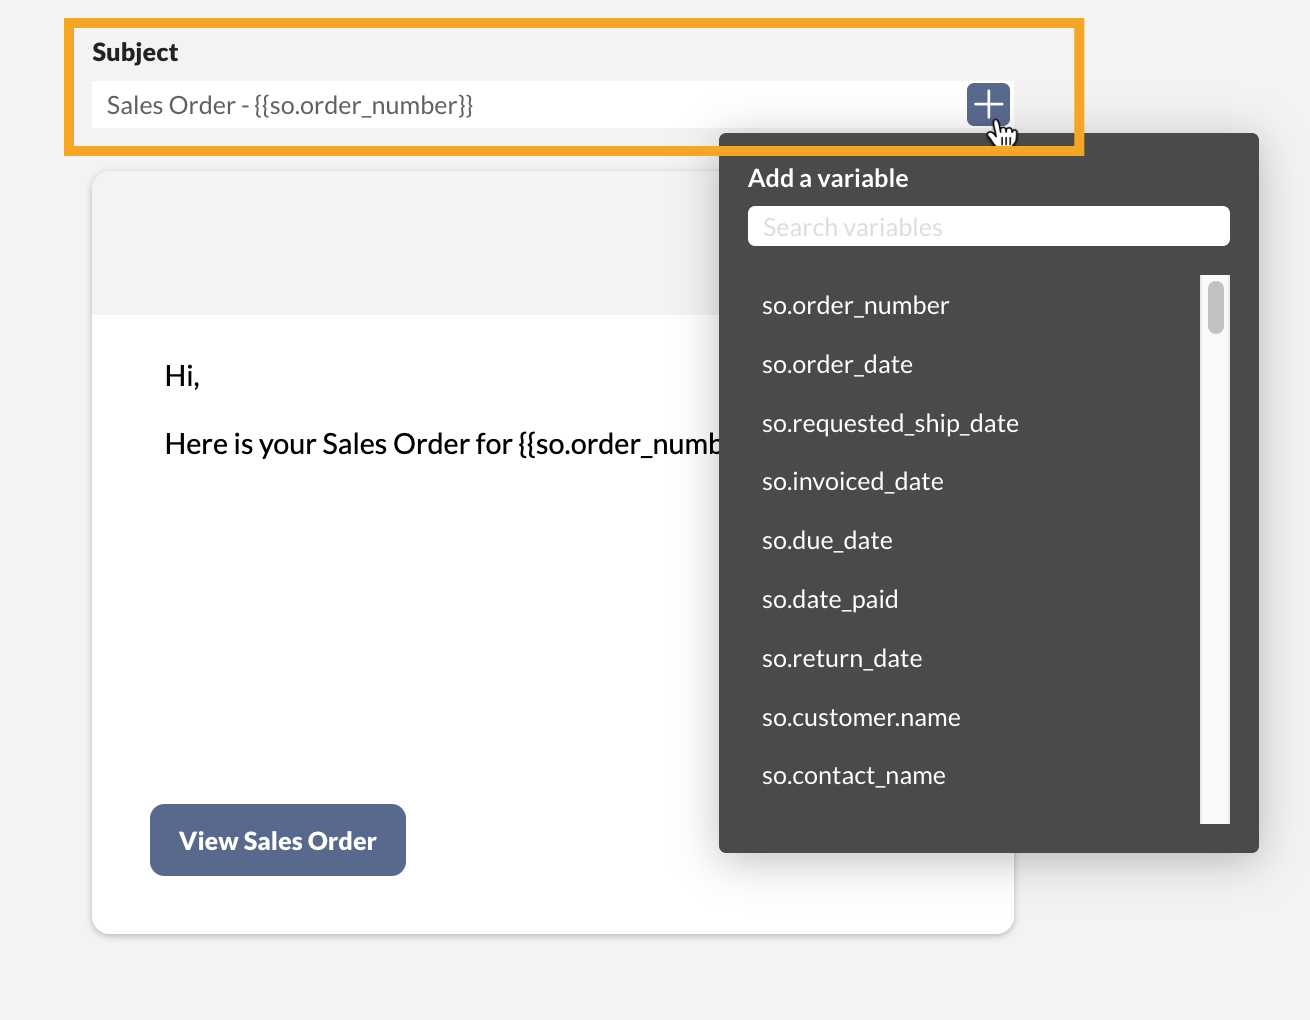
Subject line
The first part of the email you can customize is the subject line. The subject contains variables in brackets that are placeholders that allow each email to be personalized to the recipient.
Example: The sales order default subject line is Sales order - {{so.order_number}}.
- Sales order = The inFlow order you’re emailing from.
- {{So.order_number}} = The sales order number on the document.
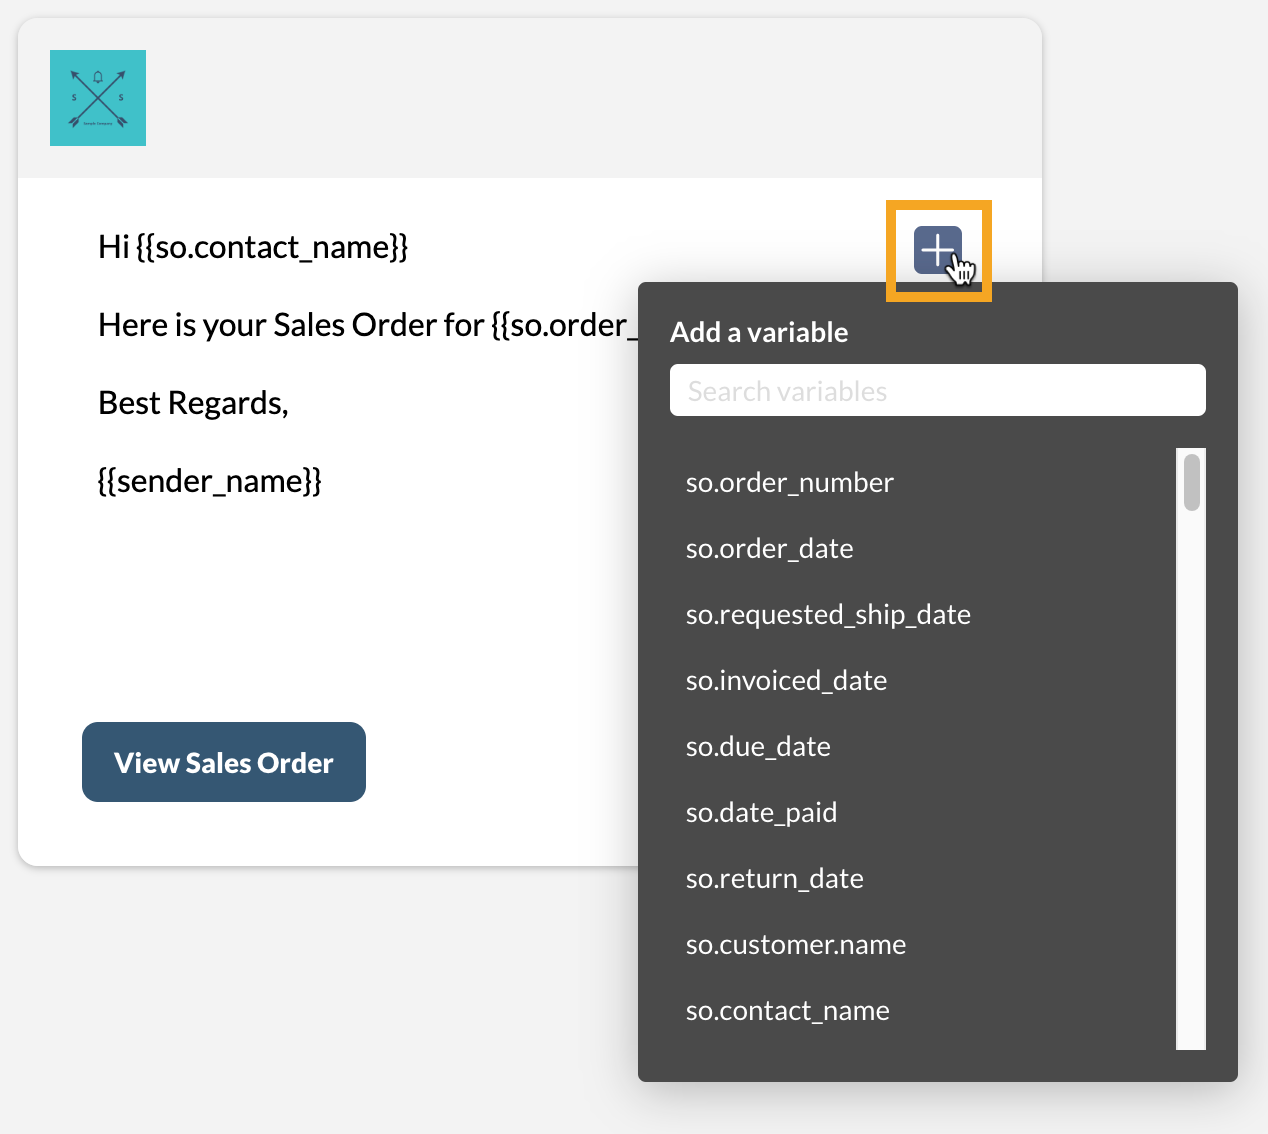
To add other variables, click the plus icon, then select a variable from the list.

Feel free to add or remove variables, but please avoid changing the periods, underscores, or brackets within the variables, as doing so may cause them to stop working properly.
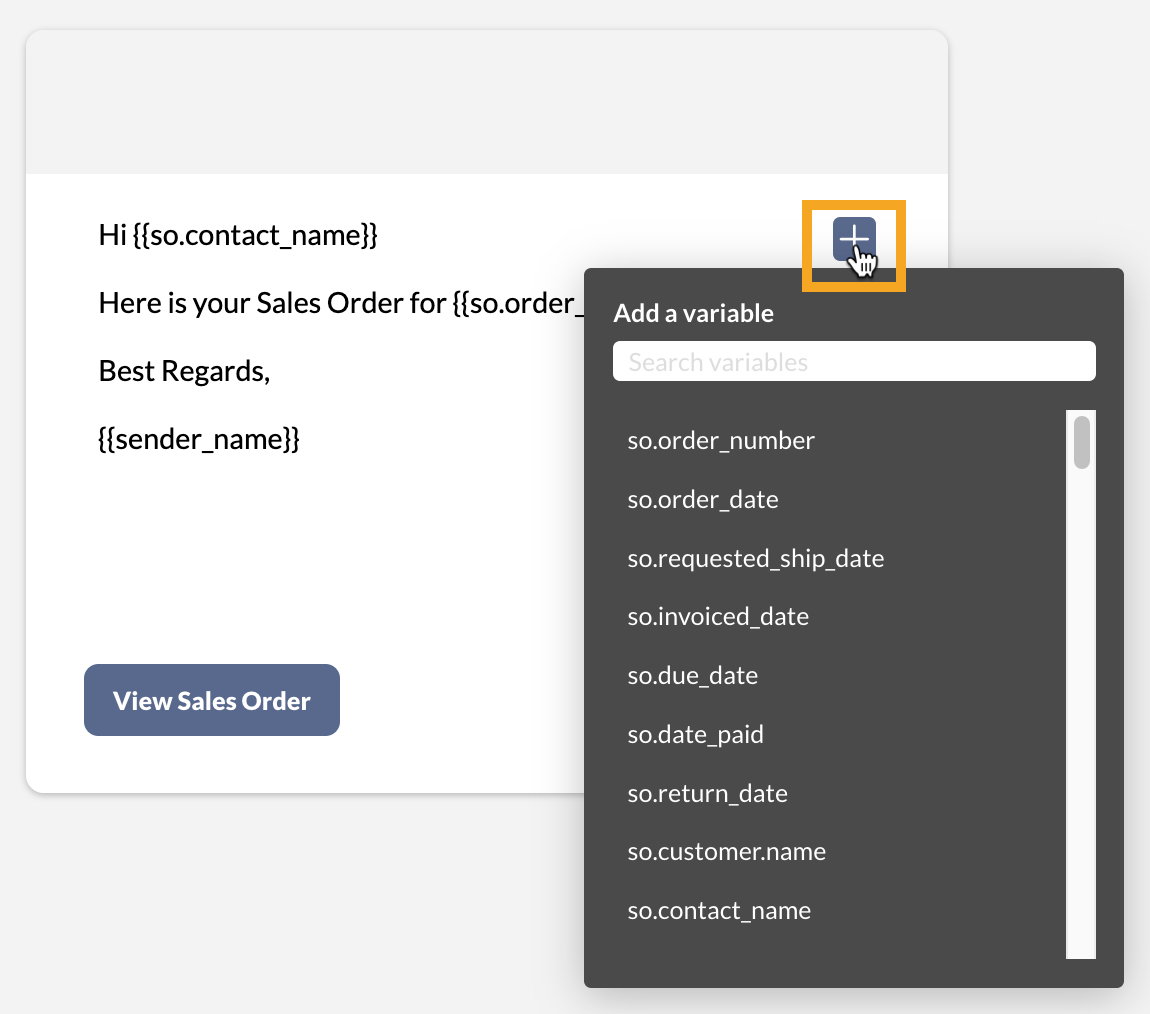
Email body
You can edit the email template in the body field below the subject line. To add variables to the email body, click on the plus icon.
When done, click Save & close.
Customizing variables
If you want to make slight changes to the variables, just add the info within the variable brackets. This is done by adding a vertical bar after the variable name, followed by a modifier within the variable brackets. See below for some examples.
Capitalization
For any variable, if you want to make all uppercase, you can add {{variable| upcase}} in the variable brackets.
Example: {{so.customer.name| upcase}} = JOSEPH BUCKLEY
Date formatting
By default, date fields will match the date formatting based on your browser setting and add a timestamp.
In the examples below, we’re using {{so.due_date}} but you can change this variable with any of the other date variables in the email template.
Default date display: {{so.order_number}} = 08/03/2024 12:45:52 +00:00
| Formatting options: | Result |
|---|---|
{{so.due_date| date: "MMM dd, yyyy"}} | Aug 03, 2024 |
{{so.due_date| date: "MM/dd/yyyy"}} | 08/03/2024 |
{{so.due_date| date: "MM/dd/yy"}} | 08/03/24 |
{{so.due_date| date: "dd MMM, yyyy"}} | 03 Aug, 2024 |
{{so.due_date| date: "dd/MM/yyyy"}} | 03/08/2024 |
{{so.due_date| date: "dd/MM/yy"}} | 03/08/24 |
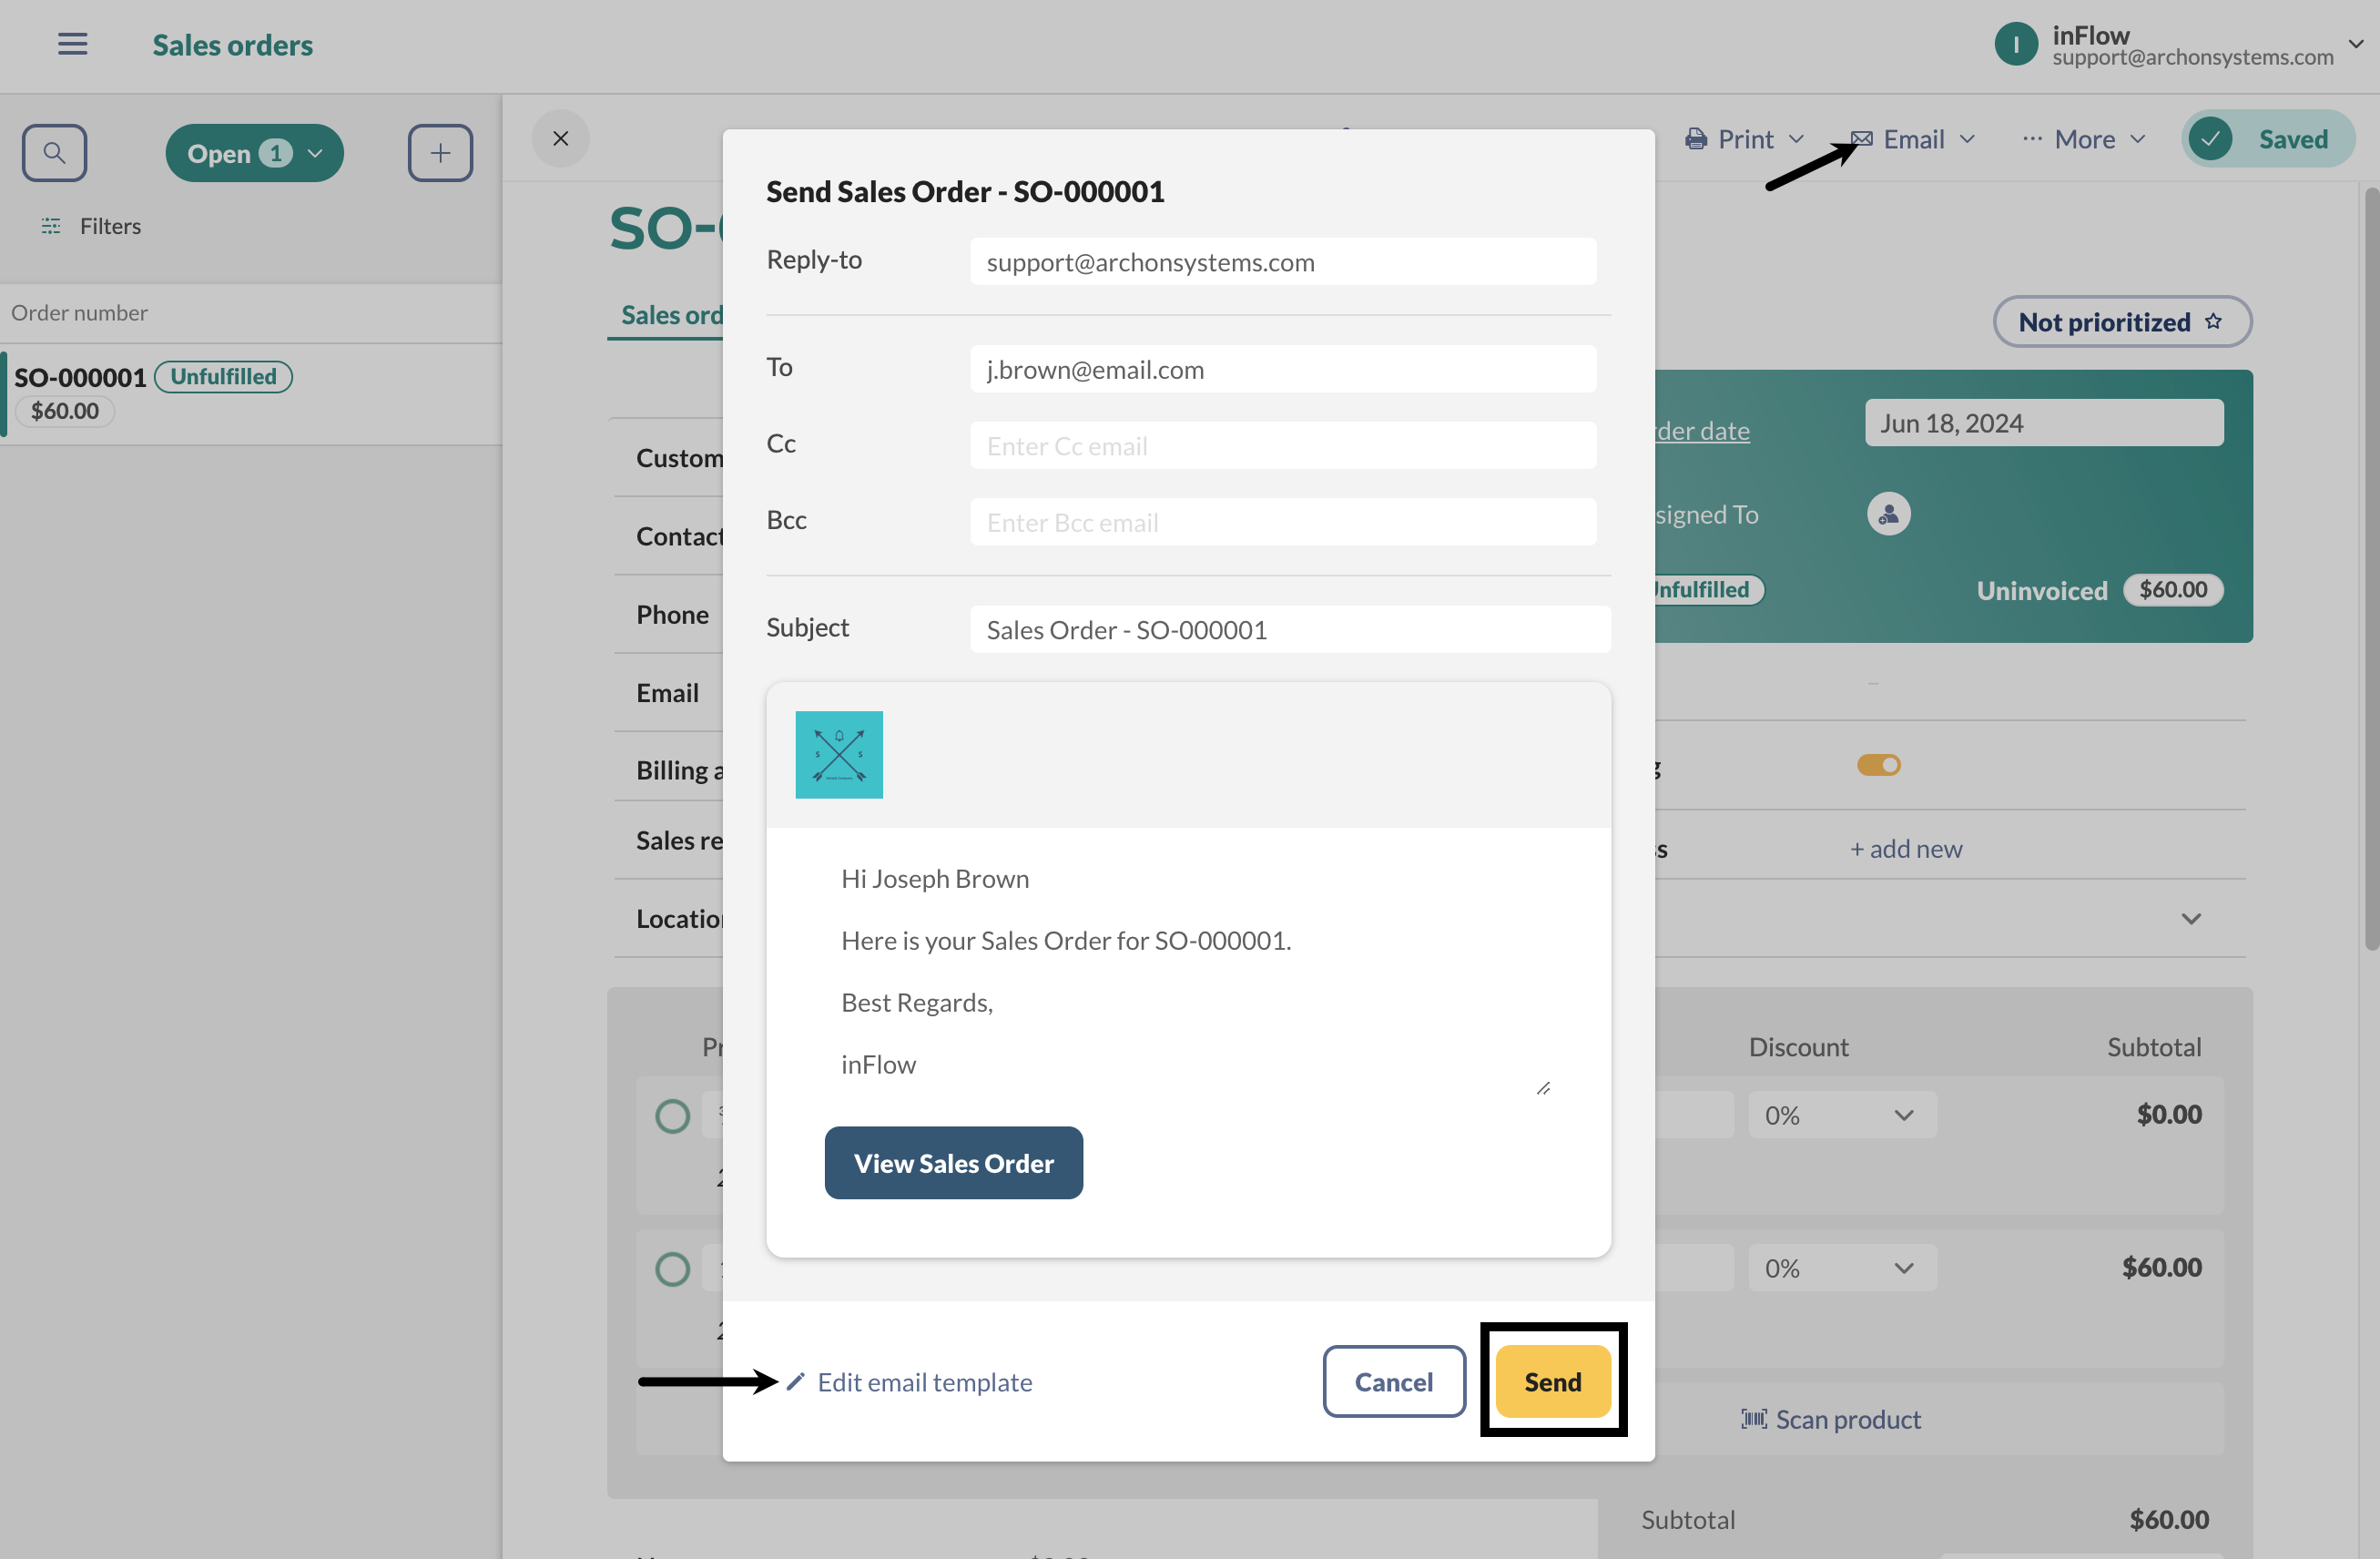
Emailing a template
Now that your template has been created you can email it from any of the inFlow orders.
- Open an order and click Email then select the document you want to email.
- Review the email fields and the email template below. To make changes to the template, click on Edit email template, make changes to the template, then click Save & close.
- Return to the order > click Email and select the document.
- Click Send when done.
To learn more about emailing documents from inFlow, take a look at this guide.
What else can I customize in inFlow?
In inFlow, you can customize different areas to meet your team’s needs.
Customizable inFlow features
- Rename fields: Rename most of inFlow’s fields to a term of your choice.
- Change order numbers: Change order prefixes.
- Custom fields: Track additional data with custom fields.
- Label Designer: Create product labels to include the barcode, image, and product name.
- Document Designer: Create and customize sales and purchasing documents.
Windows
If you are using inFlow for Windows and want to access email templates and send documents designed by the Document Designer, you can seamlessly switch to utilizing these powerful features!
Before you start
Switching to inFlow’s Email and Document Designer means that some Windows app features will no longer be available, such as:
- Documents created in Microsoft Word can be redesigned in inFlow’s user-friendly Document Designer.
- inFlow Print Settings (document styles, Document page numbers, and footers.)
- Legacy email settings.
Other notable changes:
- Emails will be sent from noreply@inflowinventory.com.
- Documents will be sent as links instead of attachments.
- All email and document templates can only be modified on inFlow for Web.
If your team has been using inFlow before July 2024, the Email and Document Designer are optional and require inFlow Admins to opt in. We suggest previewing these features in inFlow for Web before making changes.
Once you’ve opted in, you won’t be able to switch back to using legacy email settings and the original documents from inFlow for Windows. Contact the inFlow team if you have any questions.
Converting emails and documents
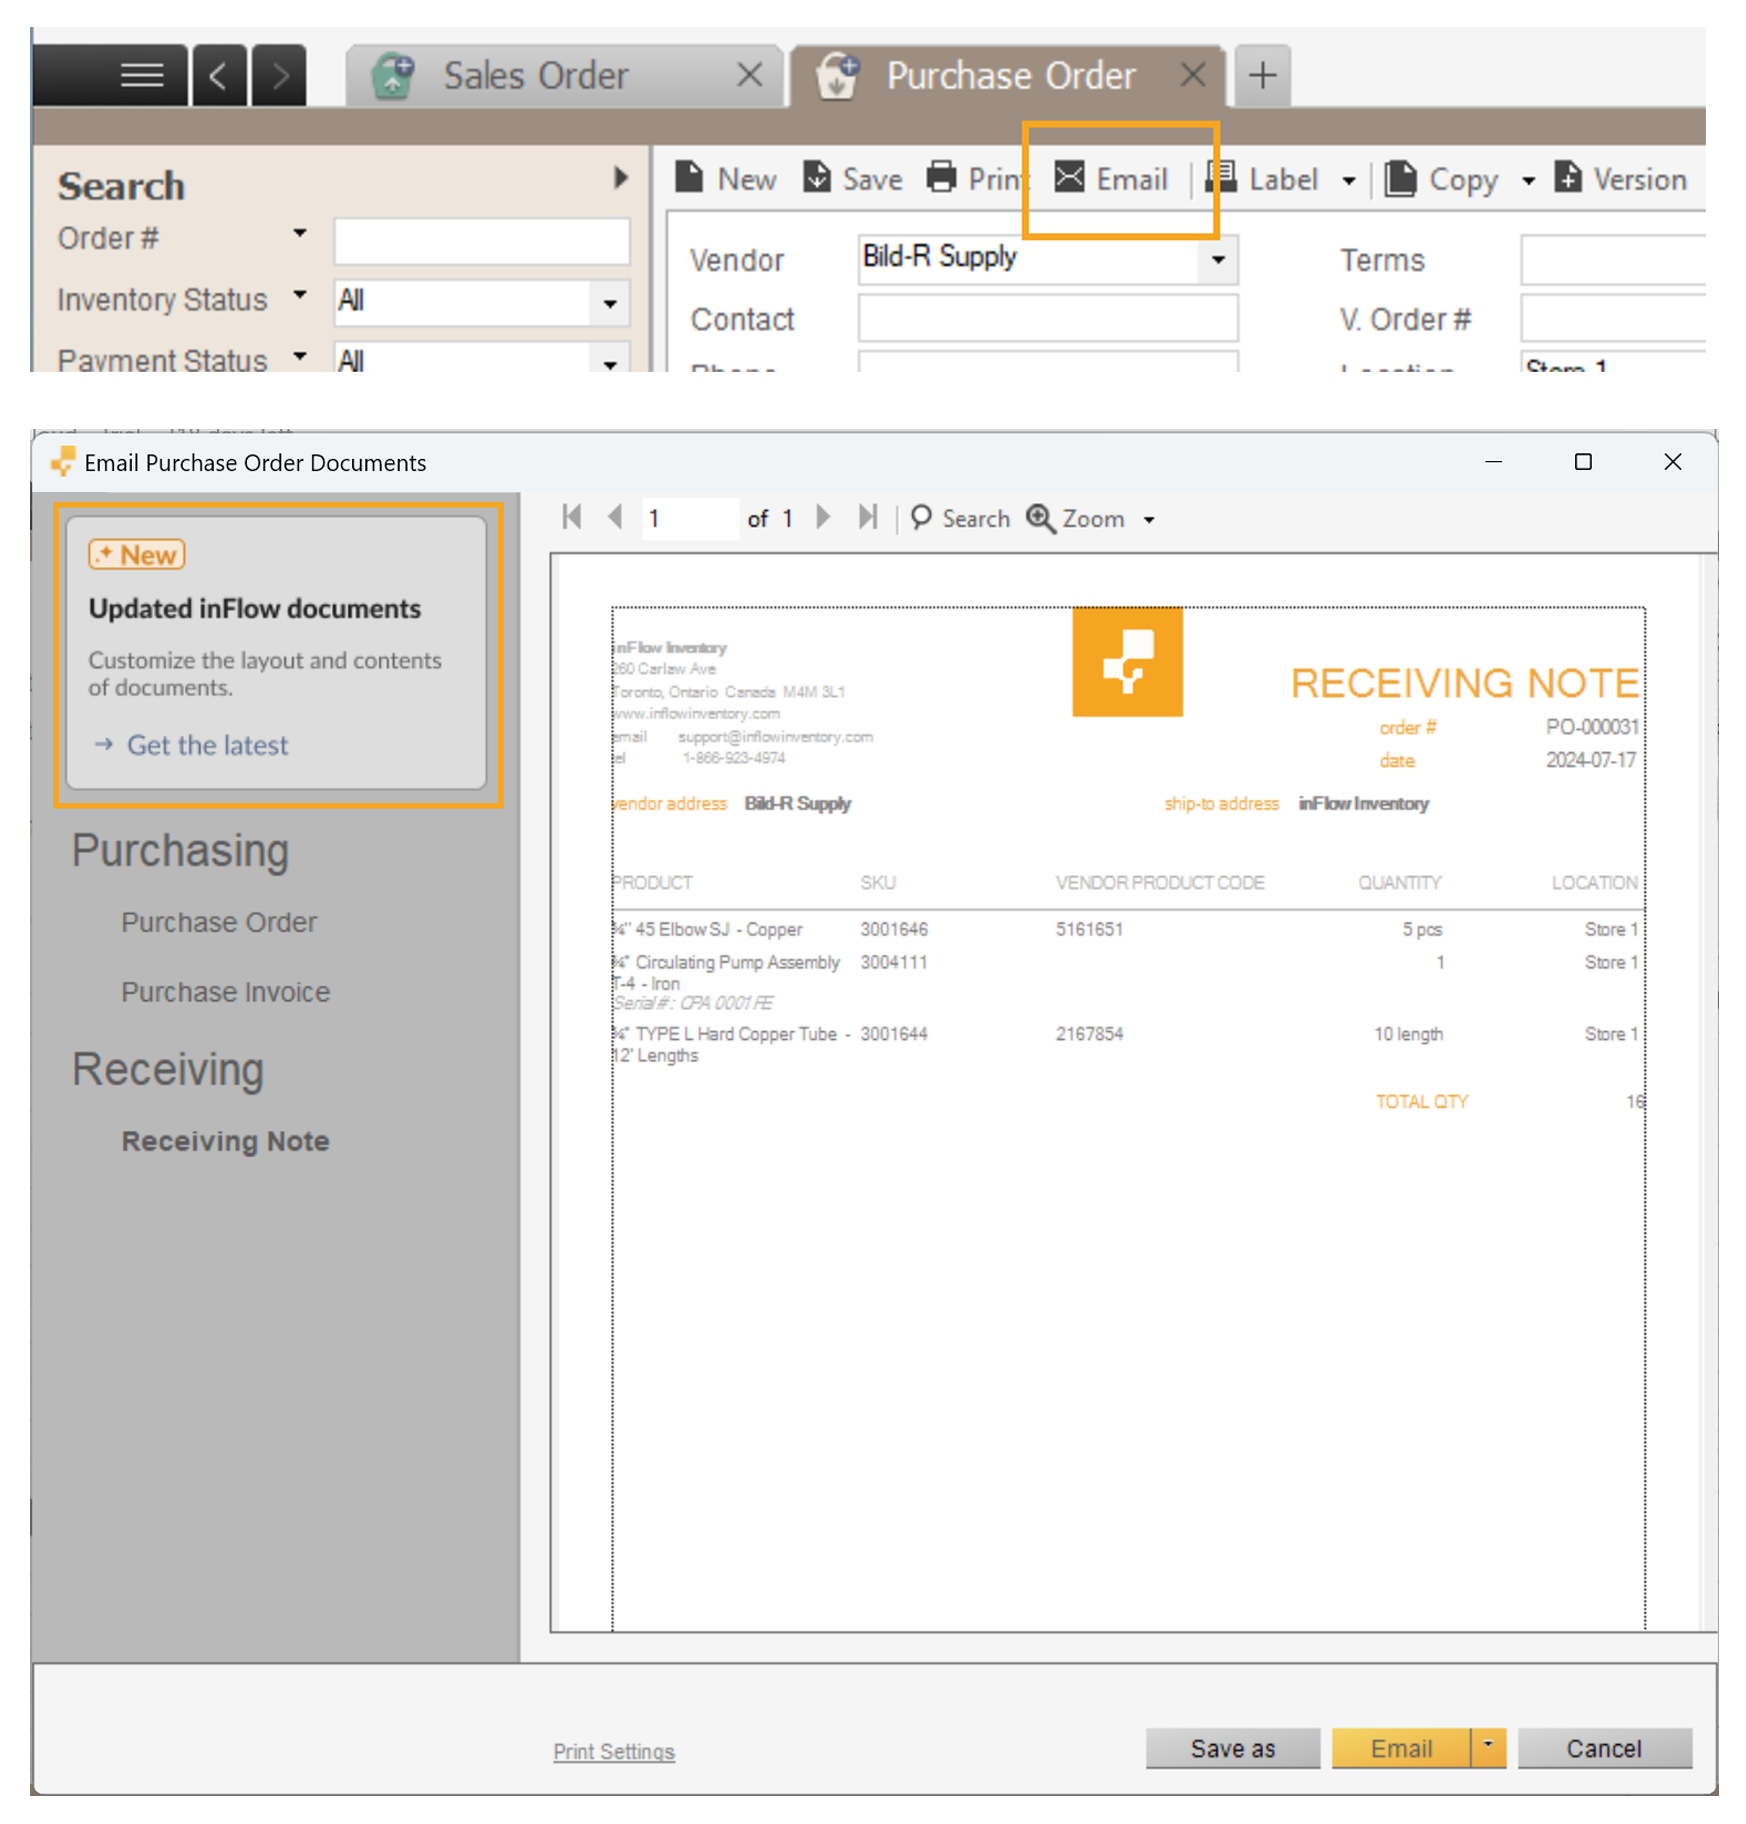
- To start, open an order in inFlow with an Admin account (sales, purchase order, etc.) > then click Email or Print.
- In the email document screen, click Get the latest.
- Review the information on-screen, then click Update.
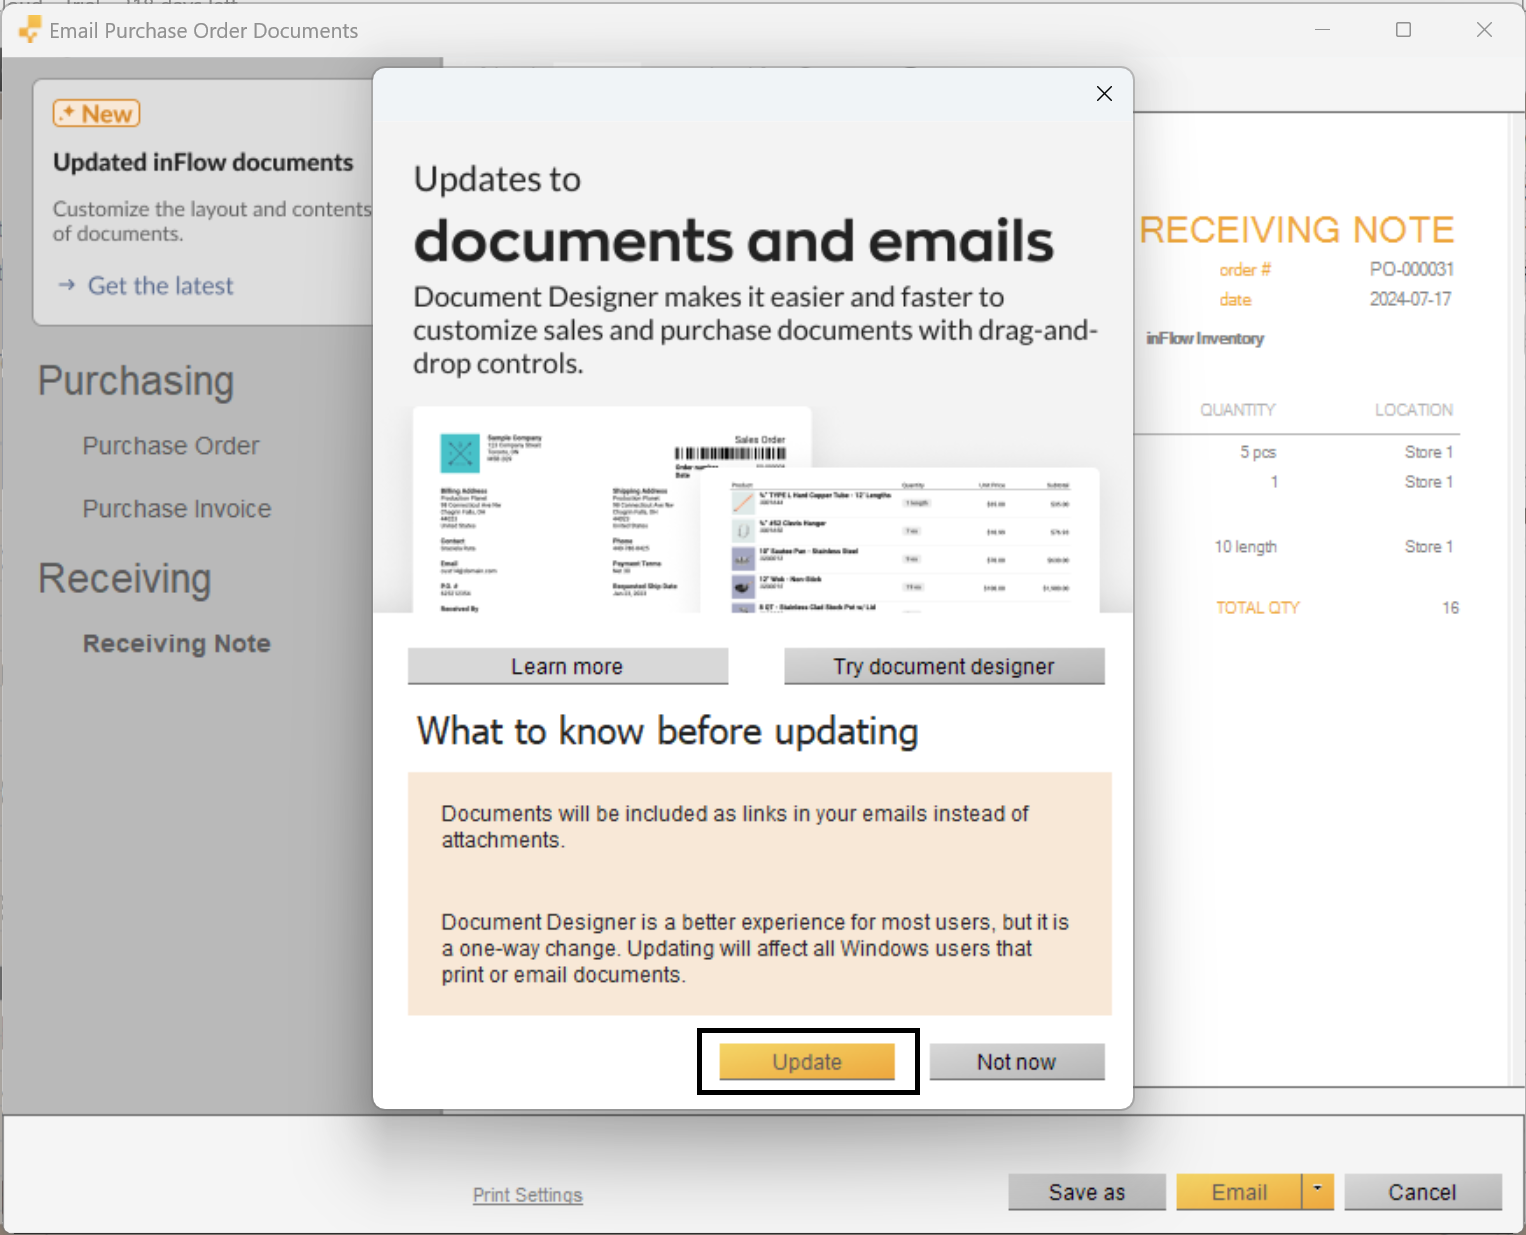
You’re all set!
From now on, when you send emails from the inFlow Windows app, the email body will be automatically filled with templates created by the Email Designer, and you’ll have access to the documents created by the Document Designer.
Accessing the Email Designer
As mentioned, email templates can only be edited from inFlow for Web. See below for steps on accessing the Email Designer settings from the inFlow Windows app.
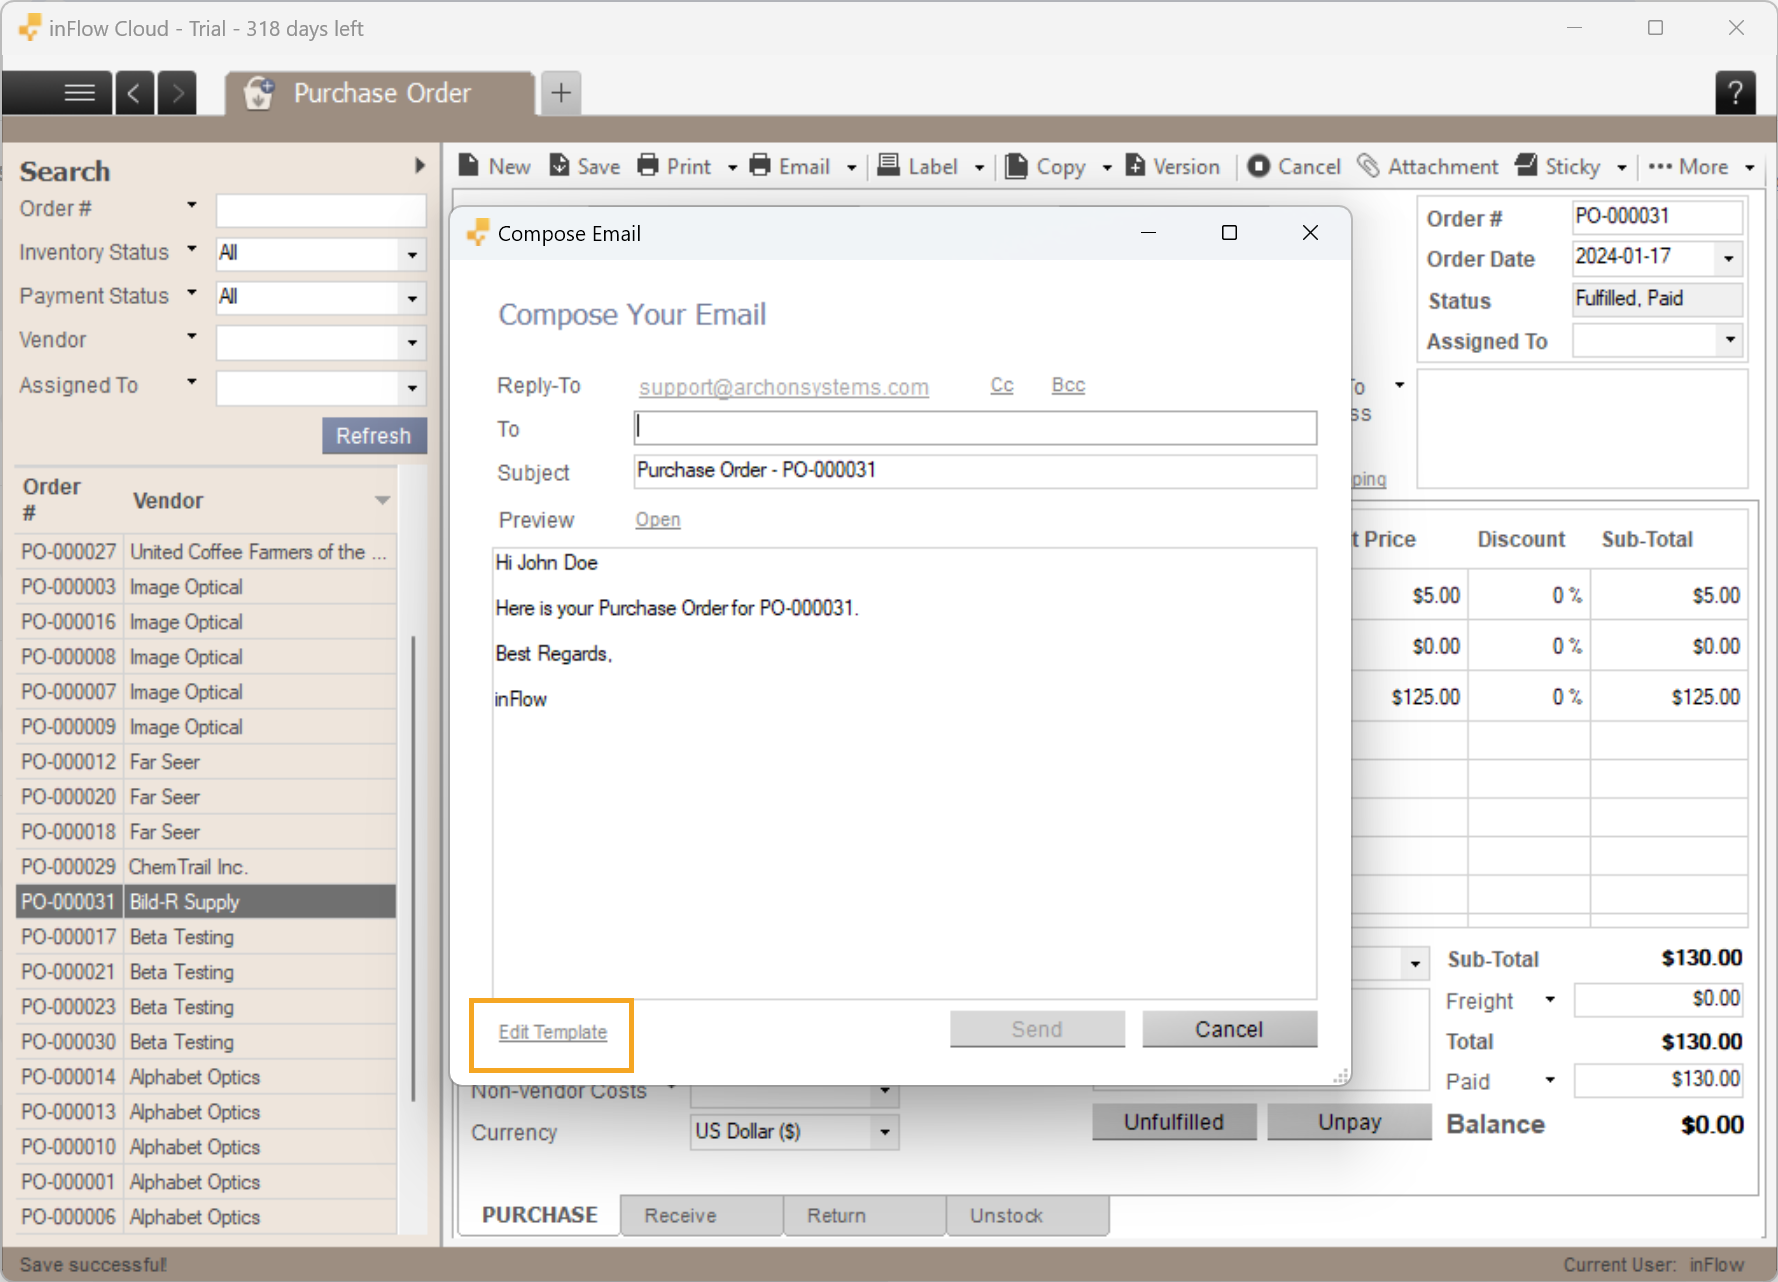
- Open any inFlow order in inFlow, then click Email then select a document.
- At the bottom of the email screen, click on Edit Template. This will open the Email Designer on inFlow for Web.
- After making changes to a template, return to inFlow for Windows and close the Compose Email window.
- Click Email on the order again to load the updated template.
Email Designer template types
On this screen, you can toggle between the list of template types from the different areas of inFlow.
Default styling
This section of the email designer is where you can set a header image, image size, and button color that will apply to all email templates. Click on the plus button to choose a different color.
If you’d like to remove changes made to the Default styling, click on Reset.
Note: The reset button will revert recent changes; however, it won’t restore the default styling to its original state.

When done, click Save & close.
Editing an email template
Hover over one of the email templates and select Edit template.
Button text
Use the Button text field to change the text on the button in the email template. (This button is what the recipient will select to view the document.)
Using custom or Default styling
The Email Designer uses the default styling for all email templates. You can edit the default styling by selecting Edit default, or you can override the defaults by selecting Use custom styling.
When using the custom styling, you can select the header image, image size, and button color.
Reset
This button allows you to undo any recent changes. However, the reset button does not restore the template back to its original state.
Subject line
The first part of the email you can customize is the subject line. The subject contains variables in brackets that are placeholders that allow each email to be personalized to the recipient.
Example: The sales order default subject line is Sales order – {{so.order_number}}.
- Sales order = The inFlow order you’re emailing from.
- {{So.order_number}} = The sales order number on the document.
To add other variables, click the plus icon, then select a variable from the list.
Feel free to add or remove variables, but please avoid changing the periods, underscores, or brackets within the variables, as doing so may cause them to stop working properly.
Email body
You can edit the email template in the body field below the subject line. To add variables to the email body, click on the plus icon.
When done, click Save & close.
Customizing variables
If you want to make slight changes to the variables, just add in the info within the variable brackets. This is done by adding a vertical bar after the variable name, followed by a modifier within the variable brackets. See below for some examples.
Capitalization
For any variable, if you want to make all uppercase, you can add {{variable| upcase}} in the variable brackets.
Example: {{so.customer.name| upcase}} = JOSEPH BUCKLEY
Date formatting
By default, date fields will match the date formatting based on your browser setting and add a timestamp.
In the examples below, we’re using {{so.due_date}} but you can change this variable with any of the other date variables in the email template.
Default date display: {{so.order_number}} = 08/03/2024 12:45:52 +00:00
| Formatting options: | Result |
|---|---|
{{so.due_date| date: "MMM dd, yyyy"}} | Aug 03, 2024 |
{{so.due_date| date: "MM/dd/yyyy"}} | 08/03/2024 |
{{so.due_date| date: "MM/dd/yy"}} | 08/03/24 |
{{so.due_date| date: "dd MMM, yyyy"}} | 03 Aug, 2024 |
{{so.due_date| date: "dd/MM/yyyy"}} | 03/08/2024 |
{{so.due_date| date: "dd/MM/yy"}} | 03/08/24 |


0 Comments