Connecting QuickBooks Online to inFlow
If you’re using inFlow and QuickBooks Online to manage your inventory and accounting, you’ll love the seamless integration between inFlow and QuickBooks Online to streamline your processes and enhance efficiency.
Setup
Two-way payment sync video
Take a look at this video to learn how you can seamlessly pay for sales and purchase orders from either inFlow or QuickBooks Online.
This video doesn’t cover setup. Take a look at the Connecting inFlow to QuickBooks Online section below for complete setup instructions.
How does this work?
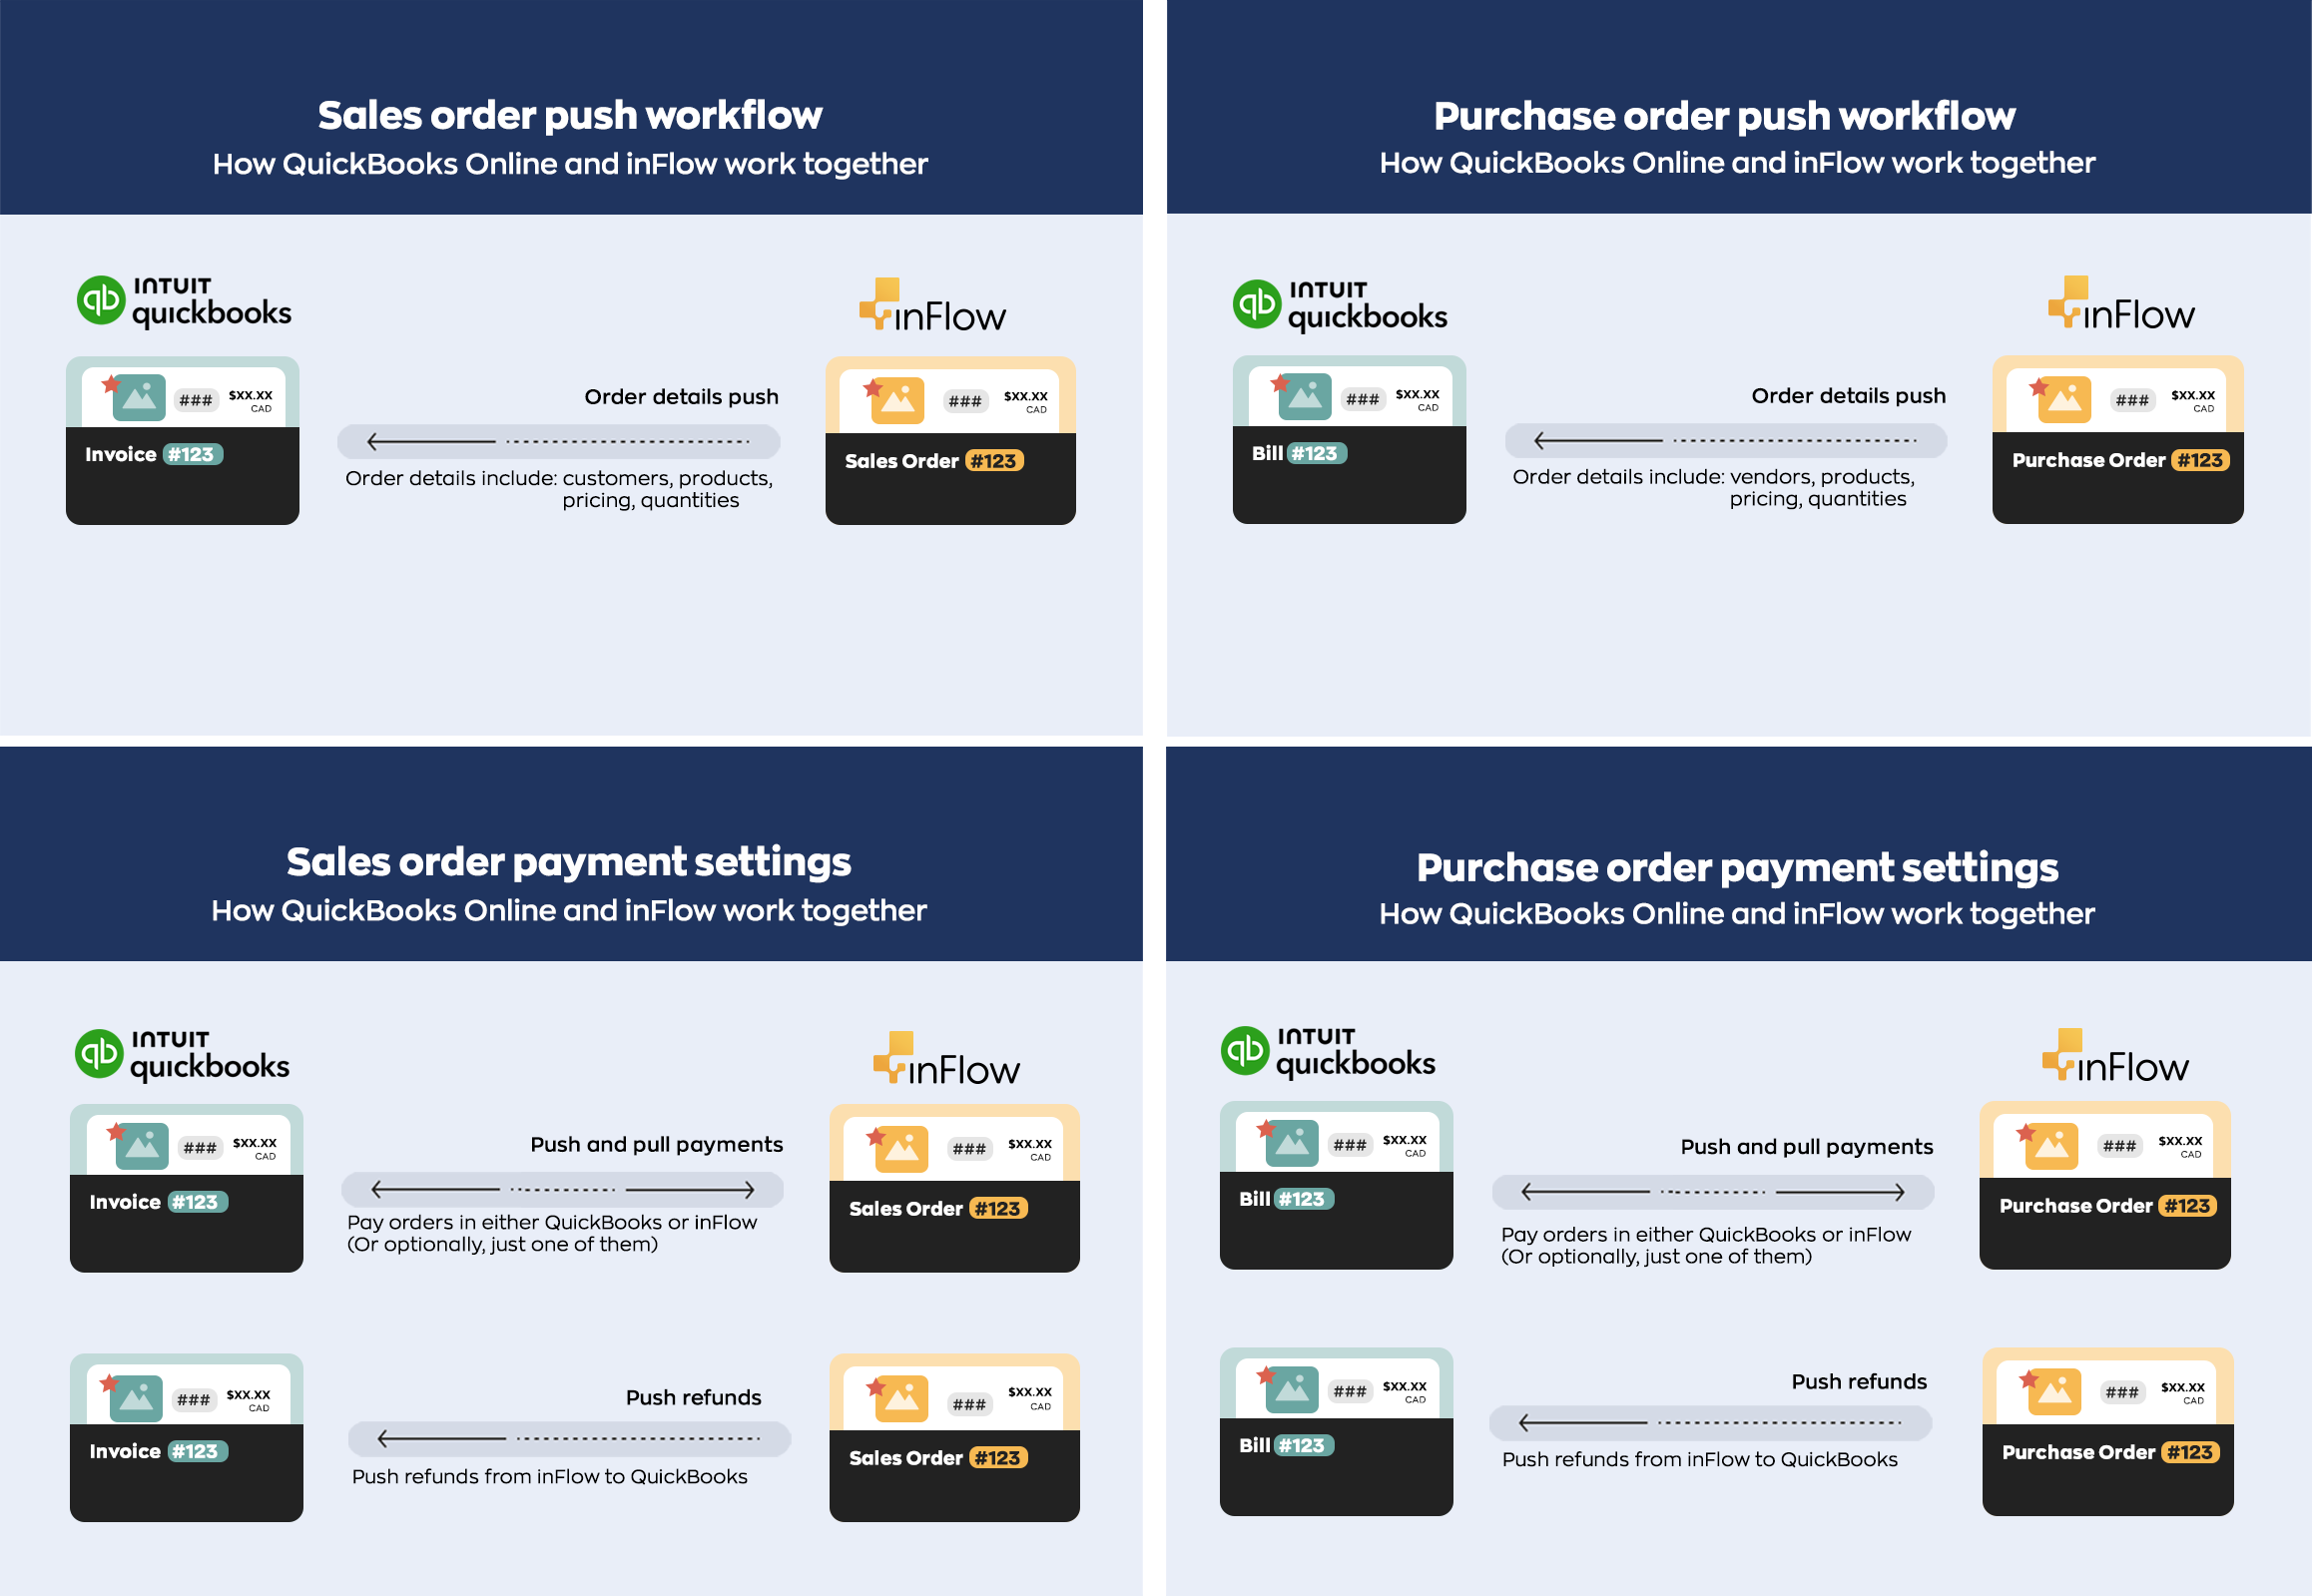
With inFlow, you can easily create new sales and purchase orders that can be seamlessly sent to QuickBooks Online. Plus, you have the flexibility to make payments within inFlow or QuickBooks Online using the handy two-way sync payments option.
If there are missing records in QuickBooks Online, inFlow can create new products, customers, and vendors for you. Currently, records made in QuickBooks Online can’t be pushed to inFlow.
As soon as the purchase order push is enabled, inFlow will push your inventory value to QuickBooks Online. Your inventory value must be accurate in inFlow and QuickBooks Online before enabling the integration.
Before setup checklist
We currently support QuickBooks US, Canada, UK and AUS.
- ✅ Are your product quantities and costs accurate in inFlow? If you intend to push purchase orders, ensure your stock levels and product costs are accurate! The integration adjusts Quickbook’s total inventory value to match inFlow’s, so you’ll want to ensure they match before you begin. See the “Push purchase orders and inventory” tab for details!
- ✅ Does your home currency in inFlow and QuickBooks Online match? Make sure that your main currency in both systems is the same. If you use more than one currency in your inFlow orders, turn on the Multicurrency setting in QuickBooks Online.
- ✅ Are your taxes in both systems? Ensure that your inFlow taxes are also in QuickBooks Online.
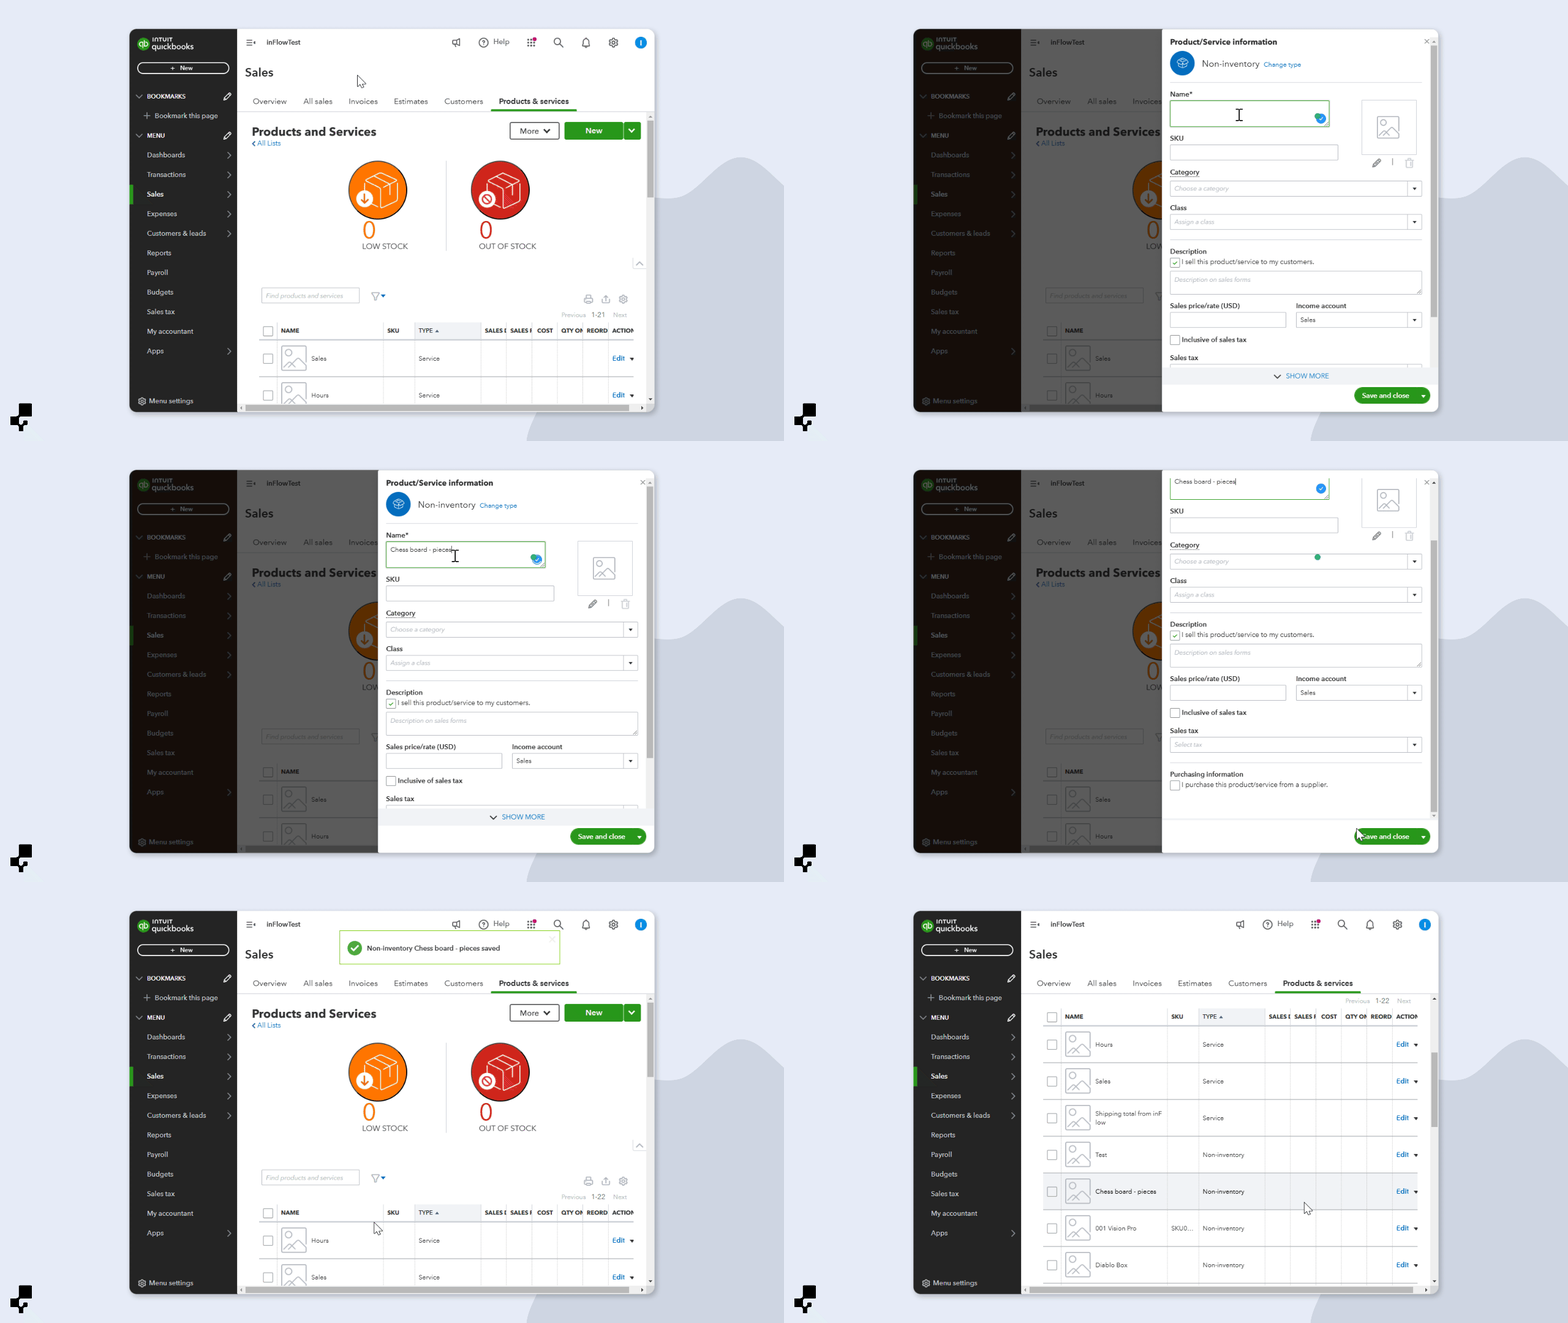
- ✅ Is your QuickBooks Online account using non-inventory product types? inFlow can only use QuickBooks Online’s non-inventory products.
If your QuickBooks account uses inventory type, it will conflict with the integration and may cause double entries as both systems try to update the stock value.
Make sure products are non-inventory types before connecting inFlow to QuickBooks Online to avoid making several corrections after the fact. If you have inventory-type products in stock, check the Adjust Inventory Items section of this QuickBooks Online guide to remove the product quantities.
If you’re using inventory-type products in QuickBooks Online, you must make them inactive and re-create them as non-inventory products
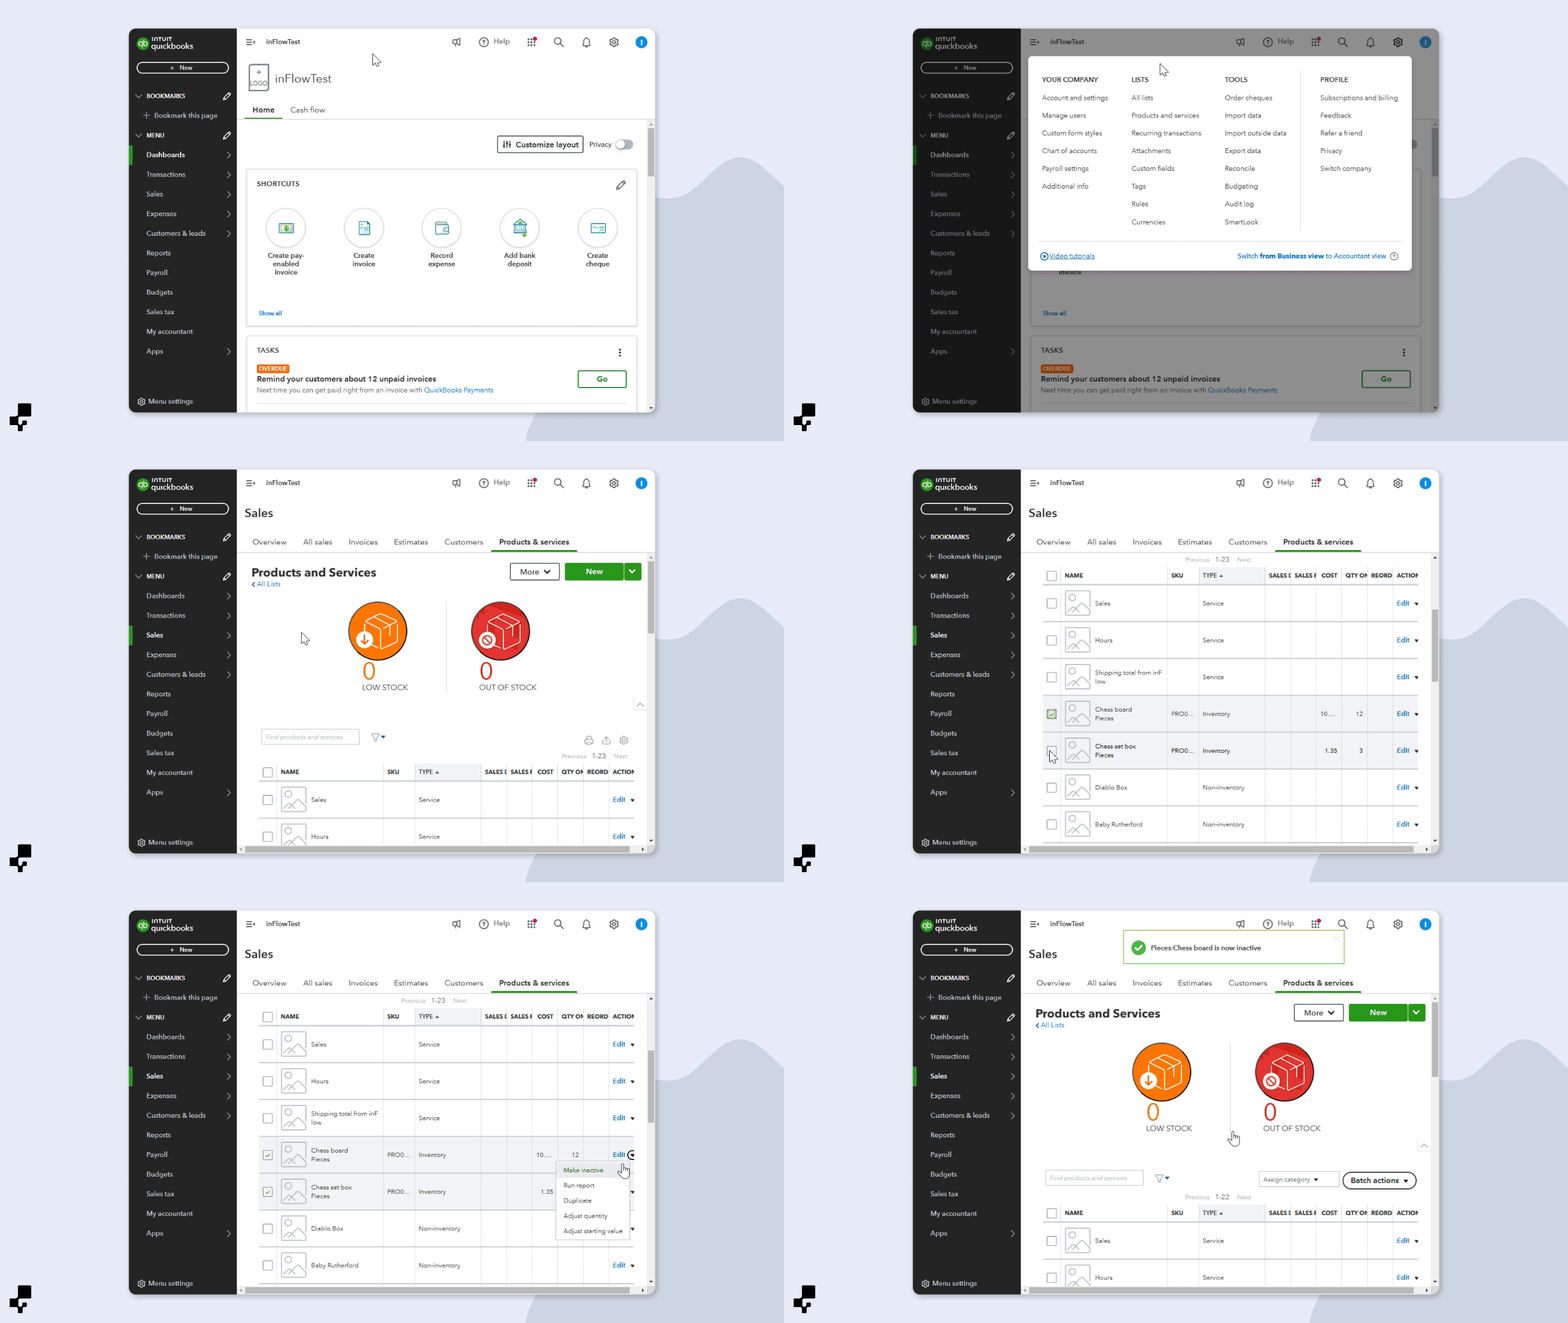
QuickBooks Online doesn’t have an option to convert inventory products to non-inventory products.
- ✅ Does your inventory include serialized products? At the moment, QuickBooks Online doesn’t support tracking serialized products, so serial numbers won’t be pushed to your QuickBooks Online invoices or bills.
When inFlow pushes a sales or purchase order with a serialized product, the product is sent to QuickBooks Online without the serial number information. There won’t be any errors in inFlow or QuickBooks mentioning the missing serial details. - ✅ Creating an inFlow Adjustments account – inFlow must connect to a Cost of Goods Sold account (COGS) and a different COGS-based account to track adjustments. During the QuickBooks Online setup, select Create inFlow Adjustments account in QuickBooks.

- ✅ Do your inFlow customers have the correct currency settings? You can’t change the customer currency settings in QuickBooks after a sales order has been pushed. Verify that the currency set up in the inFlow customer profile matches one of the currencies set up in QuickBooks.
To check, open inFlow and go to the Main Menu > Sales > Customer list. Open the customer profile and select the correct currency from the Pricing/currency drop-down menu.
QuickBooks Online explainer & setup webinar
Please note: the above webinar was recorded before the payment sync feature was added to this integration.
Exporting products from QuickBooks Online to inFlow
Connecting inFlow to QuickBooks Online is simple! You don’t need all your products ready in both systems first. inFlow will generate non-inventory-type products as needed. If you have products in QuickBooks Online, import them into inFlow to centralize your inventory management. Watch the video below for the complete steps!
- In QuickBooks Online, Click on Sales, then Products & Services.
- Before exporting, make sure all of your products are Non-inventory type for the inFlow integration to work correctly with QuickBooks Online.
- When ready, click Export and save the file to your computer.
Connecting inFlow to QuickBooks Online
- With an Admin account, log into inFlow’s integration settings. (Main Menu > Options > Integrations. )
- Under Core integrations, click on QuickBooks Online.
- In the pop-up, select Connect to QuickBooks.
- Your browser will direct you to your QuickBooks Online account for authorization. If you have multiple QuickBooks accounts, select the account with which inFlow should connect.
- Click Connect to allow inFlow to view and update your QuickBooks data.
Sales orders push integration settings
- Your browser will redirect to inFlow’s QuickBooks Online integration setup with the Sales order push setting toggled on. This means sales orders from inFlow will be pushed to QuickBooks Online as an invoice.

- In the General section, select the Product Income Account that inFlow should connect to.
Typically, this is the account in QuickBooks Online you use to receive money for products sold. This account will be set as the Product income account for products created via inFlow in QuickBooks Online. Select the appropriate QuickBooks Online account from the drop-down. The Product Income account for existing products in QuickBooks Online will not change. - Select the customer name setting you prefer. When a sales order is pushed to QuickBooks, you can choose whether to include or exclude the customer name as part of the address in the resulting invoice in QuickBooks.

Sales order payment settings
- Next are the Payment settings. When the Sync payments setting is toggled on, you can choose how you would like to manage and process payments. Select your preferred option. See the table below to learn about each payment option.

| Payment setting | Explanation |
|---|---|
| Push and pull payments | This is a two-way payment sync option, where you can enter payments in either inFlow or QuickBooks Online. Please note: The two-way sync feature is strictly for payment information. This integration does not support two-way order sync. Orders must be created in inFlow first. This setting is recommended if your team would like to process payments in either software, and the information will be sent automatically to the other one. If a payment is added to a QuickBooks Online invoice, the payment will be sent to the matching inFlow sales order. If a payment has been added to the inFlow sales order, that payment will be sent to the matching QuickBooks Online invoice. |
| Push payments | With this payment option, payments can only be made on inFlow sales orders, and the payment information will be sent to the matching QuickBooks Online invoice. If a payment is added to the QuickBooks Online invoice, inFlow will not receive the payment information on the matching sales order. |
| Pull payments | With this setting, payments are only added to the QuickBooks Online invoice, and the payment information will be sent to the matching inFlow sales order. If a payment is added to an inFlow sales order, QuickBooks Online will not receive the payment information on the matching invoice. |
- The Refund setting is toggled on by default. This allows you to process refunds in inFlow, and the refund information will be sent to the matching QuickBooks Online invoice. Toggle this setting off if you don’t want refunds sent to QuickBooks Online. Any refunds will need to be processed in inFlow and QuickBooks Online separately.
- Next, select the Payments account from the drop-down menu. This is the account that updates when payments have been made on inFlow sales orders and QuickBooks invoices.

Sales order tax setup
- At the bottom of the setup are the tax settings. Similar to mapping your accounts, you’ll need to map the taxes that are in inFlow to the tax rates that are in QuickBooks.
Match the inFlow taxes to the QuickBooks Online taxes in the drop-down menu. If you see No matches found. Please create one in QuickBooks and check again it means QuickBooks doesn’t have a matching tax. Create the tax in QuickBooks Online, then click on Check again before you proceed.

- Click Next to continue the Payment order and inventory value push integration settings.
QuickBooks has released an Automated Sales Tax feature that can calculate the taxes on your invoices for you based on shipping addresses and other order information on your invoices. If your account has this feature enabled, you won’t have to map any taxes, and the window will say, “Tax setup is complete”. Click Next to complete the setup.
Sales order push account setup breakdown
| Account | Explanation |
|---|---|
| Product income account | Typically, this is the account in QuickBooks Online you use to receive money for products sold. This account will be set as the Product income account for products created via inFlow in QuickBooks Online. Select the appropriate QuickBooks Online account from the dropdown. The Product Income account for existing products in QuickBooks Online will not change. |
| Customer name | When a sales order is pushed to QuickBooks, you can choose whether to include or exclude the customer name as part of the address in the resulting invoice in QuickBooks. |
| Payments account | If payment push is enabled, you’ll need to tell inFlow which QuickBooks account to update when the order is pushed. This is the bank account you use in QuickBooks Online to receive/send payments (Checking, etc.). |
Purchase order and inventory value push settings
- At the top of the screen, you’ll see that Purchase order and inventory value push settings are toggled on.
This setting will push purchase orders from inFlow to QuickBooks Online as bills. In addition to creating a bill, inFlow will update the Inventory Assets and Cost of Goods Sold accounts in QuickBooks.

- In the General settings, select the appropriate accounts inFlow should connect to. For the Adjustments/Other Costs account, we recommend that you select Create inFlow Adjustments account in QuickBooks to create a dedicated account for inFlow to make adjustments where needed. Don’t select the same QuickBooks Online account for more than one setting.

Purchase order payment settings
- Next in the setup is Payment settings. The Sync payments setting gives you the option of how you would like to manage payments. Select your preferred option. See the table below for a breakdown of each option.
| Payment setting | Explanation |
|---|---|
| Push and pull payments | This is a two-way payment sync option, where you can enter payments in either inFlow or QuickBooks Online. Please note: The two-way sync feature is strictly for payment information. This integration does not support two-way order sync. Orders must be created in inFlow first. This setting is recommended if your team would like to process payments using either software, and the information will be sent automatically to the other one. If a payment is added to a QuickBooks Online bill/expense, the payment will be sent to the matching inFlow purchase order. If a payment has been added to the inFlow purchase order, that payment will be sent to the matching QuickBooks Online invoice. |
| Push payments | With this setting, payments are only added to inFlow purchase orders, and the payment information will be sent to the matching QuickBooks Online bill. If a payment is added to the QuickBooks Online bill, inFlow will not receive the payment information on the matching purchase order. |
| Pull payments | With this setting, payments are only added to the QuickBooks Online bill, and the payment information will be sent to the matching inFlow purchase order. If a payment is added to an inFlow purchase order, QuickBooks Online will not receive the payment information on the matching bill. |
- The Refund setting is toggled on by default. This allows you to process refunds in inFlow, and the refund information will be sent to the matching QuickBooks Online bill. Toggle this setting off if you don’t want refunds sent to QuickBooks Online. When this setting is inactive, refunds will need to be processed in inFlow and QuickBooks Online separately.
- Next, select the Payments (Check) account and the Payments (Credit Card) account from the drop-down menus. These are the accounts that will be used for paying bills to your vendors in QuickBooks Online.

- When done, click Complete, then click Done. And now inFlow is connected to QuickBooks Online.

Purchase order push account setup breakdown
| Account | Explanation |
|---|---|
| Cost of Goods Sold | You’ll need to tell inFlow which QuickBooks account to update when it pushes the total Cost of Goods Sold value from inFlow to QuickBooks Online. |
| Inventory Assets account | You’ll need to tell inFlow which QuickBooks account to update when it pushes the inventory cost value from inFlow to QuickBooks. |
| Adjustments/Other Costs account | You’ll need to tell inFlow which QuickBooks account to use to balance out the Inventory Assets account. For example, if the integration needs to update QuickBooks’s inventory asset value by $500 to match inFlow’s inventory value, then $500 will be moved from this account to the inventory assets account. The account type is a “Cost of Goods Sold” type account only. If you don’t have a QuickBooks account to map to, you can click ‘+ create this account for me‘ to automatically create a QuickBooks account called “inFlow Adjustments” (the name can be changed in QuickBooks.) |
| Taxes on Purchases (QuickBooks US only) | QuickBooks US doesn’t support taxes on purchases. To make the integration work, you’ll need to select a QuickBooks account for inFlow to update (it should be a liability or expense account) so that any taxes on purchase orders in inFlow will still be pushed to QuickBooks, but in this case, as a separate line/category on the order. |
| Payments (Check) | If payment push is enabled, you’ll need to tell inFlow which QuickBooks account to take payment from when the payment method is set to “Check” on the purchase order in inFlow. |
| Payments (Credit Card/no payment method selected) | If payment push is enabled, you’ll need to tell inFlow which QuickBooks account to take payment from when the payment method is set to “Credit” on the purchase order in inFlow. |
If no payment method is selected on the purchase order in inFlow, then that payment will be deducted from the selected QuickBooks payment account.
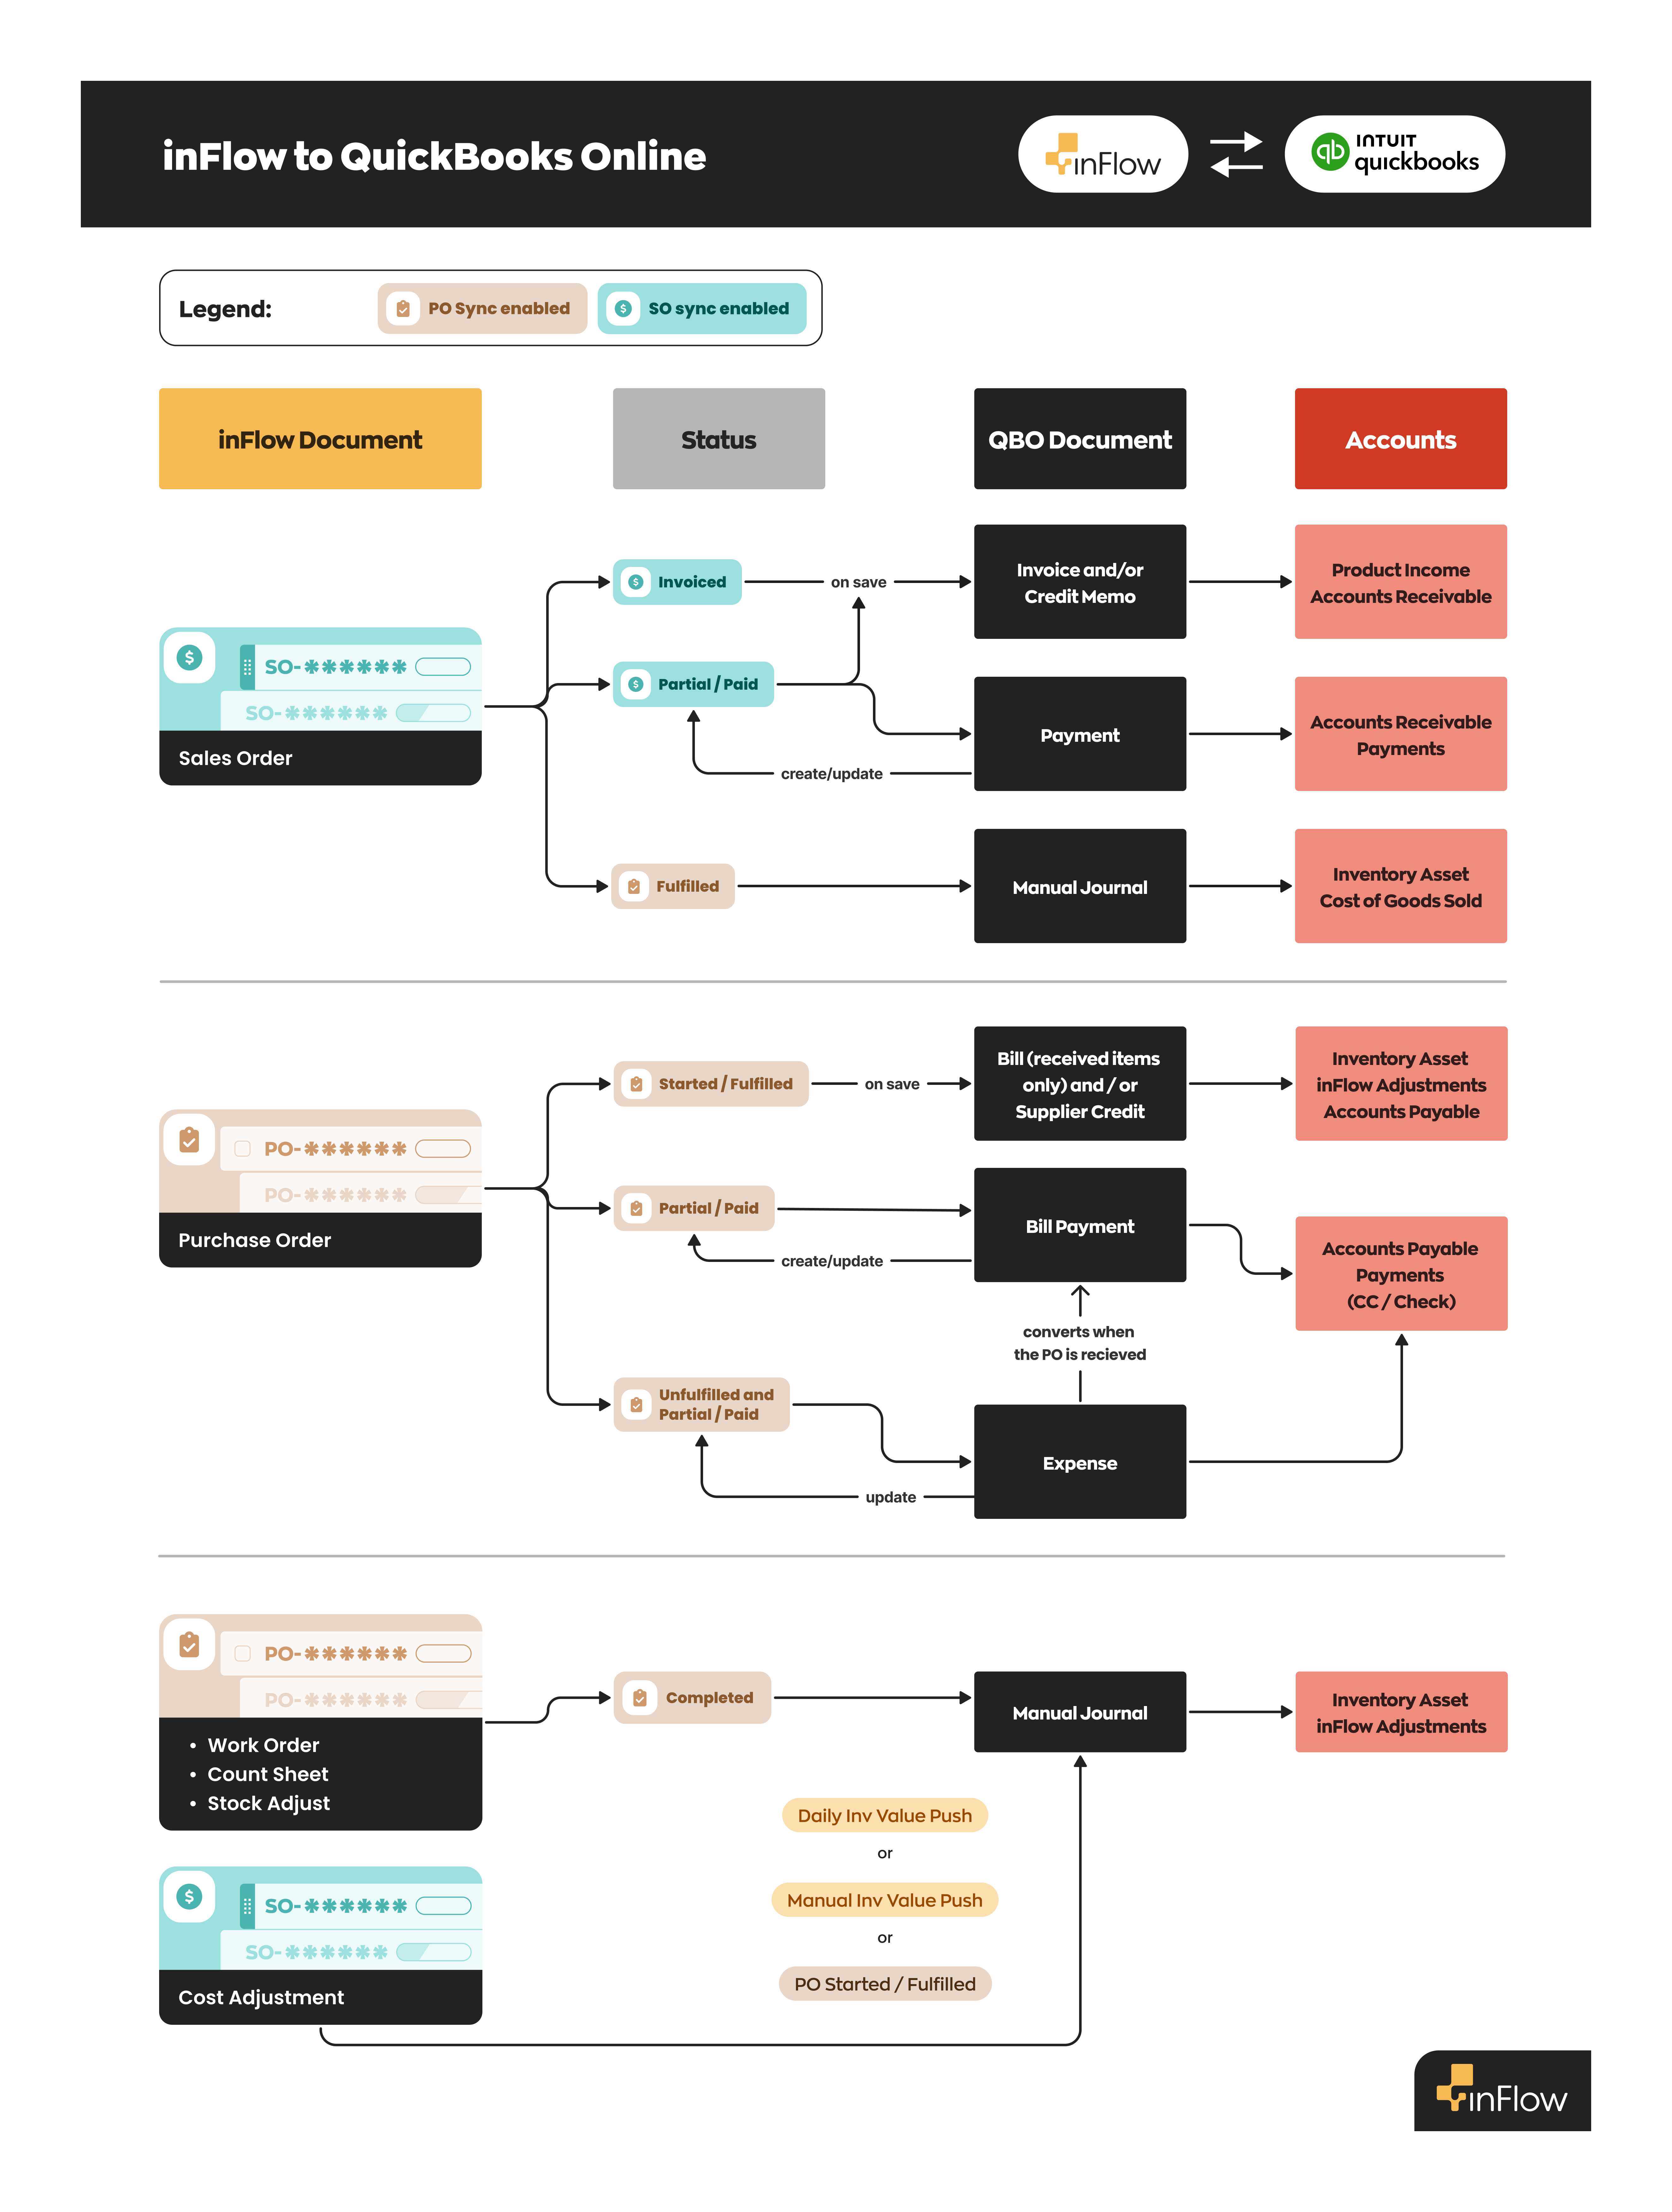
inFlow to QuickBooks account breakdown
For a visualization of how inFlow connects to your various QuickBooks Online accounts, take a look at the flow chart below.
Push sales orders
Now that inFlow and QuickBooks Online are connected, you can start processing sales orders and pushing them to QuickBooks Online.
How to push a sales order to QuickBooks Online
In inFlow, when a sales order is marked as invoiced (meaning you’ve notified your customer that they owe you for the order), inFlow will push the order to QuickBooks Online as an invoice.
You can change the sales order status to invoiced when a sales order is partially paid or paid in full or when you select the Mark invoiced button.
You can mark a sales order as invoiced in the following ways:
- Printing a sales invoice.
- Emailing a sales invoice.
- Selecting the Mark invoiced button.
Printing and emailing
Printing and emailing invoices are actions used to inform your customers that they owe money for this order. When clicking on these buttons, inFlow will automatically mark the sales order as invoiced.

Mark invoiced button
If you want to mark the order as invoiced but don’t need to print or email it, you can click on the down arrow next to Mark paid to select Mark Invoiced.
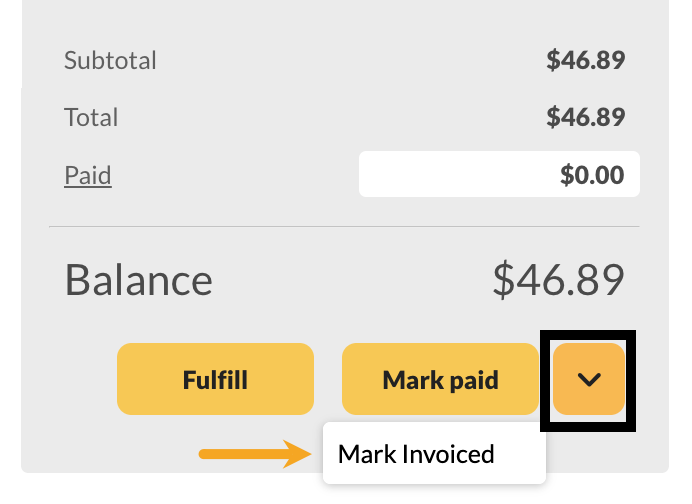
Which transactions will inFlow sales orders be in QuickBooks Online?
Sales orders pushed from inFlow will be created in QuickBooks Online as invoices, credit memos, journal entries, and payment transactions.
| Order/transaction in inFlow | Order/transaction in QuickBooks Online |
|---|---|
| Invoiced unpaid sales orders will be listed as an invoice in QuickBooks Online. | Invoice |
| Payments made on invoiced sales orders that have been pushed to QuickBooks Online. | Payment transactions |
| Refunds on paid sales orders that have been pushed to QuickBooks Online. | Journal entry |
| Unpaid blank sales orders with negative totals that are pushed to QuickBooks Online | credit memo |
New to accounting? Take a look at QuickBooks Online’s common accounting terms to learn more.
Where can I find invoices and other transactions in QuickBooks Online?
When your sales orders are invoiced, partially paid, or paid in inFlow, they can be found in the Sales section of QuickBooks Online (qbo.intuit.com/app/sales.)
You can click on any of the headings in the table to sort the view of your orders. Select Edit or View to look at the invoice.

inFlow’s sales order number will show up as the Invoice number in QuickBooks, making information tracking simple. Payments, refunds, and adjustments will create different line items in your sales transactions list.
inFlow won’t push historical sales orders or quotes to QuickBooks Online. However, changing a historical uninvoiced sales order to invoiced or adding a payment in inFlow will push that order to QuickBooks.
QuickBooks Online’s Audit log is a handy way to see many transactions at once.
Which sales order fields push to QuickBooks Online?
- Customer name
- Customer billing address
- Shipping address
- Invoice/Order date
- Invoice/Order number
- Products/SKUs sold
- Quantity of products purchased
- Payment details
- Payment terms
- Due date
- The subtotal on the sales order
- Freight
- Taxes on the sales order
- Balance left on on sales order
- Sales order remarks
Which fields won’t push to QuickBooks Online?
- P.O #
- Sales rep
- Location of items
- Non-customer costs
- Payments made by credit
- Custom fields
- Requested ship date
- Credits
What customer fields push to QuickBooks Online?
Currently, inFlow only pushes your sales order with QuickBooks, not your customer records. When you save an order in inFlow with a customer that isn’t in QuickBooks, the push will create a new customer profile in QuickBooks, and inFlow will set the following fields:
- Name
- Billing Address
- Shipping Address
- Phone Number
- Currency
Other customer fields will need to be inputted in QuickBooks manually.
After a customer has been initially created, inFlow will not update the customer profile in QuickBooks Online, so if there are any changes, please enter them directly into QuickBooks and inFlow.
How will the products sync to QuickBooks Online?
The way products are pushed to QuickBooks Online will depend on the information available for the product in inFlow and QuickBooks Online. The matching priority happens automatically, but it goes as follows:
- Matching by inFlow SKU to a QuickBooks Online SKU.
- Matching by inFlow Product Name to a QuickBooks Online Product (SKU must be empty in at least one system)
- If there is no match, inFlow will create a new non-inventory product in QuickBooks Online, matching your product name and SKU field (if a SKU exists in inFlow.)
Processing payments
When setting up the inFlow to QuickBooks integration settings, you can choose whether to process payments with the sales order push integration settings or not.
If the Sync payments setting is active, there are three payment options to choose from:
- Push and pull payments
- Push payments
- Pull payments.
Take a look below to learn how you can apply payments for each payment setting.
Push and pull payments
This is a two-way payment sync option. You can process payments in inFlow or QuickBooks online, and the payment will be pushed to the other system for you.

In this example, the payment was made in inFlow and the payment was pushed to QuickBooks Online.
Paying multiple orders/invoices
In inFlow, you can pay for multiple sales orders at once, and the payments will be pushed individually to QuickBooks Online.
When using QuickBooks Online, paying multiple invoices with a single payment isn’t supported. Each invoice must have its own payment.
Push payments
With this payment option, payments can only be made on inFlow sales orders, and the payment information will be sent to the matching QuickBooks Online invoice.
If a payment is added to the QuickBooks Online invoice, inFlow will not receive the payment information on the matching sales order.
Pull payments
With this setting, payments are only added to the QuickBooks Online invoice, and the payment information will be sent to the matching inFlow sales order.
If a payment is added to an inFlow sales order, QuickBooks Online will not receive the payment information on the matching invoice.
How are refunds handled?
With this integration, refunds need to be processed from the sales order in inFlow. How you process the refund changes the transactions that you’ll see in QuickBooks Online.
Refund options:
- Returning/refunding products on an existing paid sales order.
- Returning/refunding products on a blank unpaid sales order.
Returning/refunding products on an existing paid sales order
When processing refunds on sales orders, inFlow will push that information, and QuickBooks will track this in the form of a journal entry.
- To start, process the refund/return in inFlow.
- In QuickBooks, the matching invoice will show the refunded product, and the order total will be updated.
- When you look at your sales transactions you’ll see both the original full payment and a journal entry for the refunded amount.

Returning/refunding products on a blank unpaid sales order
If processing a refund on a blank unpaid sales order, inFlow will push that information, and QuickBooks will track the refund as a QuickBooks credit memo.
- To start, process the refund/return in inFlow.
- In QuickBooks, a (debit) journal entry will be made with an accompanying credit memo with the matching order number will be created with the refunded product and funds.

To learn more about debits and credits, take a look at this QuickBooks Online blog post.
Customer Credits
Credits used in inFlow sales orders cannot be pushed to QuickBooks Online. If you need to issue a credit on a sales order, you will need to manually adjust your invoice in QuickBooks.
This also applies when a customer pays for a sales order with a credit. This information won’t be pushed and needs to be adjusted manually.
If a customer uses credit as payment in either inFlow or QuickBooks Online, the other system will only register a payment without noting that the customer used credit as the payment method.
Because inFlow and QuickBooks Online have different credit systems, both solutions may have different customer and vendor credits that will have to be managed.
Push purchase orders
Now that inFlow and QuickBooks Online are connected, you can start processing purchase orders and pushing them to QuickBooks Online.
How to push purchase orders and inventory value to QuickBooks Online
When a purchase order is fully or partially received, inFlow creates a bill in QuickBooks Online. In addition to sending this information, your inventory value will also be pushed.
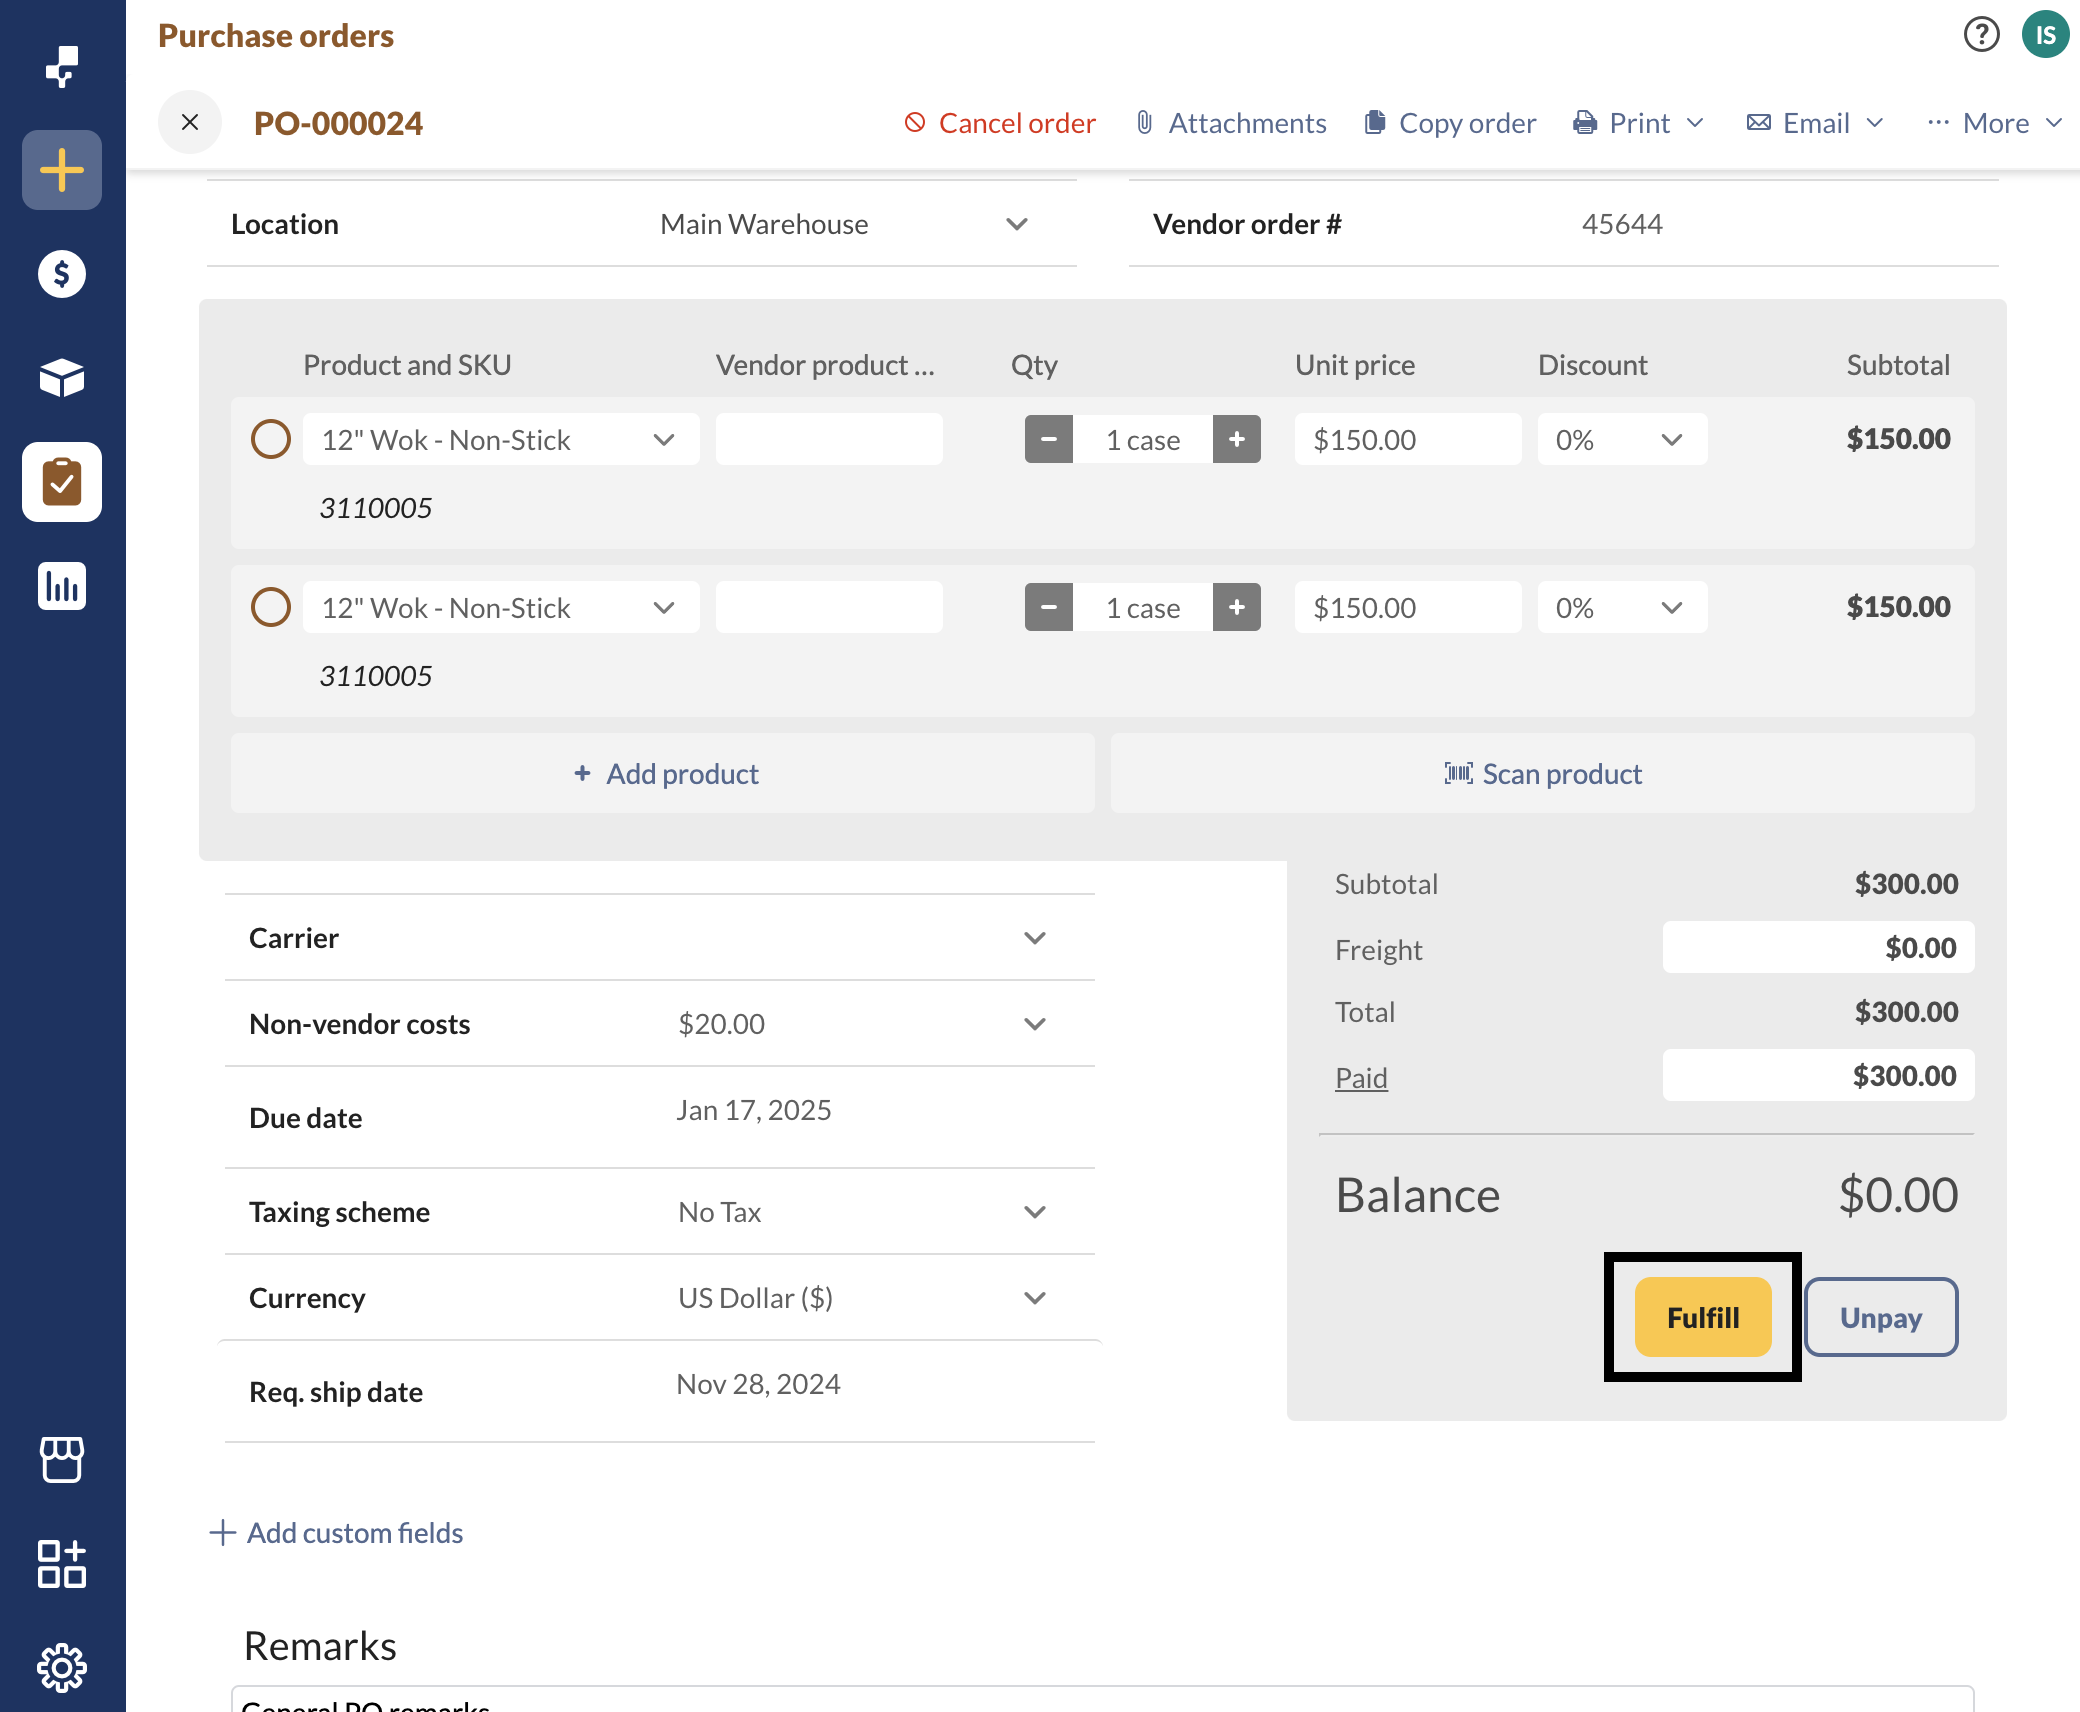
- To push a purchase order, click the fulfill button, or select the go to the Receive tab to partially receive the order.
- Once the purchase order is partially or fully received, it will be sent to QuickBooks Online as a bill.
When a purchase order is unfulfilled and is partially or fully paid in inFlow creates an expense until the purchase order is fulfilled.
Partially received purchase orders
For partially received orders, when the order is pushed to QuickBooks, it will only include items that have been received. As the remaining items are marked as received in inFlow, the same QuickBooks Bill will be updated to include those items.
If you’d like to create separate QuickBooks bills when partially receiving items in inFlow, you’ll need to split the order by received items to create two separate purchase orders in inFlow.
Which purchase order fields are pushed to QuickBooks Online?
- Vendor name
- Purchase order number
- Purchase order date
- Products/SKUs sold
- Quantity of products purchased
- Payment details
- Payment terms
- Due date
- The subtotal on the purchase order
- Balance left on the purchase order
- Freight
- Taxes on the Purchase order
- Purchase order remarks
Which purchase order fields won’t push to QuickBooks Online?
- Vendor billing address (QuickBooks will use the address in the Quickbooks vendor profile)
- Shipping address
- Vendor order #
- Location of items
- Non-Vendor costs
- Credits
- Payments made by credit
- Custom fields
- Requested ship date
Why don’t I see my vendor address in QuickBooks Online?
When inFlow sends vendor information to QuickBooks Online for the first time, it transfers most of the vendor details from inFlow. However, inFlow isn’t able to update vendor records in QuickBooks. If inFlow sends vendor information without an address the first time, that address will stay blank in QuickBooks. You will have to add the address to your vendor records manually.
Pushing total inventory value
inFlow calculates the inventory value by adding up all of the costs of the items you currently have in stock. When a purchase order is pushed from inFlow to QuickBooks, inFlow will update QuickBooks’s inventory asset account with the new inventory value.
As soon as purchase order sync is enabled, inFlow will sync inventory value. It’s important that your inventory value is accurate in inFlow before enabling the sync. Otherwise, the inventory value that is synced to QuickBooks Online will be inaccurate.
To check the current inventory value in inFlow, run the Inventory Details report with “Total Cost Value” selected as a column.
Your total inventory value in inFlow is affected by:
| Purchasing/selling items | If you purchase or sell items, your inventory quantities change and your inventory value will increase or decrease accordingly. |
| Stock adjustments/count sheets | Adjusting your inventory quantities will increase/decrease the inventory value accordingly. |
| Manufacture orders | As you build finished products and use up components, your total inventory quantities will change, which will affect your inventory value. |
| Cost adjustments | When the cost of your items changes, so does the total inventory value. |
How does inFlow push the Cost of Goods Sold?
inFlow calculates the Cost of Goods Sold using a number of factors. When a sales order is marked Fulfilled, inFlow will update QuickBooks’s Cost of Goods Sold account with the Cost of Goods Sold value for that order.
inFlow’s Cost of Goods Sold will update the QuickBooks Cost of Goods Sold account.
Note: if you disable sales order push, the invoice will not be created in QuickBooks, but the Cost of Goods Sold will still be pushed if you have enabled purchase order & inventory value push.
Which transactions will inFlow purchase orders be in QuickBooks Online?
Purchase orders pushed from inFlow will be created in QuickBooks Online as bills and bill payments or expenses if the payment is made on an unreceived purchase order.
To make the inFlow integration available to most of our customers, inFlow creates a bill instead of a purchase order. Purchase orders are available on select QuickBooks Online plans.
| Order/transaction in inFlow | Order/transaction in QuickBooks Online |
| Partially or fully received purchase orders | Bills |
| Payments made on partially or fully received purchase orders that have been pushed to QuickBooks Online | Bill payments |
| Unreceived paid purchase orders | Expense |
| Refunds on partially or fully received purchase orders that have been pushed to QuickBooks | Journal entry |
Where can I find bills and other transactions in QuickBooks?
When purchase orders are partially or fully received, inFlow pushes them as a bill, which you can find in the Expenses section of QuickBooks Online (qbo.intuit.com/app/expenses.)
You can click on any of the headings in the table to sort the view of your orders. Select Edit or View to look at the invoice.

How will the products sync to QuickBooks Online?
The way products sync to QuickBooks Online will depend on the information available for the product in inFlow and QuickBooks Online.
The product matching priority happens automatically, but it goes as follows:
- Matching by inFlow SKU to a QuickBooks Online SKU.
- Matching by inFlow Product Name to a QuickBooks Online Product (SKU must be empty in at least one system)
- If there is no match, inFlow will create a new non-inventory product in QuickBooks Online, matching your product name and SKU field (if a SKU exists in inFlow.)
Processing payments
When setting up the inFlow to QuickBooks integration settings, you can choose whether to process payments with the purchase order push integration settings.
If the Sync payments setting is active, there are three payment options to choose from:
- Push and pull payments
- Push payments
- Pull payments.
Take a look below to learn how you can apply payments for each payment setting.
Push and pull payments
This is a two-way payment sync option. You can process payments in inFlow or QuickBooks online, and the payment will be pushed to the other system for you.
Paying multiple orders/invoices
In inFlow, you can pay for multiple purchase orders at once, and the payments will be pushed to QuickBooks Online.
When using QuickBooks Online, paying multiple bills with a single payment isn’t supported. Each bill must have its own payment.
Push payments
With this payment option, payments can only be made on inFlow purchase orders, and the payment information will be sent to the matching QuickBooks Online bill.
If a payment is added to the QuickBooks Online bill, inFlow will not receive the payment information on the matching purchase order.
Pull payments
With this setting, payments are only added to the QuickBooks Online bill, and the payment information will be sent to the matching inFlow purchase order.
If a payment is added to an inFlow purchase order, QuickBooks Online will not receive the payment information on the matching bill.
Troubleshooting
If you are having trouble using QuickBooks Online with inFlow, go to inFlow’s Integration settings and look at the error messages that are preventing your orders from syncing. (Main Menu > Options > Integrations.)
We currently support QuickBooks Online US, Canada, UK and AUS.
What if the product exists in inFlow but not in QuickBooks Online?
If a product on an order doesn’t exist in QuickBooks Online, inFlow will create the product in QuickBooks Online as a non-inventory item when an invoice/bill is pushed. Depending on which setting you enable, it’ll also fill in either of these checkboxes in QuickBooks Online:
- “I sell this item” and sets the income account for this product to the same one that is mapped in the inFlow setup.
- “I purchase this item” and sets the expense account for this product depending on the inFlow product type:
- stocked products: Inventory Asset account
- non-stocked products: Adjustments / Other Costs account
- service products: Adjustments / Other Costs account
At the moment there isn’t an option for inFlow to push all product information to create new products in QuickBooks Online. New products can only be made when invoices/bills are pushed from inFlow.
Does this sync inventory quantities?
No – the integration only pushes purchase orders, sales orders, total Cost of Goods Sold, and total Inventory value from inFlow to QuickBooks Online.
If I make changes to an order, product, vendor, or customer in QuickBooks Online, will it be updated in inFlow?
No – the integration is one-way. All data is pushed from inFlow to QuickBooks Online (no data gets pushed back from QuickBooks Online to inFlow with the exception of payments with the Push and pull payments option).
Seeing duplicate payments?
Duplicate payments can happen if payments are made directly into inFlow and QuickBooks Online (or another software integration) when the payment settings are set to Push payments. See the steps below to correct this issue.
- Go to the inFlow’s integration settings and click on QuickBooks Online.
- Select Sales orders or Purchase orders and inventory values.
- Under Payment settings select Push and pull payments. This setting makes sure payments stay in sync between inFlow and QuickBooks Online to avoid discrepancies.
- Click Save.
How to create new accounts & make accounts inactive in QuickBooks Online
To connect inFlow with QuickBooks Online, it’s important to have all the right accounts set up in your QuickBooks chart of accounts. Check out the video below for steps on creating a new account and how to make any accounts inactive if you don’t need them anymore.
The inFlow team does not offer official support for QuickBooks Online. For the most current instructions, refer to the QuickBooks Online support center.
Creating a new account
- In QuickBooks Online, click on Settings, then Chart of Accounts.
- Click New, then fill out the fields on this screen.
- Click Save when done.
How to remove an account
- In QuickBooks Online, click on Settings, then Chart of Accounts.
- On the chart of accounts screen, locate the account you want to make inactive, then select the down arrow to the right of the screen and select Make inactive.
- On the confirmation screen, select “Yes, make inactive.”
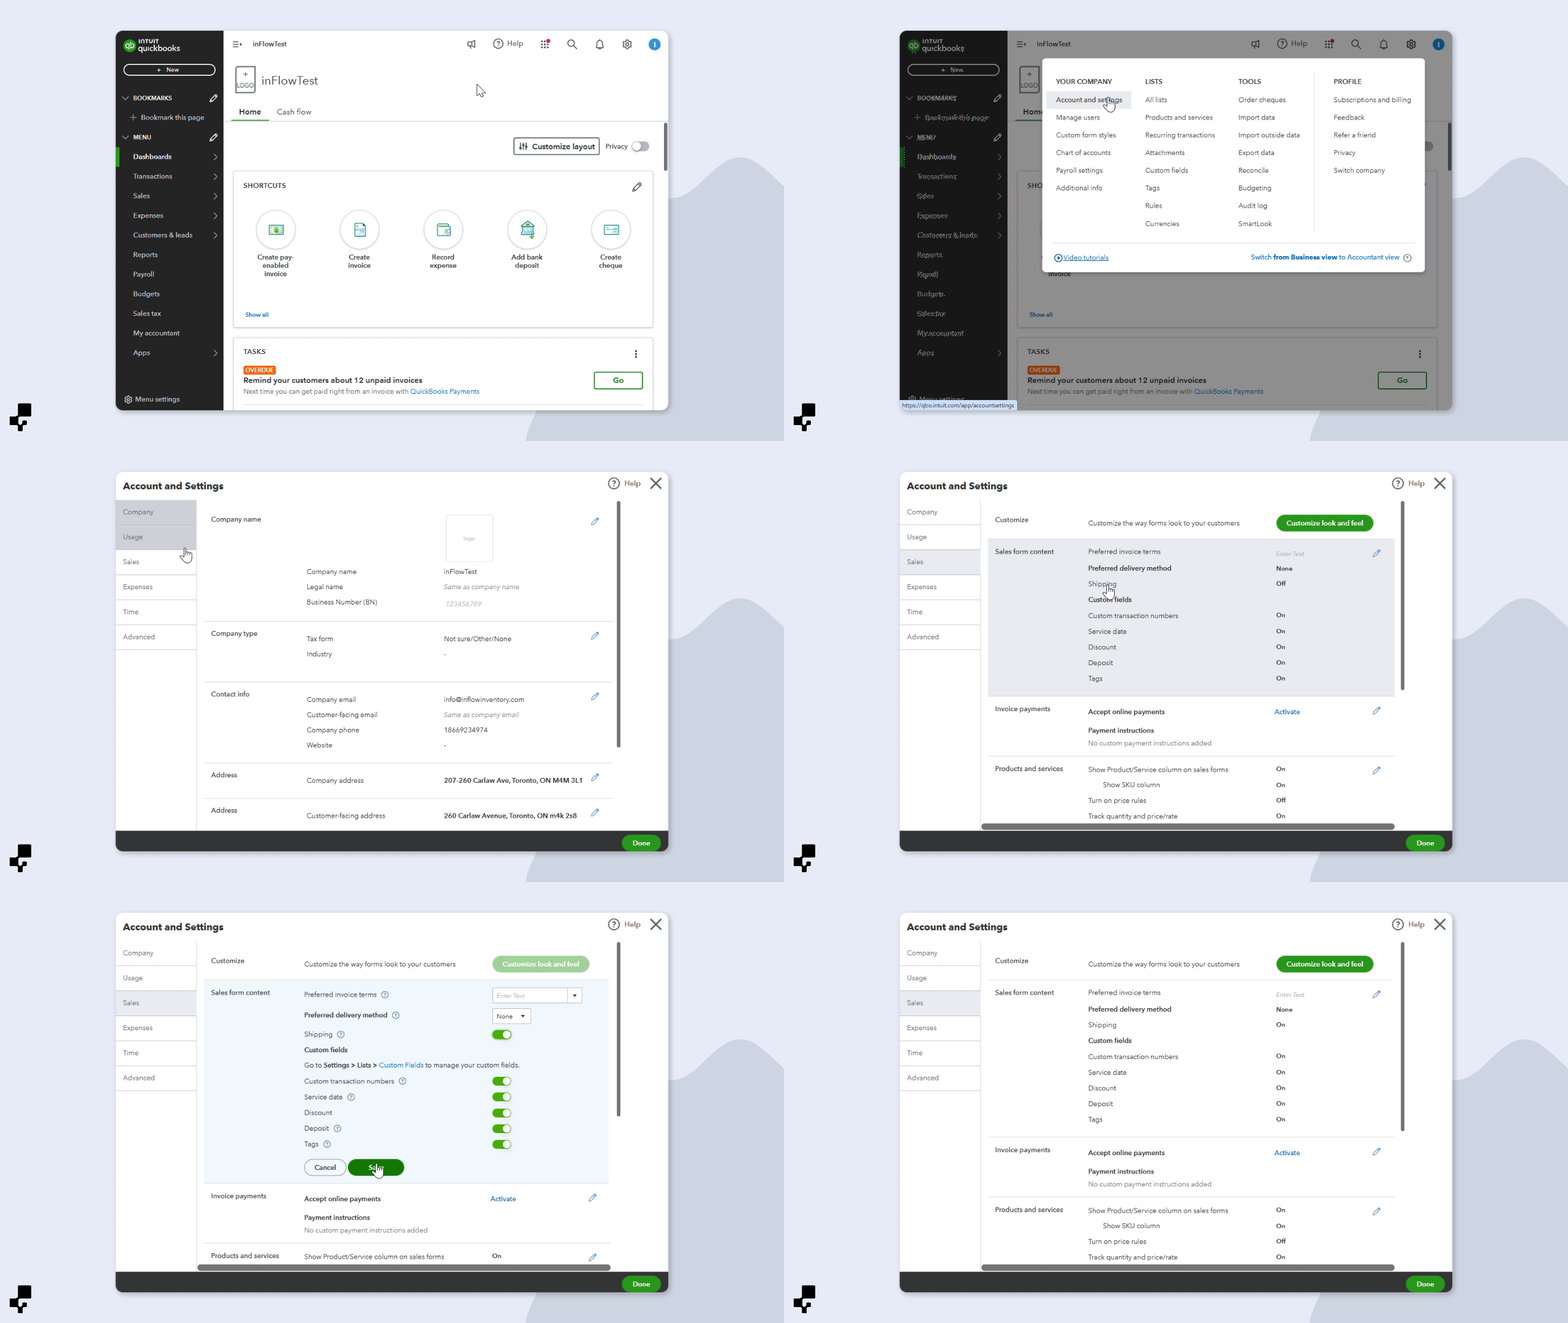
How to enable shipping for sales in QuickBooks Online
- Click on the settings icon > Account and Settings.
- Select the Sales tab.
- In the Sales form content section, select the toggle next to Shipping.
- Click Done.
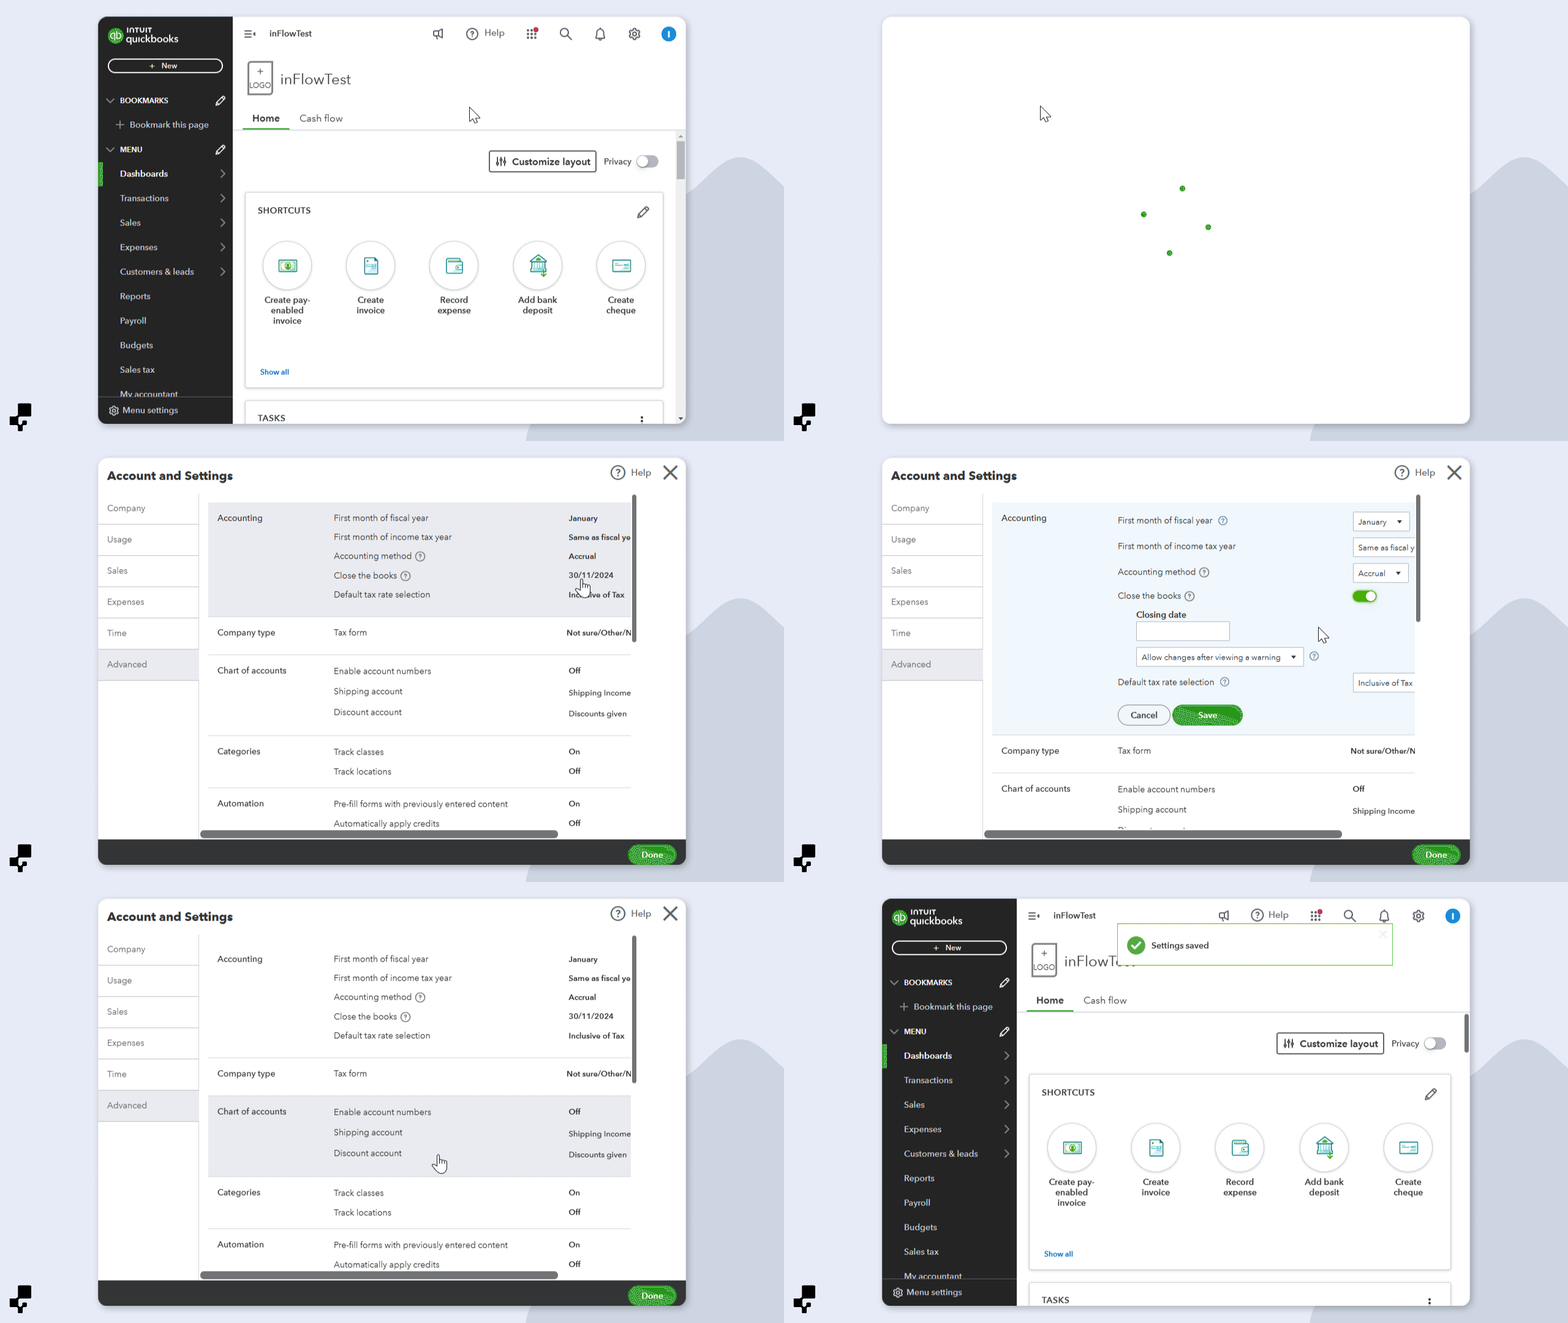
How to set the accounting period in QuickBooks Online
- Click on the Settings icon
- Account and settings, then click on Advanced
- Select the toggle next to Close the books and select the Closing date below.
- Click Save, then click Done.
Common alerts/errors
If you have saved orders in inFlow and you don’t see those orders in QuickBooks Online, check inFlow’s Integrations screen to see what is causing the errors not to sync. You can also look below for common errors and how you can fix them.
Once you have made the changes, click on the Retry all button to sync your orders.
[Product] has different SKUs in inFlow and in QuickBooks Online. The SKU in inFlow is [xxxx], and the SKU in QuickBooks Online is [xyxy].
Reason: inFlow and QuickBooks have the same product, but there are different SKUs.
Solution: Correct the SKU in either inFlow or QuickBooks Online so that the product has the same SKU in both systems.
Customer [Name here] has spaces at the start or end of the name, which QuickBooks Online does not allow. Please remove the extra spaces and try again.
Reason: An extra space at the end of the customer name prevents the order from being pushed to QuickBooks Online.
Solution: Go to the customer profile, remove the extra space, and save the customer record. When you’re done, click the Retry button.
Business Validation Error: Enter a transaction amount to continue.
Reason: This can happen when multiple transactions make changes to the same accounts receivable/accounts payable account (saving an order multiple times or multiple edits).
Solution: Check if the inFlow order has created a matching invoice/bill in QuickBooks Online. If it has, and payments/changes also push to QuickBooks Online, then you can click the Dismiss button from inFlow’s Integration settings.
The QuickBooks Online payment must have only one invoice/bill selected.
Reason: Multiple invoices/bills were paid at the same time in QuickBooks Online.
Solution: Remove the bulk payment in QuickBooks Online and process payments on the outstanding invoices/bills individually.
Product/Service assigned to this transaction has been deleted. Before you can modify this transaction, you must restore [Product name]
Reason: The product on this inFlow sales order has been deleted or marked inactive in QuickBooks Online.
Solution: Log into QuickBooks Online and make this product active/available in order to sync this sales order.
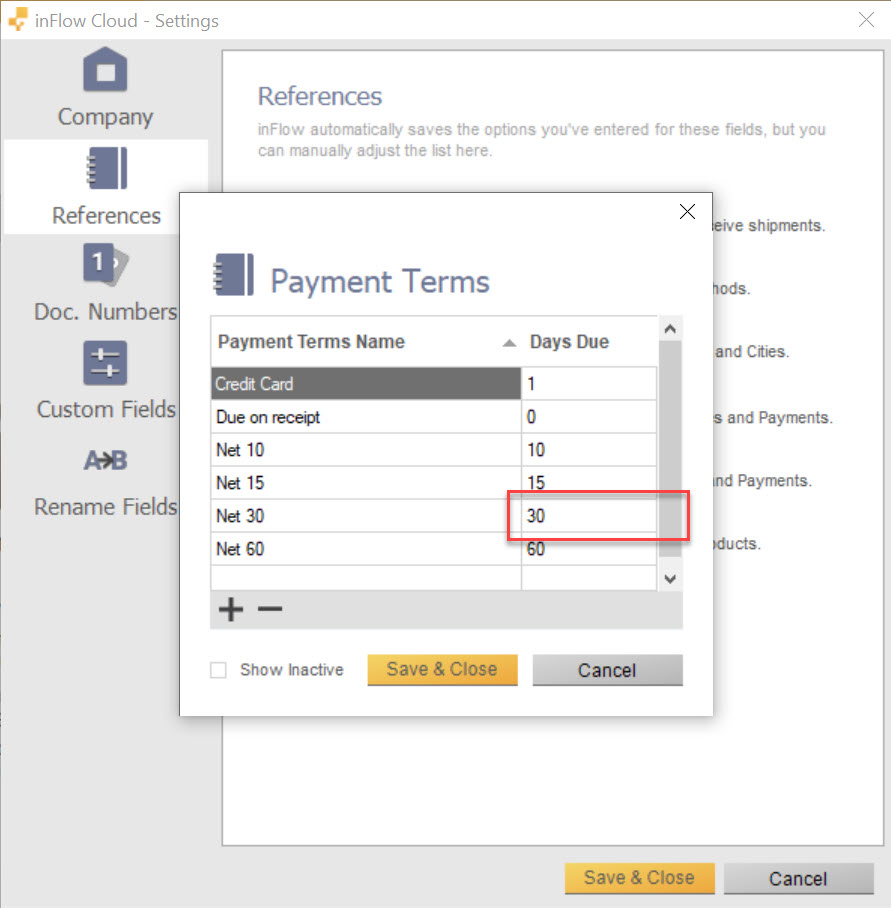
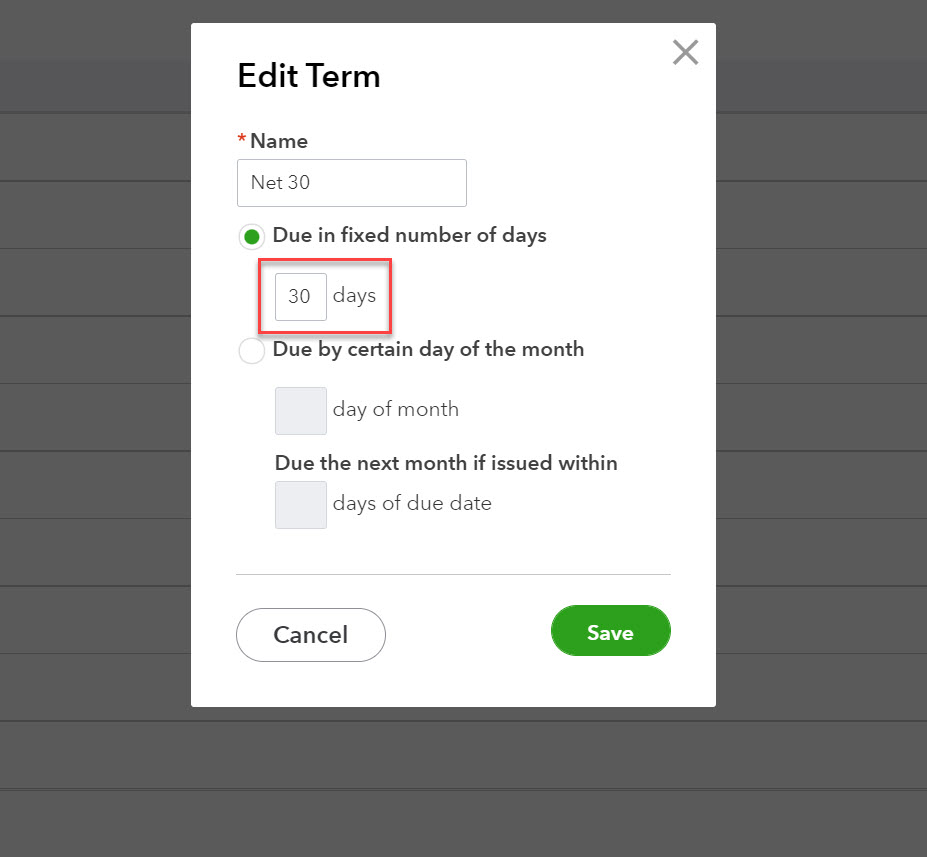
The “[Name]” Payment Term details in inFlow and QuickBooks don’t match
Reason: The Days Due in inFlow and QuickBooks are different.
Solution: in the inFlow Windows App check the Days Due by going to
- Main Menu>Options>Settings>References>Payment Terms (Windows.) Or go to the inFlow Order settings and click on Payment terms (Web.)
- Besides the terms that aren’t syncing, check the Days Due. Now in QuickBooks, go to Settings>All lists>Terms>Click edit beside the term you just checked for in inFlow that the Days Due match. If they don’t update them too.
The name supplied already exists. : Id=X
1. This is a generic QuickBooks Online error that may be caused by a vendor with the same name as a customer (QuickBooks Online doesn’t allow this).
Solution: Check if you have a customer or vendor in QuickBooks Online with the same name as the customer or vendor on the order you’re trying to sync. If you do, QuickBooks Online recommends adding an indication to the names so it can handle them as two different entries: E.g., DebraC (C for customer) and DebraV (V for vendor).
2. This error can also occur if the Product name, Customer name, Categories, or Payment Terms have extra spaces in between or after them.
Solution: Please check your Product List/Customer/Vendor in inFlow and see if you can find that extra space at the end of the name. Once found, remove it save the product/customer/vendor, and retry the error.
If there are several products in the same order, you can check it also through an export. If there are extra spaces, please remove them and import the products back again with the updated CSV file (of course, you could also do the same process manually in every product on your account). The system should recognize the changes, and you can then retry the error on the Integration page.
3. There are some characters that QuickBooks does not accept. For example, product names containing the colon “: ” will cause this error.
Solution: Go through the Product names, Customer names, and Categories to see if there are characters other than the accepted ones listed by QuickBooks Online.
The name supplied already exists. : Another product or service is already using this name. Please use a different name.
Reason: If a product on your inFlow order has a different name than the product in QuickBooks Online, e.g., there is an extra “space” at the end of the name like “Apple ” vs. “Apple,” QuickBooks Online reads it as a different product.
Solution: check the product in the affected sales order in inFlow to see if there is an extra “space” at the end of the product name.
The name supplied already exists. : Another customer, supplier, or employee is already using this name. Please use a different name.
Reason: If a customer name in inFlow is different from the name in QuickBooks Online. e.g., the customer name in inFlow has an extra “space” at the end of it, like “John” vs “John “, QuickBooks Online reads it as a different customer.
Solution: check the customer in the affected sales orders in inFlow to see if there is an extra space at the end of the customer name.
Business Validation Error: You must set a transaction amount.
Reason: This error appears whenever there is a payment entry for either a Sales Order or Purchase Order with the value of 0 as the payment amount/amount applied.
Solution: On the order page, click on Paid, and on the Payment Details page, then delete that row. After that, you can retry the error on the Integration page, and the error should disappear.
Element contains invalid characters.
Reason: This error means you have an invalid character either in your company name, Customers, Suppliers, Products and Services, or the Chart of Accounts.
Solution: Please check and remove any special characters. You can check for QuickBooks Online acceptable characters here.
String length specified does not match the supported length.
Reason: Some fields have limited character lengths in QuickBooks but no limit in inFlow. If there is a field on the inFlow order that has reached the character limit for the matching field in QuickBooks Online, the sync will fail.
Solution: The error will specify a field’s character limit in QuickBooks (there is a list of their fields and character limits here). Check the corresponding field in inFlow to see that it hasn’t exceeded this character limit.
Object Not Found: Something you’re trying to use has been made inactive. Check the fields with accounts, customers, items, vendors or employees.
Reason: There’s a customer, product, or vendor on the order that has been deactivated in QuickBooks Online.
Solution: check to see if the customer or product in the affected sales order in inFlow has been deactivated in QuickBooks Online and then reactivate them before retrying the sync.
Business Validation Error: You are not allowed to modify the quantity of an inactive stock item.
Reason: A product or service on the inFlow order is inactive in QuickBooks.
Solution: Check that the products or services that are on the inFlow order are not deactivated in QuickBooks Online and activate them if necessary. You can find more details here.
Invalid account type: You can’t associate a product or service with accounts of certain types (such as Accounts Receivable and Accounts Payable). If the product or service is something you sell, use an income account. If the product or service is something you buy, use an expense account.
Reason: Products inside of QuickBooks have an account associated with them. An item on the affected order has an account associated with it that is not allowed.
Solution: Check the accounts that are set up for the items on the affected order in QuickBooks Online. The accounts should be set up as income and/or expense accounts (depending on if it’s a sales order or a purchase order). Here’s how you can change the account associated.
This transaction has been deposited. If you want to change or delete it, you must edit the deposit it appears on and remove it first.
Reason: This error may be due to an inFlow sales order that had previously synced with QuickBooks Online, and the payment was marked as deposited, but the payment was updated in inFlow after the initial sync to QuickBooks Online.
Solution: remove the payment deposit in QuickBooks Online or click “dismiss” on the error in the Cloud integration page to clear it.
Email Address does not conform to the syntax rules of RFC822.
Reason: There are issues with the syntax/format of the email in question. (e.g., extra white spaces or rouge symbols like “,com” instead of “.com”)
Solution: check the specific sales order, and look at the email of that order to see if there are any obvious extra spaces or incorrect email symbols. (easier to see on the Windows application)
Product has a duplicate SKU in QuickBooks Online.
Reason: QuickBooks Online allows different products to have the same SKU, while inFlow does not. When a sales order is pushed to QuickBooks Online, inFlow will look at items on the order to see if they already exist in QuickBooks Online by matching the SKU in both programs first. If you have more than one product with the same SKU in QuickBooks Online, inFlow doesn’t know which product it should match. Instead, it will match the first product in QuickBooks Online that has the corresponding SKU, which may be incorrect.
Solution: Check QuickBooks Online to see what items have the same SKU as the one in the inFlow error. Make sure that you don’t have duplicate SKUs in QuickBooks Online. You will also need to correct any sales orders that were pushed to QuickBooks Online with the item listed in the error and swap out the incorrect product for the intended one.
Business Validation Error: there is no account associated with “[Product name]”. Is it marked for purchase, and has an account associated with it?
Reason: QuickBooks Online requires confirmation that the product or service is allowed to be sold or purchased.
Solution: Go to the item’s settings in QuickBooks Online and make sure the item is marked for sale and/or purchase. You can do this by checking the appropriate box: “I purchase this product/service from a supplier” and/or “I sell this product/service to my customers” in the item’s settings.
Transactions with inventory (QOH) products cant be dated earlier than the Inventory Start Date for the product.
Reason: Only Inventory type items in QBO have an Inventory Start Date. This means that some items on the sales order are set as Inventory type in QuickBooks Online.
Solution: You’ll need to delete the original item in QBO (mark it as inactive), then click Retry on the error in inFlow. This should prompt inFlow to create a new version of the item in QuickBooks Online automatically.
You can only use one foreign currency per transaction.
1. Sales order: QuickBooks Online only allows one currency per customer. If a customer already has transactions in a specific currency (e.g., USD), you won’t be able to push transactions in a different currency (e.g., CAD) for that same customer—and vice versa.
Solution: Make sure each customer only has transactions in one currency. If you need to work with a different currency, you’ll need to create a new customer in both inFlow and QBO with the correct currency.
2. Purchase order: This error can happen when a vendor in inFlow has a currency different from your default QBO currency (e.g., EUR, GBP), but multi-currency wasn’t enabled in QuickBooks Online at the time of sync. As a result, QBO creates the vendor and their bills using the default currency (e.g., USD).
Later, if multi-currency is enabled in QBO, inFlow will try to push new orders using the vendor’s actual currency—but QBO doesn’t allow changing a vendor’s currency after they’re created.
Solution: Create a new vendor in both inFlow and QuickBooks Online using the correct currency. This new vendor should be used for all future transactions, and syncing should work without issues.
Change this transaction currency to match what you use for your accounts receivable and accounts payable.
Reason: In inFlow, you can create sales or purchase orders for the same customer or vendor in different currencies. However, QuickBooks Online doesn’t support this — each customer or vendor can only be set up with one currency in QBO.
Solution: You’ll need to make sure that each customer or vendor in inFlow uses only one currency for all their orders. That currency should match the one set for them in QBO. If you need to use a different currency with a customer or vendor, please create a new customer or vendor record for that specific currency. This way, each one will have only one currency assigned to it, as required by QBO.
Invalid Reference Id : An item in this transaction is set up as a category instead of a product or service.
Reason: This error shows up when an invoice/bill in inFlow tries to sync to QuickBooks Online, but one or more of the item names on the invoice/bill matches a Category type in QBO.
In other words, the item is being used as a regular product/service in inFlow, but in QBO it’s set up as a Product or Service Category, not an actual item. For example, if you’ve set up a category in QBO called “Delivery”, you can’t also use “Delivery” as a line item on an inFlow invoice/bill — QBO won’t accept it.
Solution: Double-check your Product and Service categories in QuickBooks Online, and compare them to the item names on your inFlow invoice. If you spot a category name that matches an item name on your invoice/bill, you have two options:
Option 1: Go to inFlow and rename the item to something slightly different (e.g., add a letter or number).
Option 2: Rename the category in QBO instead.
Parent Reference Invalid : Select a category.
Reason: This error likely appears because one or more of the items on the invoice or bill in inFlow is not assigned to any category in QuickBooks Online.
Solution: Check each item from the invoice or bill in inFlow and make sure that all of them are assigned to a category in QBO.
Business Validation Error: You need to activate this item before updating the quantity.
1. This error can happen if the item in inFlow is trying to sync with a product in QuickBooks Online that has been deactivated.
Solution: Check if the item in QBO is deactivated. If it is, reactivate it and then try syncing again.
2. It can also happen if multiple items in QBO have the same name or SKU, but with different types (Inventory and Non-Inventory). This confuses the sync, and inFlow may try to match to the wrong one.
Solution: If the item isn’t deactivated, check for any other items in QBO with the same name or SKU. If there are duplicates, rename them slightly so inFlow can match the correct one during the sync.
No matching A/P account found for currency of this Purchase Order.
Reason: QuickBooks Online creates a foreign currency Accounts Payable (AP) account only after a bill is created in that currency. In inFlow, a bill is sent to QBO only when the order is fulfilled or partially fulfilled. So, if nothing has been received yet, the bill won’t be created, and the AP account won’t exist in QBO.
Solution: You have two options:
Option 1: Partially fulfill the order in inFlow (e.g., receive one or two items). This will trigger the bill to be created in QBO, and the AP account will be set up automatically.
Option 2: Manually create a bill in QBO using that vendor and the correct currency. This also forces QBO to create the AP account for that currency.
The account period has closed. Txn Date=xx/xx/xxxx is before book closing date=xx/xx/xxxx
Reason: This error appears when an invoice you’re trying to sync from inFlow has a date that falls within a closed accounting period in QuickBooks Online. QBO doesn’t allow changes in periods that are already closed.
Solution: You’ll need to temporarily reopen the closed period in QBO so the transaction can sync. After syncing, you can re-enter the closing date to close the books again. You can find the steps on how to reopen the closing period in QuickBooks Online here: How to set the accounting period in QuickBooks Online.
QuickBooks Online bill payment must have only one bill selected. Your inFlow payment still exists, if you need to remove it, please do so manually
OR
QuickBooks Online payment must have only one invoice selected. Your inFlow payment still exists, if you need to remove it, please do so manually
1. This error can occur if a payment originally pushed from inFlow is edited in QuickBooks Online and applied to multiple invoices or bills, or if the payment was directly applied in QBO to multiple invoices or bills. inFlow only supports payments linked to one invoice or bill at a time, so syncing will fail if the payment is spread across more than one.
Solution: To fix this, go to QBO and edit the payment so that it’s applied to only one invoice or bill.
1. It can also happen if you refund an invoice in full. This brings the invoice total to $0 in QBO, and any linked payments become unapplied, which can also trigger the error.
Solution: Please double-check for any discrepancies between the invoices or bills in QuickBooks Online and inFlow. If anything is missing, manually adjust the payments. If everything looks correct, you can safely dismiss the error.
Business Validation Error: Not a valid product or service name. Names must have at least one character and cannot include tabs, newlines or ‘:’.
Reason: This error usually occurs when one or more of your items in inFlow have disallowed characters (such as ‘:’) in their names.
Solution: Go to the orders with errors and check the names of all the items. If you find an item with a colon ‘:’ in its name, go to that item in inFlow and update its name. Avoid using ‘:’ in the item’s name when syncing with QBO.
The customer you have specified has been deleted. You cannot create or edit a transaction with a deleted customer.
Reason: This error occurs when the customer associated with the order has been deactivated or merged with another customer in QuickBooks Online
Solution: Check for any merged or deleted customers in QBO and reactivate them. After reactivating, retry the sync.
Note: If the customer was merged, the reactivated customer will not have any transaction history.
Business Validation Error: Select an account for this transaction.
Reason: This error is likely caused by some accounts not being mapped in the integration settings (for example, “Payments (Credit Card)” account) for both sales and purchase orders.
Solution: Go to the QBO settings on the Integrations page in inFlow. Ensure that all accounts are properly mapped and that no fields are left empty — each should have an account assigned.
Tax Inclusive transactions are not supported In US QuickBooks editions.
Reason: This error can occur if the pricing scheme (for sales orders) or vendor (for purchase orders) is set to tax inclusive in inFlow.
Solution: Check the pricing scheme (sales) or vendor (purchase) settings in inFlow and make sure the tax inclusive option is disabled. If clicking the Retry button doesn’t push the order to QBO, follow these steps:
For Sales Orders:
- Open the sales order linked to the error.
- Change the pricing scheme to a different one.
- Save the changes.
- Change the pricing scheme back to the correct one.
- Save again.
- If needed, click Retry on the Integrations page.
For Purchase Orders:
- Open the purchase order linked to the error.
- Change the vendor to a different one.
- Save the changes.
- Change the vendor back to the correct one.
- Save again.
- If needed, click Retry on the Integrations page.
Sales Shipping is disabled in QuickBooks but specified in the inFlow transaction.
Reason: QuickBooks Online needs to have Shipping enabled so shipping information can be synced from inFlow to QuickBooks Online.
Solution: In QuickBooks Online, find the cogwheel on the top right. Click Account and Settings. Click Sales on the left bar. Edit the Sales form content section so that the Shipping setting is on.

QuickBooks Online can’t connect
If too many sales orders are saved in inFlow at the same time (for example, while importing sales orders), you may get an error saying: “Cannot connect to “QuickBooks Online at the moment.” This error will also be accompanied by a red exclamation mark on the top right-hand corner of the QuickBooks Online image and a warning on the inFlow for Windows app.
Don’t panic! QuickBooks Online has a system that prevents too many orders from being synced at once, so your orders are still able to sync. You’ll just need to wait a little, then click the Retry all button to sync again.
If the Retry all option doesn’t work, please contact the inFlow team so we can further assist you.

0 Comments