Shipping with EasyPost and inFlow
Have you just made a sale and want to ship your products right away? By shipping with EasyPost, you can purchase and print shipping labels from within inFlow!
EasyPost is a quick and easy way to manage your shipping carriers in one place and then purchase shipping labels directly from inFlow.
Setup
Signing up and using EasyPost is free. However, monthly or yearly charges will occur if your company does volume shipping (more than 36,000 labels per year). See the EasyPost website for details.
Shipping Setup
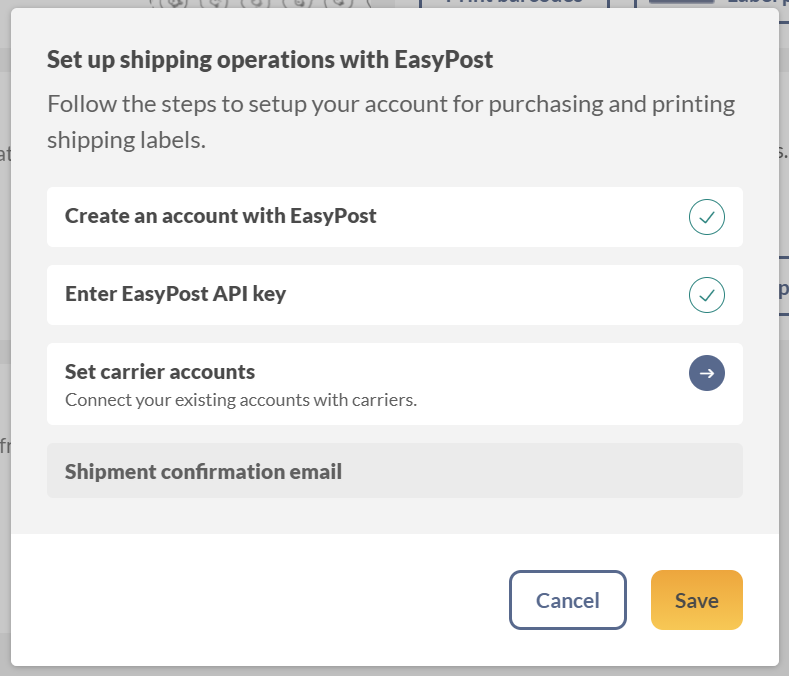
You will need an EasyPost account (it’s free). This setup will walk you through creating and connecting your EasyPost account.
- Log in to your inFlow account.
- In the Main Menu, hover over the settings icon, then click Options.
- Select Shipping.
- Click Set up to begin.
Setup
- Click Create an account with EasyPost. This will open EasyPost’s website in a new tab. Log in to EasyPost at the top right if you already have an account. Otherwise, sign up for a free account on this page.
- After you’ve signed up or logged into your EasyPost account, click Account Settings, then API Keys. You’ll have 2 options here. Copy the chosen key depending on whether you want to test the connection or start using it fully.
- Test API Key. This test key will connect your EasyPost account but will only generate VOIDED labels at no charge. Use this key for testing the connection and see how rates and labels will look inside inFlow.
- Production API Key. This key fully connects you to your EasyPost account and will allow you to start purchasing valid labels right away.
- When you’ve copied the key you want, return to the inFlow Inventory tab. Click Enter EasyPost API key.
- Paste the copied key into the API key text box. Click Connect. Once you see EasyPost API connected, click Next at the bottom of the window.
Note: You should see Test API key if using the test key or Connected if using the Production API key. - Click Next when finished.
- Click Complete setup.
Optional settings
- Click Set carrier accounts. From here, you can open your EasyPost carriers page and add the companies you wish to ship with. No changes are needed inside inFlow, so when you’re done, hit Next.
- Click Shipment confirmation email. Here you can configure sending email confirmations to your customers when the shipping company picks up the parcel (On, by default) and if you would like that email to be copied to another email address.
- Toggle On or Off Send shipment confirmation email.
- Toggle On or Off Send a copy of confirmation emails
- If turned on, enter the email address you would like copied. Multiple emails can be added by separating each email address with a comma.
Your EasyPost connection is complete, and you can start creating shipping labels! There are a few more options you can explore at this time if you’d like. If so, click on Explore Settings. Otherwise, you can revisit these additional settings at any time by returning to this Shipping option.
Additional Settings
Now that you have inFlow connected with your EasyPost account, you can set up a few more settings to make purchasing shipping labels easier.
Please note, that clicking the left arrow at the top left of the settings window at any time will save the current settings you have entered and return you to the previous settings page. Clicking Save or Done buttons at the bottom right will save your settings and close the window.
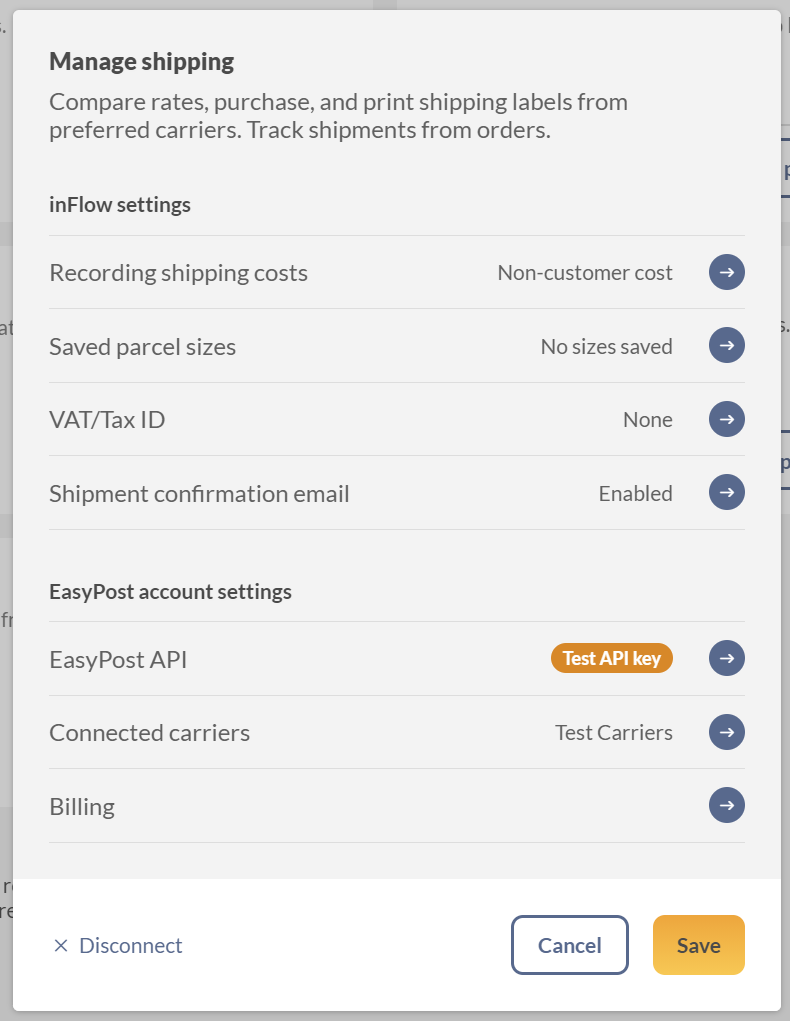
From this window, you can modify the following:
Recording shipping costs – Set how to record shipping costs in your sales order and invoices in inFlow. Options:
Don’t record (default) – Shipping costs won’t be recorded on the sales orders.
Non-customer cost (recommended) – The shipping costs will not affect the sales order subtotal but will be placed in the non-customer cost field on sales orders. This is recommended because it will easily allow you to track how much is spent on shipping without showing these values to the customer.
Freight – The shipping costs will affect the sales order subtotal and be recorded in the freight field on sales orders.
Saved parcel sizes – This allows you to save preset parcel/box sizes for commonly used dimensions. This may make purchasing labels faster as you can select any of the existing box sizes.
To save a new parcel size:
- Click Add saved size.
- Enter a name, length, width, and height.
- Choose whether it is recorded in cm or in
- Click on Save size.
VAT/Tax ID – If you ship internationally, you are required to have either a VAT or Tax ID. This allows you to enter or modify it here, so it will be prefilled when purchasing labels.
Shipment confirmation email – Allows you to notify customers when their order is on its way. A confirmation email is sent when the parcel is picked up by the carrier (by default). You can also choose if you would like to copy any other email addresses on these confirmation emails. If adding multiple email addresses, separate them with a comma.
The following three options are related to your EasyPost account and require you to log in to your EasyPost account.
EasyPost API key – lets you change what API key you have entered, connecting inFlow to EasyPost.
Connected carriers – Shows a list of the carriers that are connected to your EasyPost account. If you would like to add more, navigate to your EasyPost account, choose the carrier that you would like to add, and log into your account right from EasyPost. When you add a new account, inFlow will automatically display it.
Billing – All label purchases are handled directly from the carrier themselves through your carrier-specific accounts (i.e. FedEx, Purolator, UPS, etc.). However, if you are using EasyPost’s USPS negotiated rates, purchasing insurance from EasyPost, or receiving alerts for overage fees, you will need to set up your billing account in EasyPost directly. Follow the link and instructions here.
Web
Buying a Label
As long as shipping is enabled on your Sales Order and EasyPost is connected, inFlow will automatically bring up the label purchase screen when you fulfill your order. If you don’t need to purchase a label for any reason, you can click “Skip, no label needed” to proceed without purchasing a label, and the item will be shipped via a manual shipment line.
Wherever possible, inFlow will try to pre-populate the form with as much information as possible. This includes things like addresses, product names and descriptions, weight, value, etc.
For more detailed steps, follow below:
- Connect your EasyPost account to inFlow by adding your API key in the shipping settings.
- Create a sales order and ensure that shipping is enabled.
- There are two main ways to purchase a label.
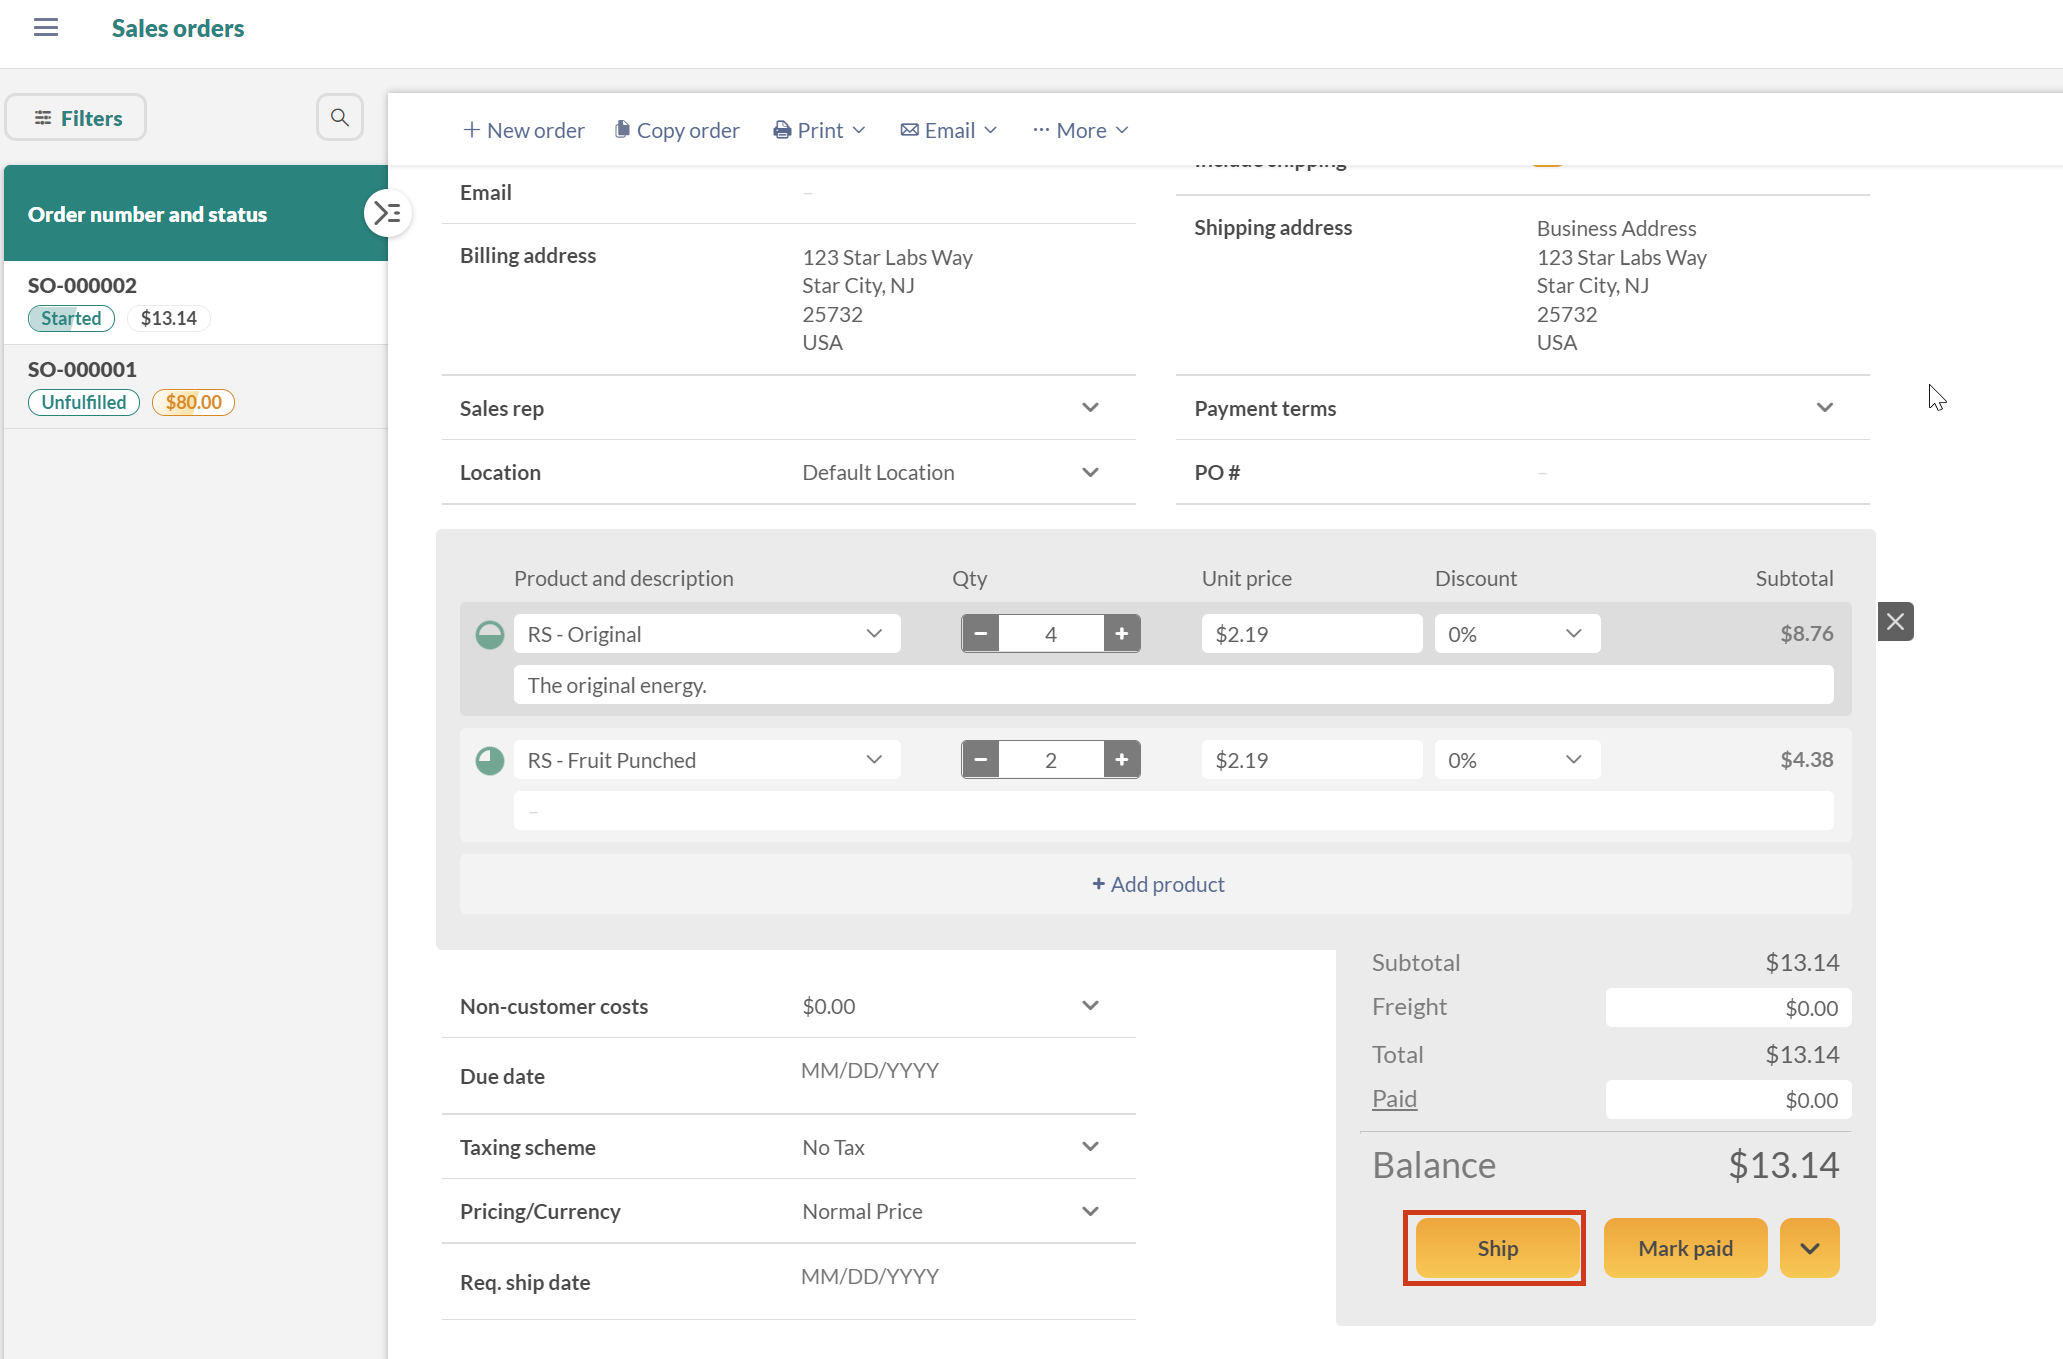
- Click Fulfill on the sales order, which will automatically bring up the label purchase screen.
- Or enter the items in the Pick tab and the Ship tab of the sales order, then click the Ship it button beside the items on the Ship tab.
- You will now see the Shipment Details window.
Shipment Details screen
- Ensure that there is both a Shipping to and Shipping from address. If you need to modify either of these, click Edit and enter the information as needed.
- Toggle whether a signature is required for delivery.
- Enter the parcel weight, and you can choose either kg or lbs.
- Choose the parcel size either by selecting a pre-existing saved size if you have created it or by entering the length, width, and height of the parcel. You have the option to save these sizes from this screen if you so choose. Click Save parcel size, enter a name, length, width, and height for the saved parcel, and click the Save button before proceeding.
- Click the Next button to continue.
Shipment Customs screen
- If customs is required for your item, toggle the Customs required for this shipment either on or off. If no customs are required, toggle Off and hit Next to continue to the Rates screen. If On, continue filling out the form.
- Select a Contents Type.
- Add a description of the contents.
- Select if there are any restrictions for the items.
- Enter the value for each item in the box, including Country of Origin, total weight, HS Code, and value.
- Fill in the EEL / PFC field (sometimes also known as AES / ITN). This value is required for some international shipments.
- If shipping from the US and the total value of goods is less than $2,500, inFlow automatically will use the code “NOEEI 30.37(a)”.
- If shipping from the US and goods are more than $2,500, you will need to apply for a number via the ACE AESDirect website.
- If shipping from outside the US, please follow your country’s specific exporting/importing rules.
- Set the Tax and duty payment terms.
- Choose what should happen to the parcel if it cannot be delivered.
- Read and check the certification checkmark at the bottom and enter your name in the Certified by field.
- Click the Next button to continue.
Shipment Rates screen
- You will be shown a list of available carriers and their rates based on the information you entered previously. Select the carrier and rate you would like to continue with.
- You can filter the results to only specific carriers by pressing the checkboxes on the left-hand side or arrange the list by price or shipping priority with the toggle at the top right.
- Click Next to continue.
Review & Purchase Label screen
This screen shows a summary of all the information entered for this label. Review and edit any information as needed, and if the sales order is in USD and under $5,000 USD in value, you can choose to purchase insurance on the parcel.
When satisfied with all the information, click the Purchase Label button.
You’ll see a summary screen with the tracking information and be able to choose the label size: either 8.5 in x 11 on standard paper or 4 in x 6 on A6 paper/labels.
Once you are finished, click “Done”.
What if I need more than one box per sales order? Purchasing multiple shipping labels.
On the Ship tab, make sure to enter the same corresponding box number on each product that is going in the same box. For example, you may have 1 case of Pepsi in box 1 and 1 case of Coke in box 2.
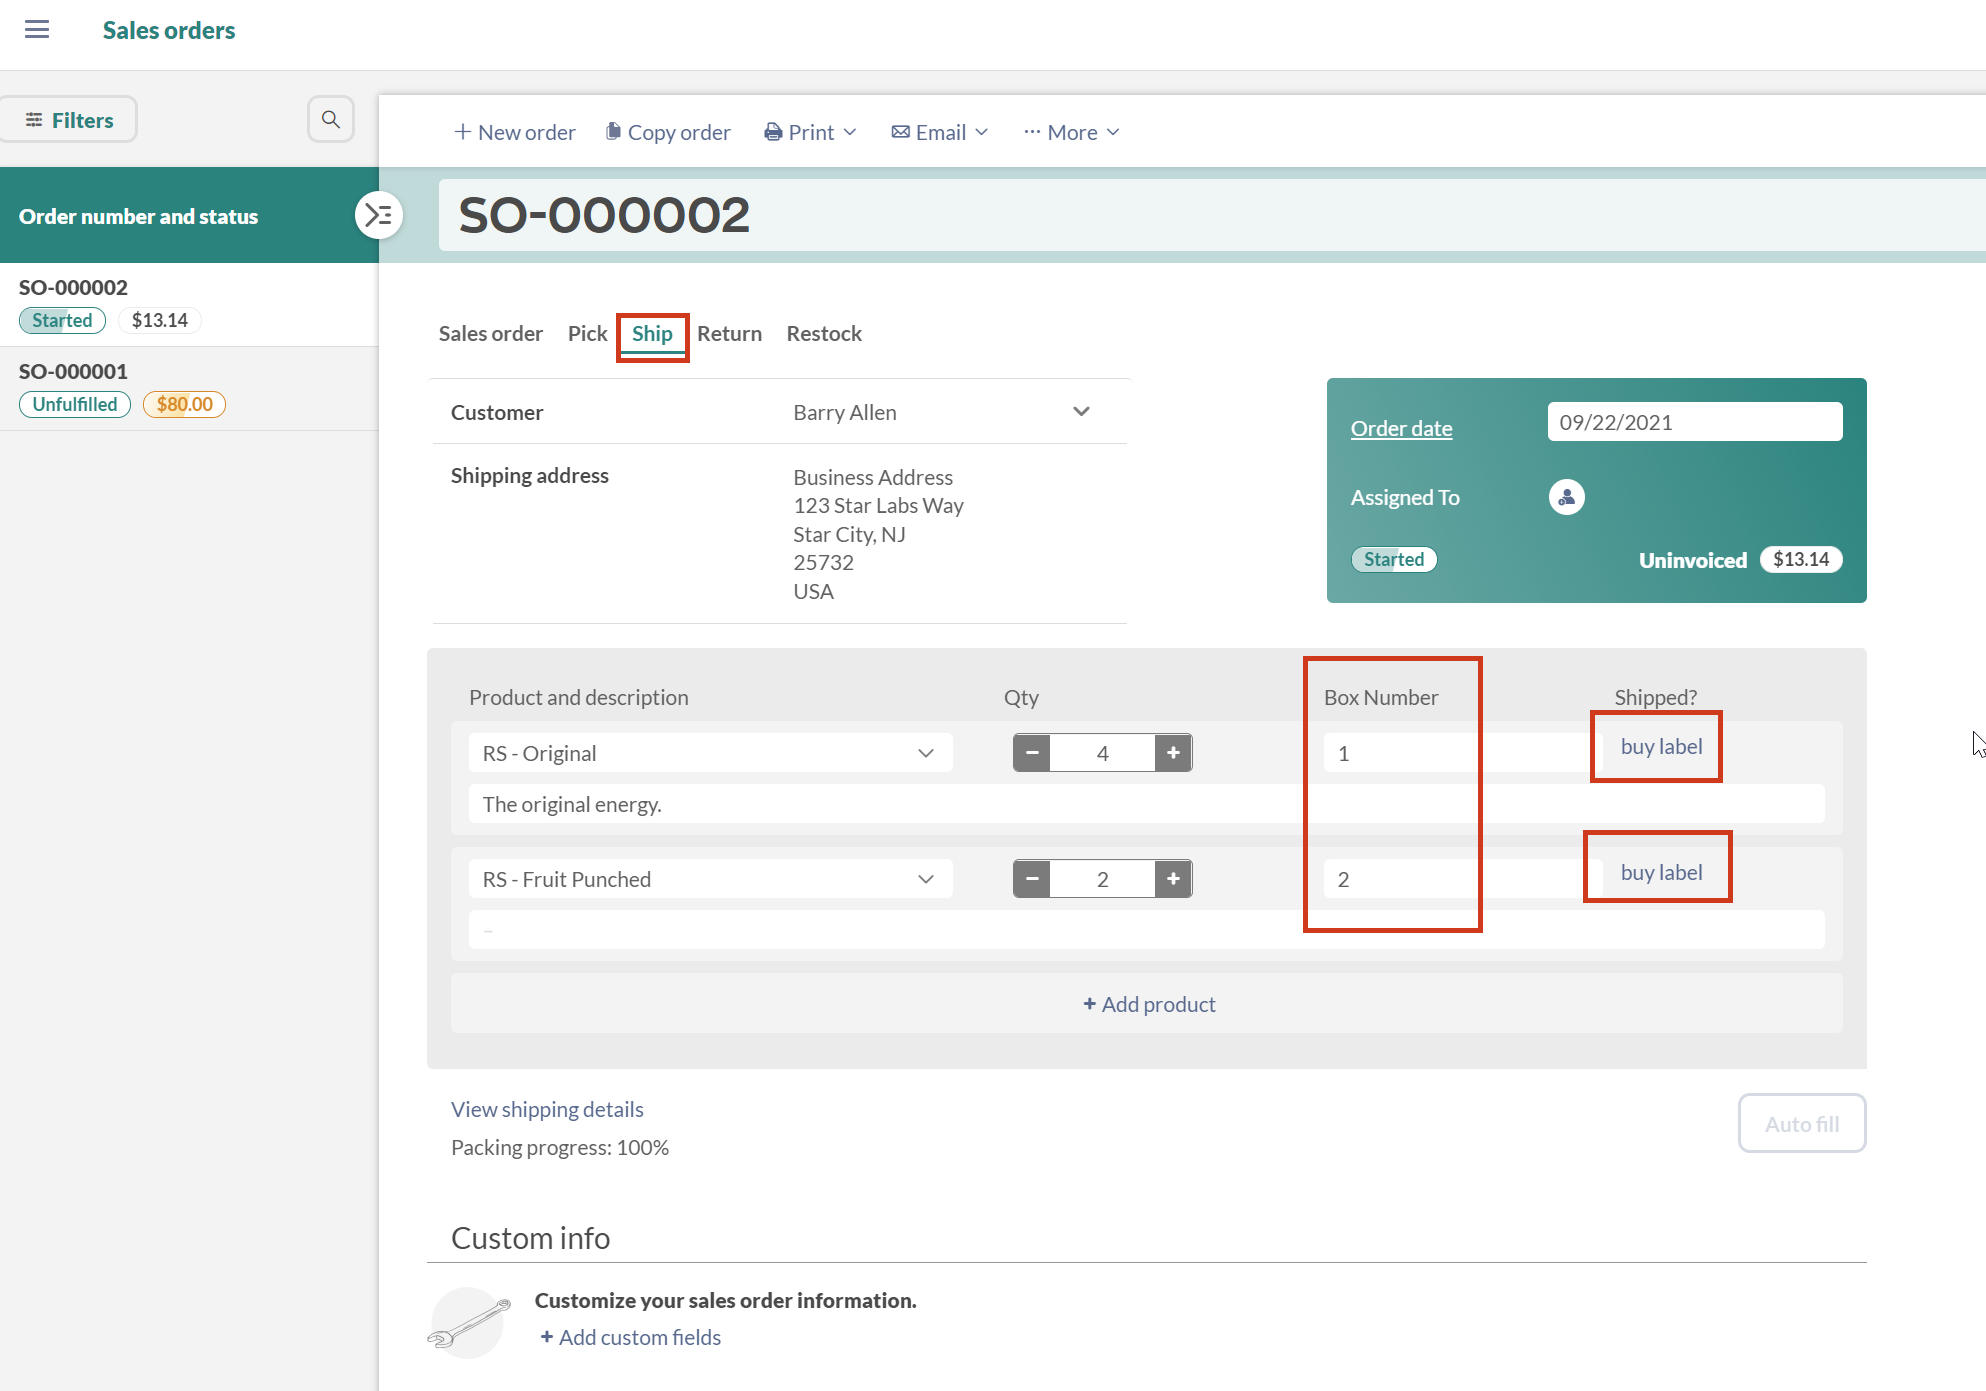
Click the words buy label beside one of your items, and you will see a Shipment Contents screen confirming the items in that box. If the contents are correct, click Confirm to continue with the regular shipping label purchase process. Once finished with this label, repeat the steps for any other boxes that need shipping.
Viewing a Label
Once you have purchased a label you can easily view/print it again by returning to the sales order it was created for.
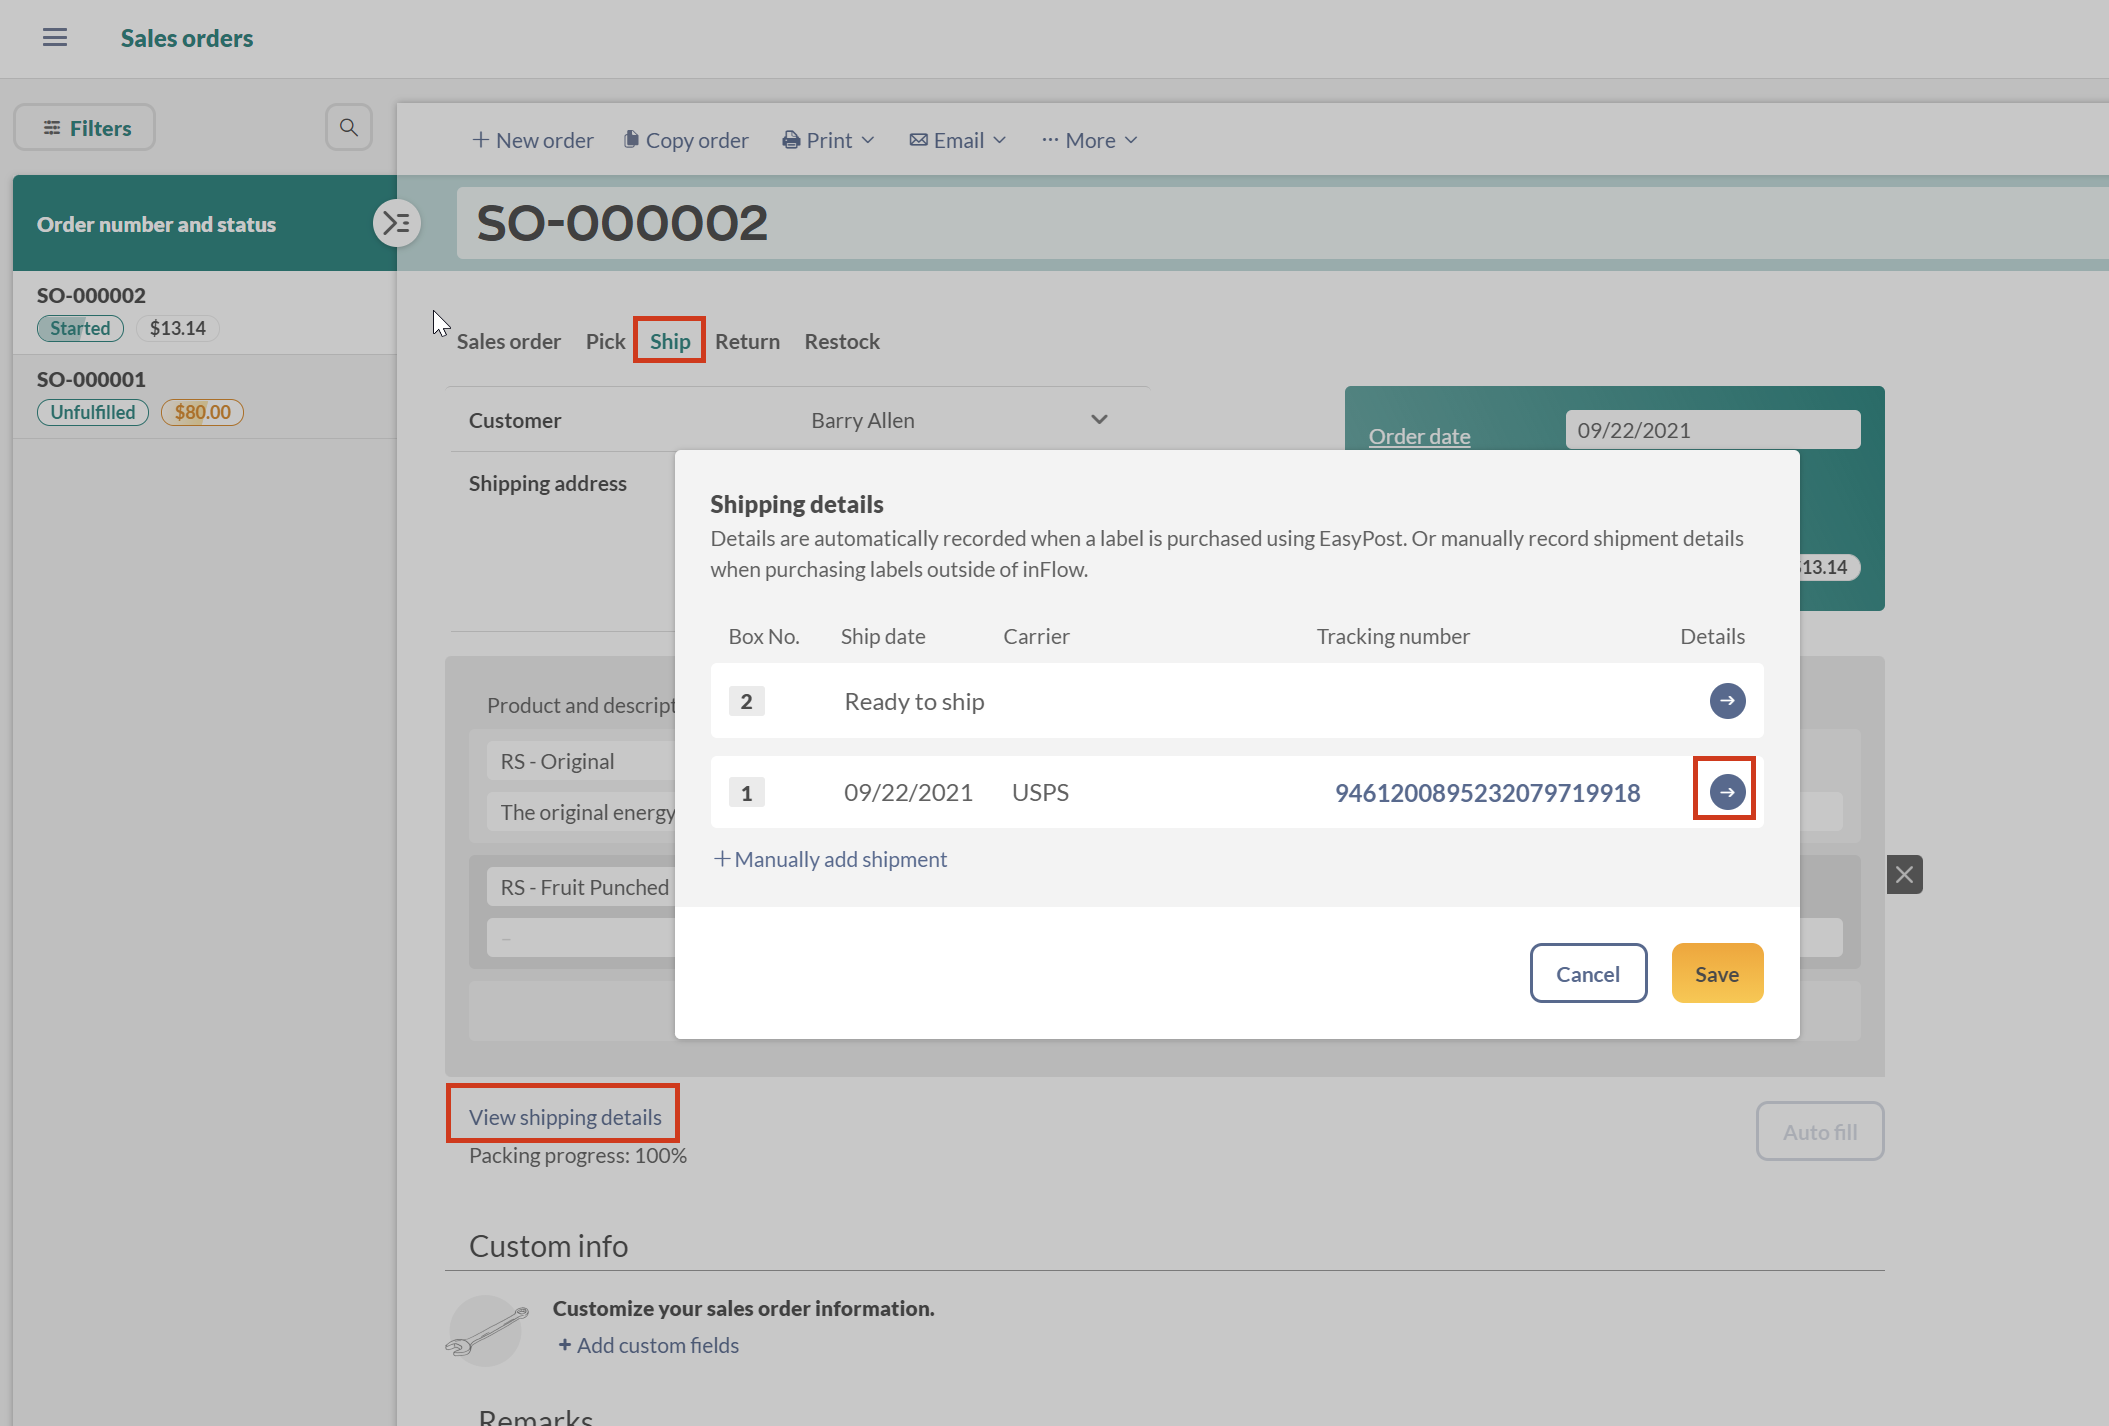
- Open the original Sales Order the label was purchased for.
- Click on the Ship tab.
- In the Ship tab, click View shipping details near the bottom right. You will see each box in the shipment, the ship date, the carrier, and the tracking number. Click the right arrow beside one of these tracking numbers to view the purchased label.
Removing a Label
Once a label has been purchased for an order, you can remove it from within inFlow. Note that removing a label from inFlow does not refund or cancel the label. To cancel or return your label, you must do this from within your EasyPost dashboard. Return policies vary from carrier to carrier. You can read more about refunding labels on the EasyPosts website here.
Removing the label will allow you to purchase a new one inside inFlow or modify the shipment information if no label is needed.
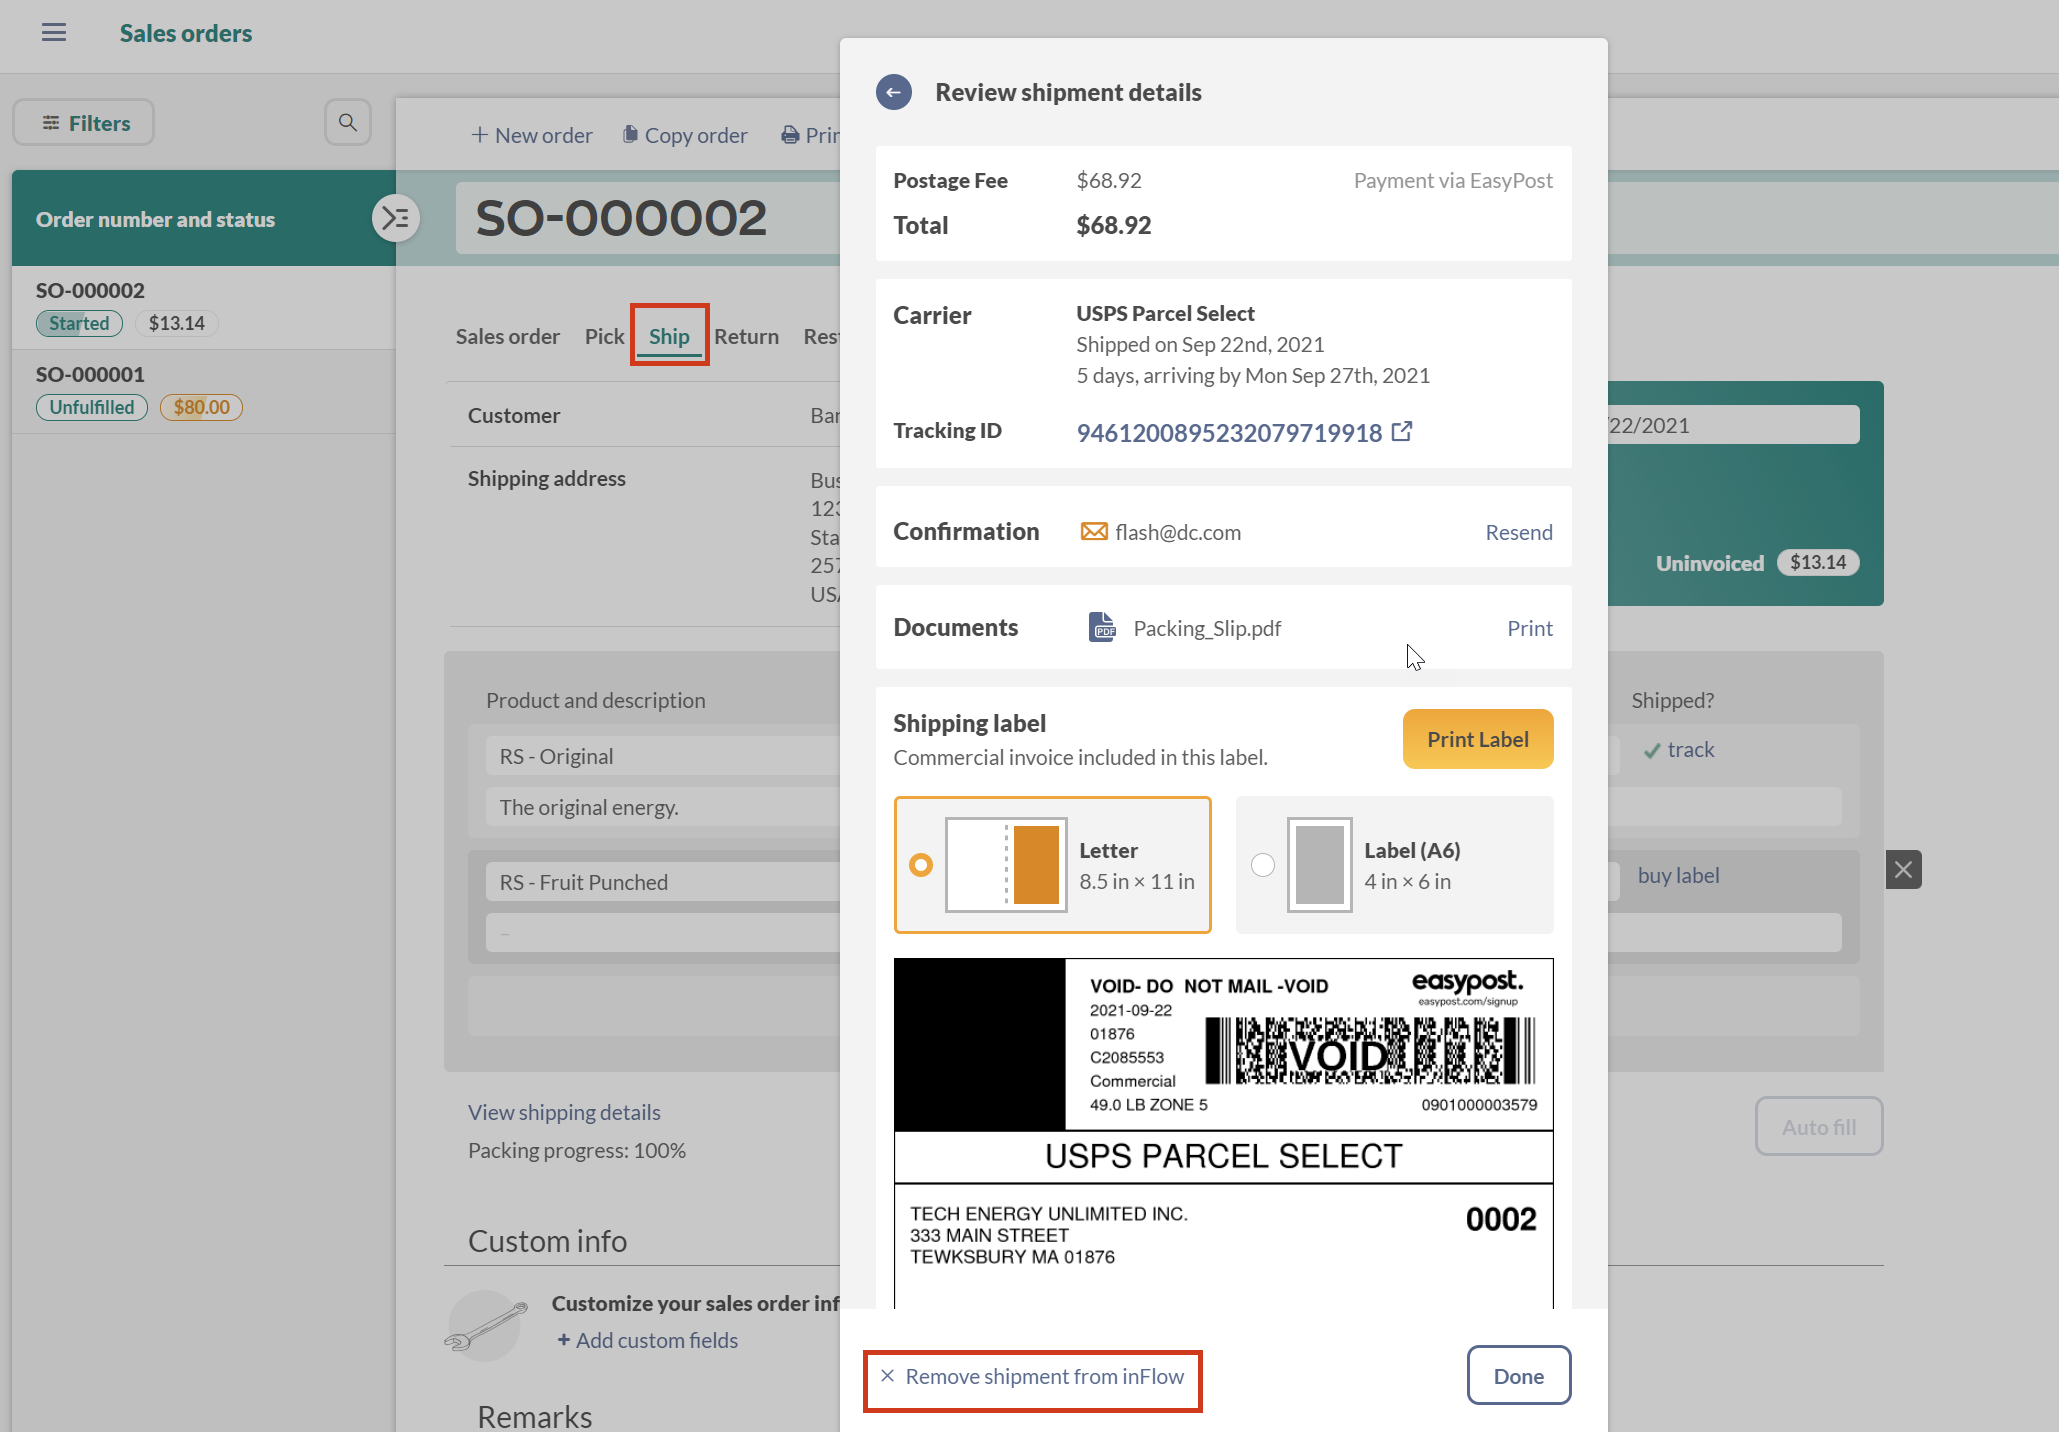
To remove your label from inFlow:
- Open the original Sales Order the label was purchased from.
- Click on the Ship tab.
- In the Ship tab, click View shipping details near the bottom right. You will see each box in the shipment as well as the Ship Date, Carrier, and Tracking Number. Click the right arrow beside one of these tracking numbers to view the purchased label.
- Click X Remove shipment from inFlow to remove the shipping label.
- A confirmation message will be displayed. Click Remove shipment to finalize the removal.
- Repeat for any other labels as needed.
Windows
Buying a Label
As long as shipping is enabled on your Sales Order and EasyPost is connected, inFlow will automatically bring up the label purchase screen when you fulfill your order. If you don’t need to purchase a label for any reason, you can click “Skip, no label needed” to proceed without purchasing a label, and the item will be shipped via a manual shipment line.
Wherever possible, inFlow will try and pre-populate the form with as much information as possible, this includes things like addresses, product names and descriptions, weight, value, etc.
For more detailed steps, follow below:
- Connect your EasyPost account to inFlow by adding your API key in the shipping settings.
- Create a sales order and ensure that shipping is enabled.
- There are two main ways to purchase a label.
- Click Fulfill on the sales order, which will automatically bring up the label purchase screen.
- Or enter the items in the Pick tab and the Ship tab of the sales order, then click the Ship it button beside the items on the Ship tab.
- You will now see the Shipment Details window.
Shipment Details screen
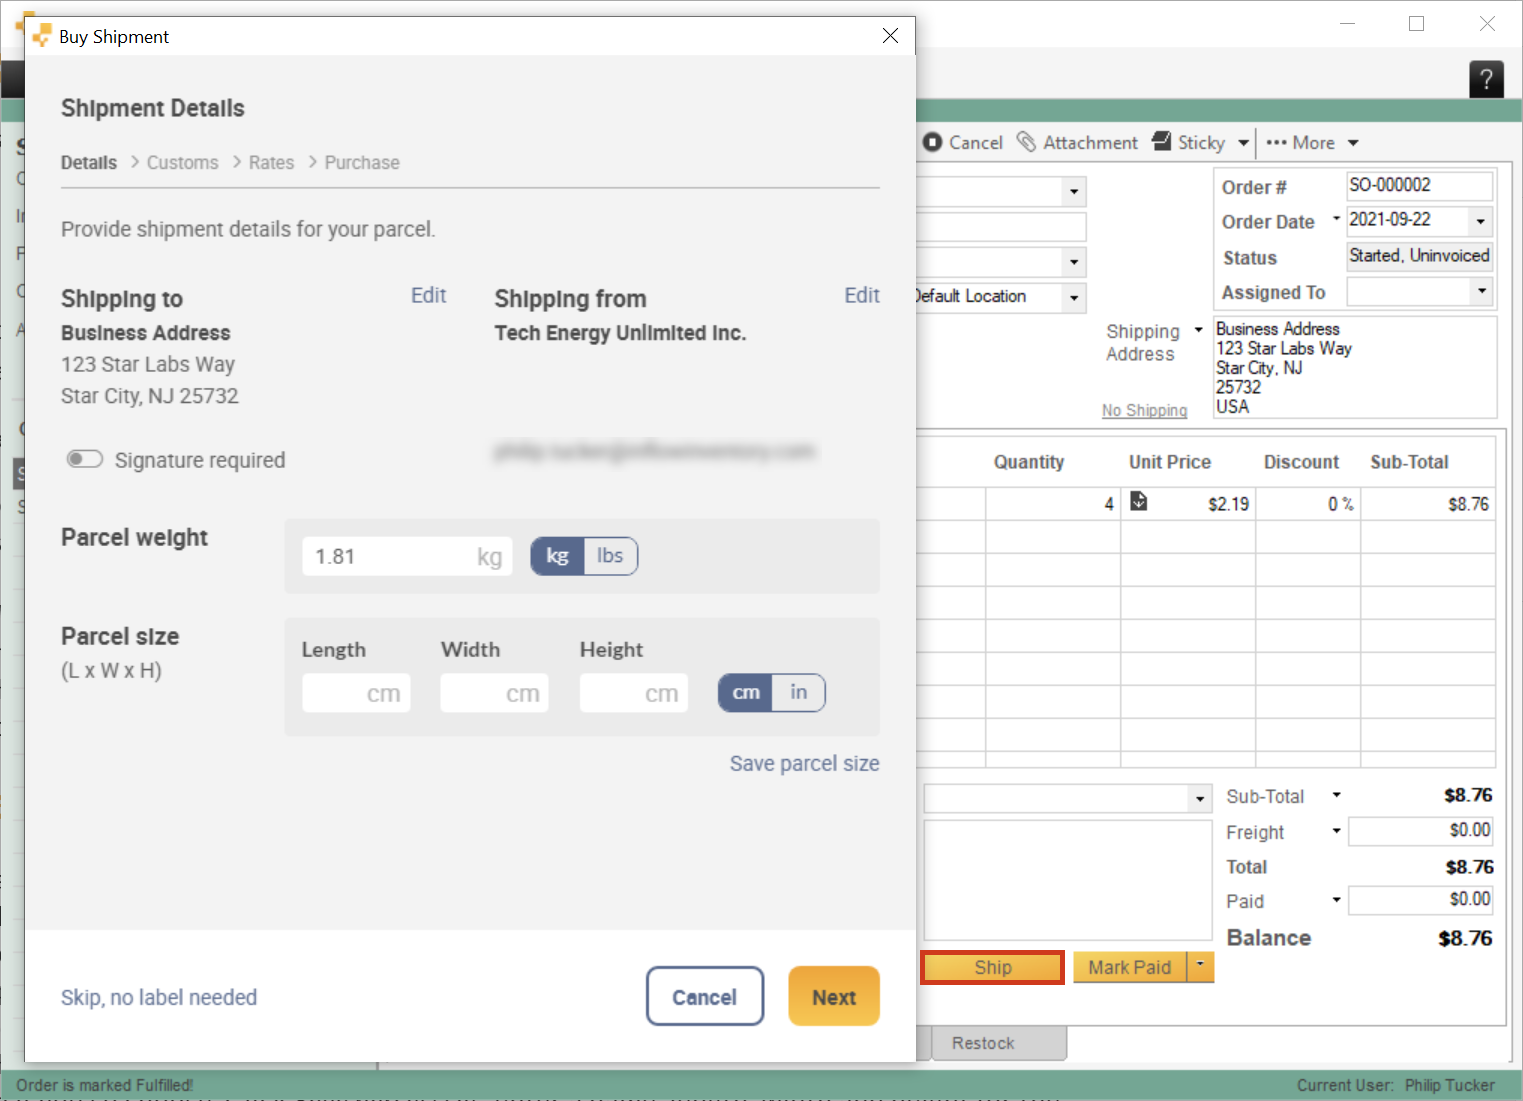
- Ensure that there is both a Shipping to and Shipping from address. If you need to modify either of these, click Edit and enter the information as needed.
- Toggle whether a signature is required for delivery.
- Enter the parcel weight, and you can choose either kg or lbs.
- Choose the parcel size either by selecting a pre-existing saved size if you have created it or by entering the length, width, and height of the parcel. You have the option to save these sizes from this screen if you so choose. Click Save parcel size, enter a name, length, width, and height for the saved parcel, and click the Save button before proceeding.
- Click the Next button to continue.
Shipment Customs screen
- If customs is required for your item, toggle the Customs required for this shipment either on or off. If no customs are required, toggle Off and hit Next to continue to the Rates screen. If On, continue filling out the form.
- Select a Contents Type.
- Add a description of the contents.
- Select if there are any restrictions for the items.
- Enter the value for each item in the box, including Country of Origin, total weight, HS Code, and value.
- Fill in the EEL / PFC field (sometimes also known as AES / ITN). This value is required for some international shipments.
- If shipping from the US and the total value of goods is less than $2,500, inFlow automatically will use the code “NOEEI 30.37(a)”.
- If shipping from the US and goods are more than $2,500, you will need to apply for a number via https://ace.cbp.dhs.gov/
- If shipping from outside the US, please follow your country’s specific exporting/importing rules.
- Set the Tax and duty payment terms.
- Choose what should happen to the parcel if it cannot be delivered.
- Read and check the certification checkmark at the bottom and enter your name in the Certified by field.
- Click the Next button to continue.
Shipment Rates screen
- You will be shown a list of available carriers and their rates based on the information you entered previously. Select the carrier and rate you would like to continue with.
- You can filter the results to only specific carriers by pressing the checkboxes on the left-hand side or arrange the list by price or shipping priority with the toggle at the top right.
- Click Next to continue.
Review & Purchase Label screen
This screen shows a summary of all the information entered for this label. Review and edit any information as needed, and optionally, you can choose to purchase insurance on the parcel if the sales order is in USD and under $ 5,000 USD value.
When satisfied with all the information, click the “Purchase Label” button.
You’ll see a summary screen with the tracking information and be able to choose the label size: either 8.5 in x 11 on standard paper or 4 in x 6 on A6 paper/labels.
Once you are finished, click Done.
What if I need more than one box per sales order? Purchasing multiple shipping labels.
On the Ship tab, make sure to enter the same box number for each product that is going in the same box. For example, you may have one case of Pepsi in box 1 and one case of Coke in box 2.
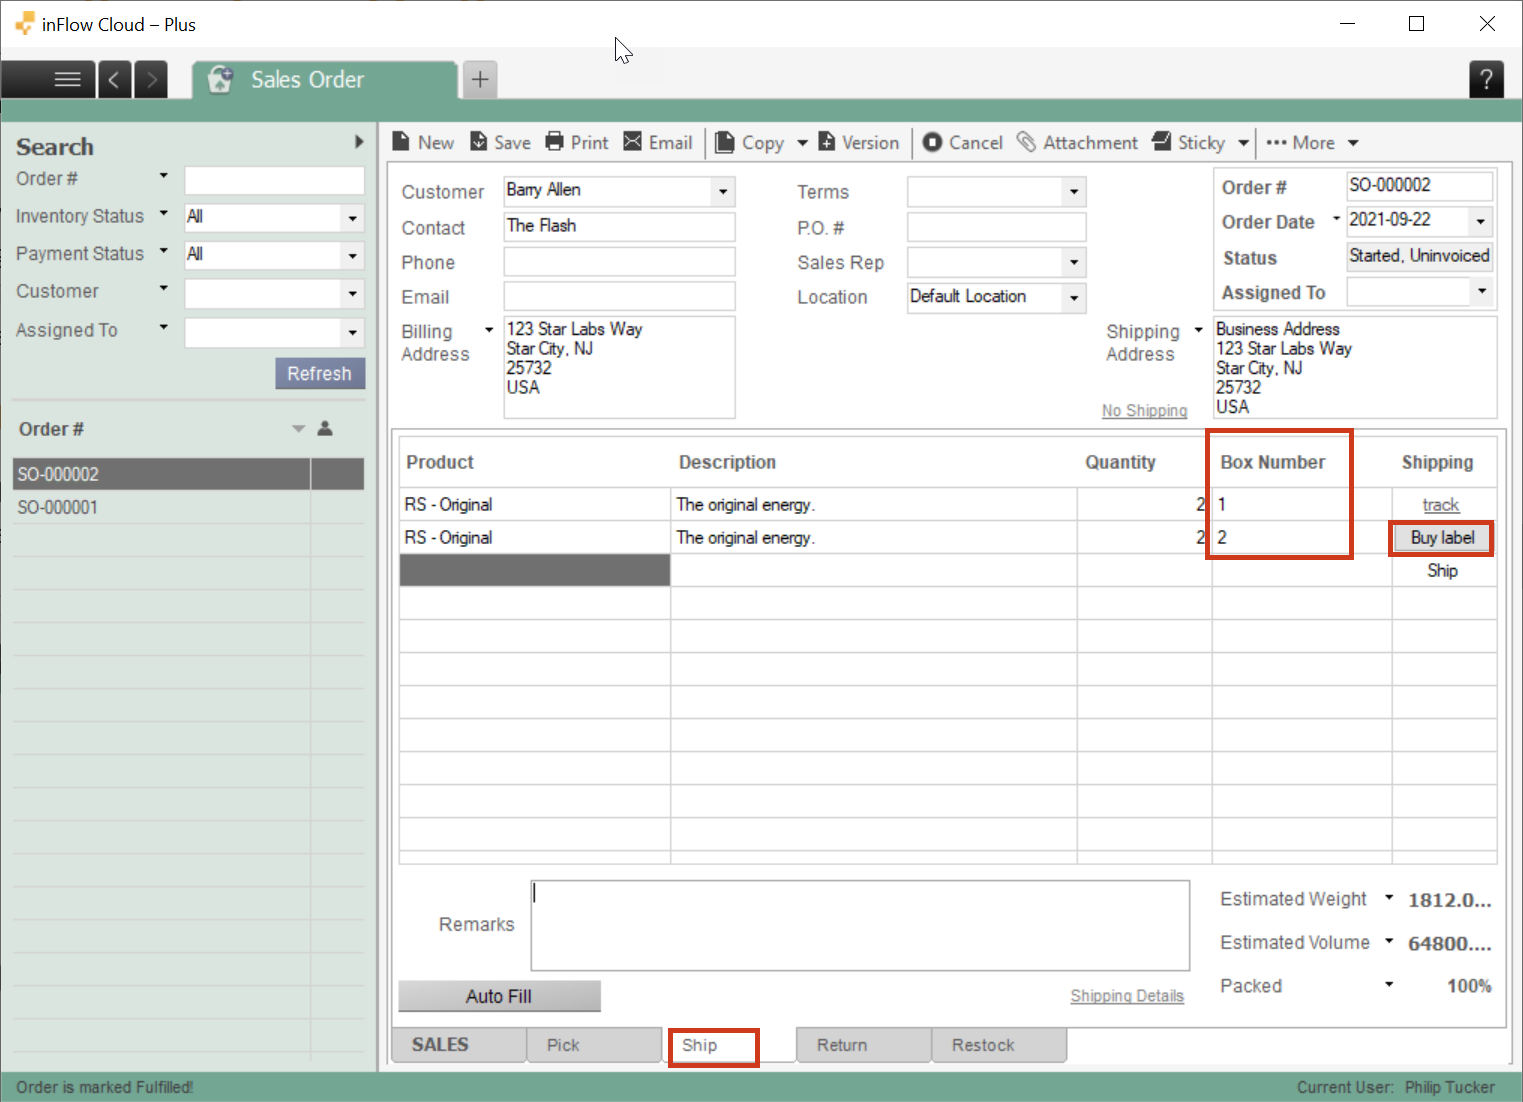
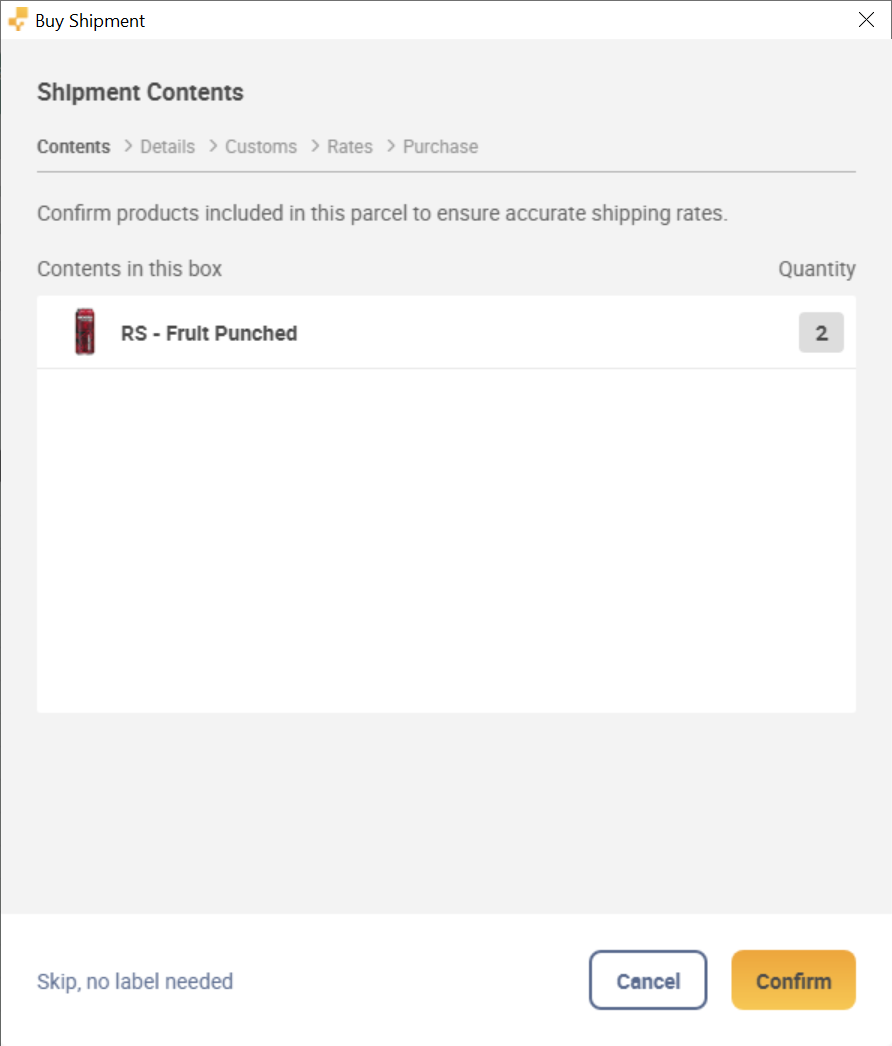
Click the button Buy label beside one of your items, and you will see a Shipment Contents screen confirming the items in that box. If the contents are correct, click Confirm to continue with the regular shipping label purchase process. Once finished with this label, repeat the steps for any other boxes that need shipping.
Viewing a Label
Once you have purchased a label you can easily view/print it again by returning to the sales order it was created for.
- Open the original Sales Order the label was purchased for.
- Click on the Ship tab.
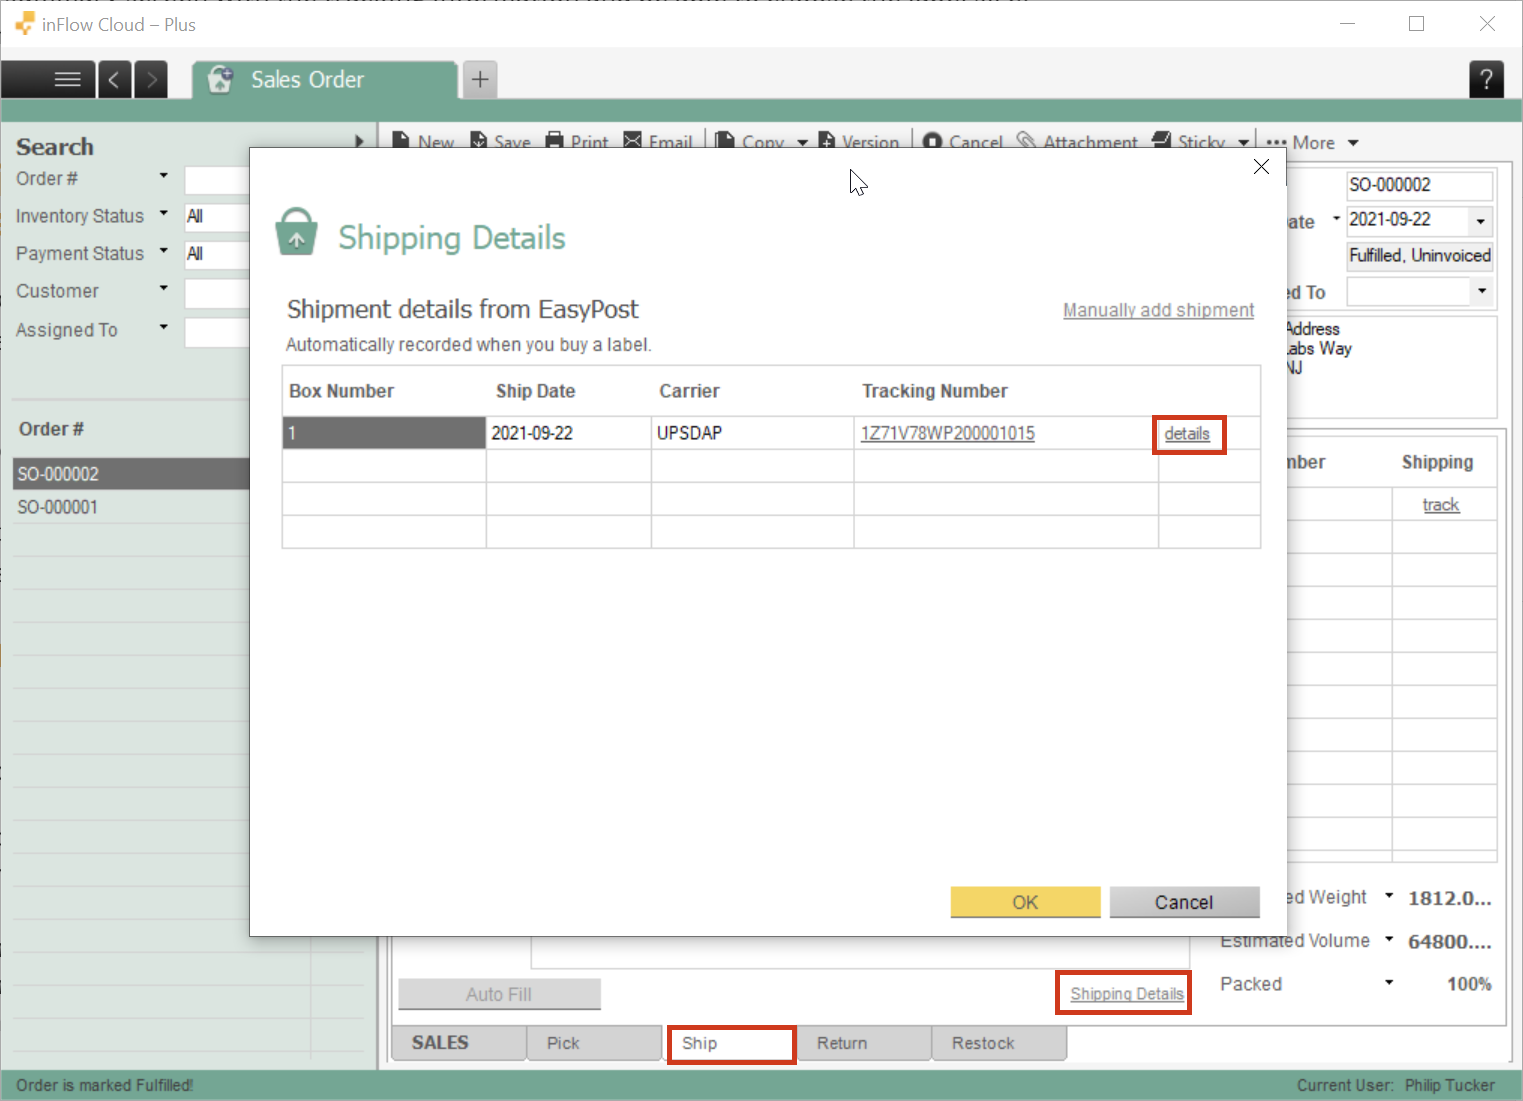
- In the Ship tab, click View shipping details near the bottom right. You will see each box in the shipment, the ship date, the carrier, and the tracking number. Click the details button beside one of these tracking numbers to view the purchased label.
Removing a Label
Once a label has been purchased for an order, you can remove it from within inFlow. Note that removing a label from inFlow does not refund or cancel the label. To cancel or return your label, you must do this from within your EasyPost dashboard. Return policies vary from carrier to carrier. You can read more about refunding labels on EasyPosts website here.
Removing the label will allow you to purchase a new one inside inFlow or modify the shipment information if no label is needed.
To remove your label from inFlow:
- Open the original Sales Order the label was purchased from.
- Click on the Ship tab.
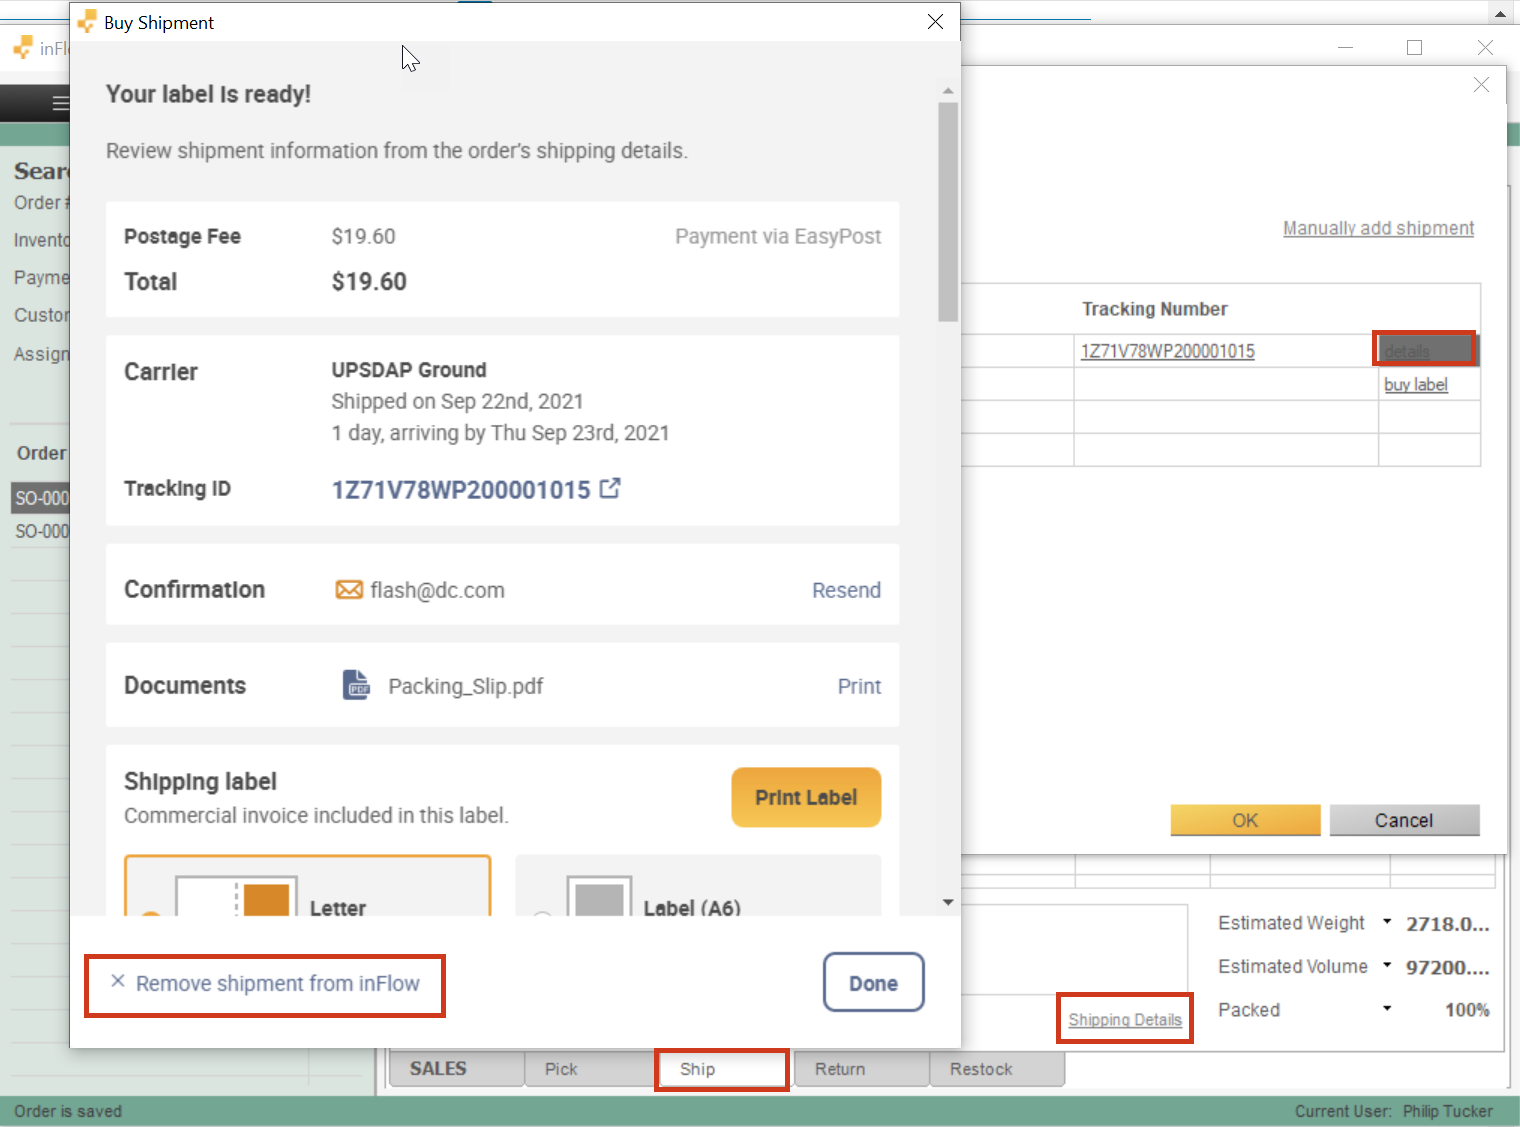
- In the Ship tab, click View shipping details near the bottom right. You will see each box in the shipment as well as the Ship Date, Carrier, and Tracking Number. Click the details button beside one of these tracking numbers to view the purchased label.
- Click X Remove shipment from inFlow, to remove the shipping label.
- A confirmation message will be displayed. Click Remove shipment to finalize the removal.
- Repeat for any other labels as needed.
Mobile
Buying a Label
As long as shipping is enabled on your Sales Order and EasyPost is connected, inFlow will automatically bring up the label purchase screen when you fulfill your order. If you don’t need to purchase a label for any reason, you can click “Skip, no label needed” to proceed without purchasing a label, and the item will be shipped via a manual shipment line.
Wherever possible, inFlow will try to pre-populate the form with as much information as possible. This includes things like addresses, product names and descriptions, weight, value, etc.
For more detailed steps, follow below:
- Connect your EasyPost account to inFlow by adding your API key in the shipping settings.
- Create a sales order and ensure that shipping is enabled.
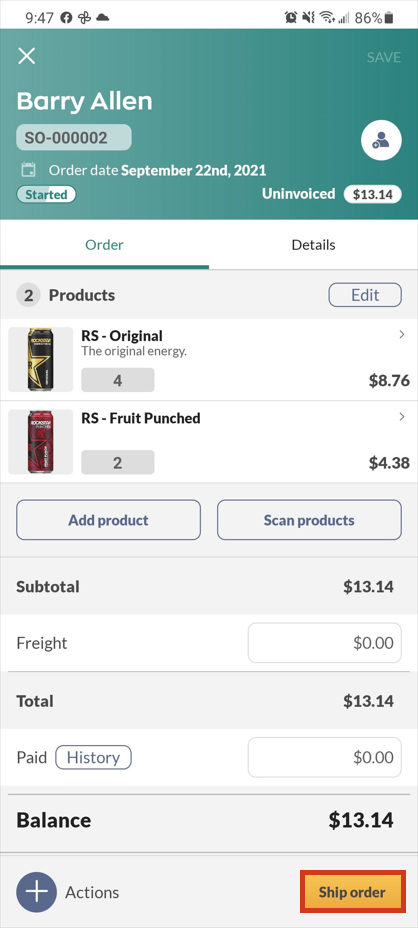
- Click Ship order on the sales order, which will automatically bring up the label purchase screen.
- You will now see the Shipment Details window.
Shipment Details screen
- Ensure that there is both a Shipping to and Shipping from address. If you need to modify either of these, click Edit and enter the information as needed.
- Toggle whether a signature is required for delivery.
- Enter the parcel weight. You can choose either kg or lbs.
- Choose the parcel size either by selecting a pre-existing saved size if you have created it or by entering the length, width, and height of the parcel. You have the option to save these sizes from this screen if you so choose. Click Save parcel size, enter a name, length, width, and height for the saved parcel, and click the Save button before proceeding.
- Click the Next button to continue.
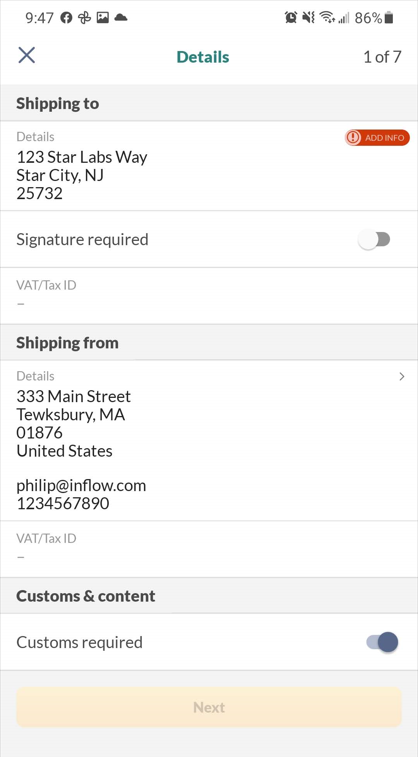
Shipment Customs screen
- If customs is required for your item, toggle the Customs required for this shipment either on or off. If no customs are required, toggle Off and hit Next to continue to the Rates screen. If On, continue filling out the form.
- Select a Contents Type.
- Add a description of the contents.
- Select if there are any restrictions for the items.
- Enter the value for each item in the box, including the country of origin, total weight, HS Code, and value.
- Fill in the EEL / PFC field (sometimes also known as AES / ITN). This value is required for some international shipments.
- If shipping from the US and the total value of goods is less than $2,500, inFlow automatically will use the code “NOEEI 30.37(a)”.
- If shipping from the US and goods are more than $2,500, you will need to apply for a number via https://ace.cbp.dhs.gov/
- If shipping from outside the US, please follow your country’s specific exporting/importing rules.
- Set the Tax and duty payment terms.
- Choose what should happen to the parcel if it cannot be delivered.
- Read and check the certification checkmark at the bottom and enter your name in the Certified by field.
- Click the Next button to continue.
Shipment Rates screen
- You will be shown a list of available carriers and their rates based on the information you entered previously. Select the carrier and rate you would like to continue with.
- You can filter the results to only specific carriers or arrange the list by price or shipping priority by clicking the buttons at the bottom of the screen.
- Click Next to continue.
Review & Purchase Label screen
This screen shows a summary of all the information entered for this label. Review and edit any information as needed, and optionally, you can choose to purchase insurance on the parcel if the sales order is in USD and under $ 5,000 USD value.
When satisfied with all the information, click the “Purchase Label” button.
You’ll see a summary screen with the tracking information and be able to choose the label size: either 8.5 in x 11 on standard paper or 4 in x 6 on A6 paper/labels.
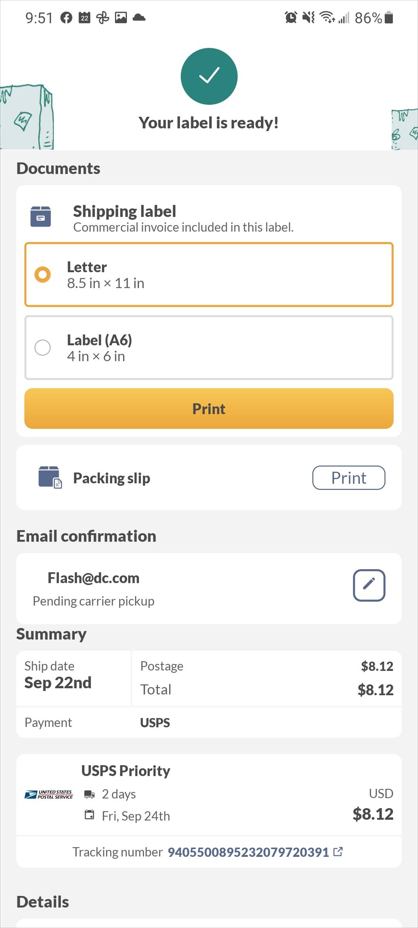
Once you are finished, click “Done”.
What if I need more than one box per sales order? Purchasing multiple shipping labels.
While labels can be purchased for multiple boxes using the mobile app, currently, it is not possible to select which items go in each individual box inside the app. So to purchase multiple labels, you must first specify which items belong in each box on either the Web or Windows app.
Viewing a Label
Once you have purchased a label, you can easily view or print it again by returning to the sales order it was created for.
- Open the original Sales Order the label was purchased for.
- Click on the +Actions button.
- Select Ship from the menu.
- Click on any of the shipments listed to go to the shipment details screen.
Removing a Label
Once a label has been purchased for an order, you can remove it from within inFlow. However, removing a label from inFlow does not refund or cancel it. To cancel or return your label, you must do so from within your EasyPost dashboard. Return policies vary from carrier to carrier. You can read more about refunding labels on the EasyPost website here.
Removing the label will allow you to purchase a new one inside inFlow or modify the shipment information if no label is needed.
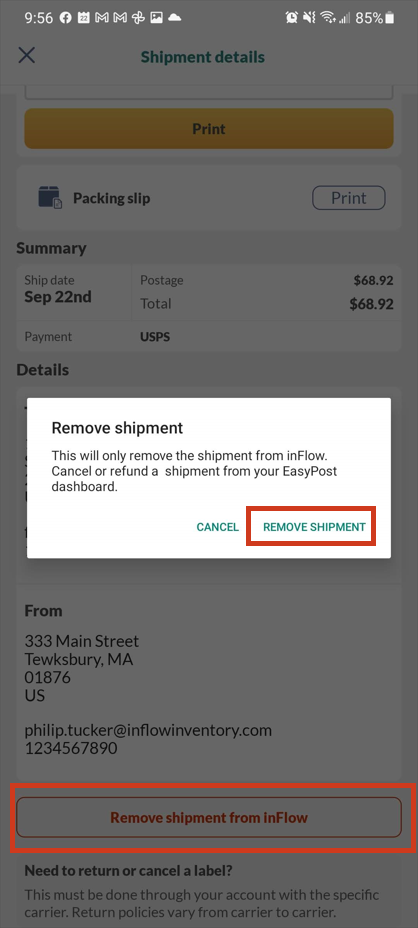
To remove your label from inFlow:
- Open the original Sales Order the label was purchased from.
- Click on the +Actions button.
- Select Ship from the menu.
- Click on any of the shipments listed to go to the shipment details screen.
- Click Remove shipment from inFlow, to remove the shipping label.
- A confirmation message will be displayed. Click Remove shipment to finalize the removal.
- Repeat for any other labels as needed.

0 Comments